
Word count: 5046
This final project piece involved creating a unique creative project that displayed individual style and expertise,
while demonstrating a range of design skills and critical analysis.
Additionally, this project required the development of a new or weaker personal game design skill.
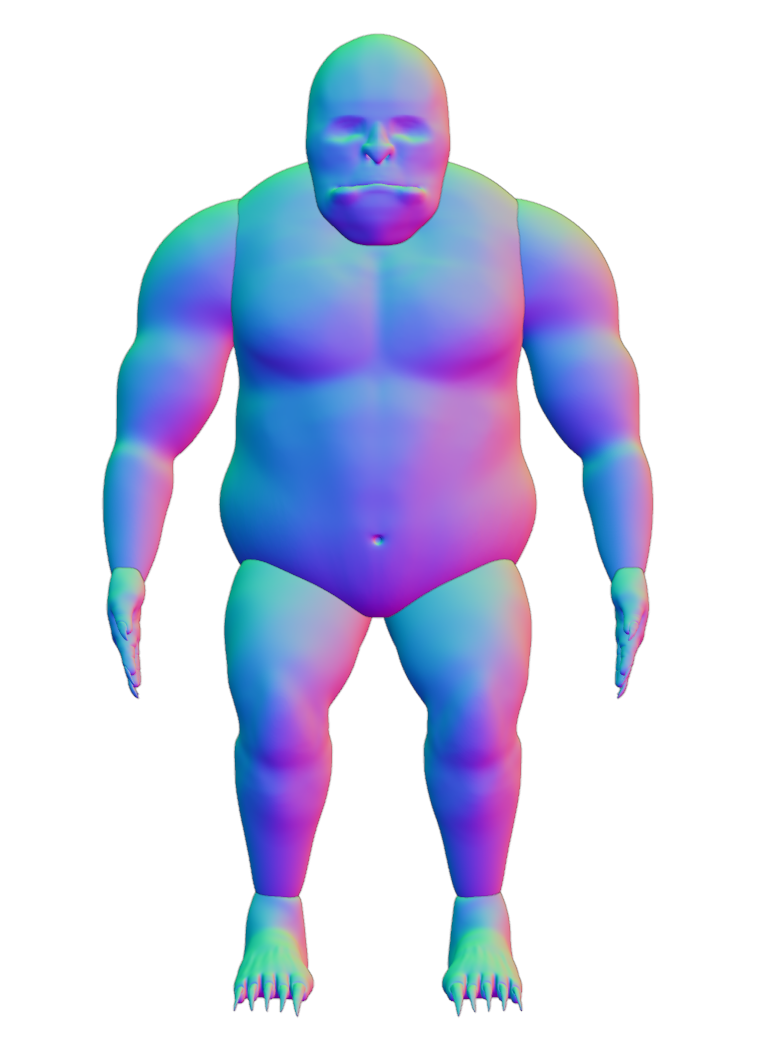
The specific direction of this project involved creating a game character set in a medieval fantasy world.
The goal of this project was to create a unique and cohesive character with the ability to convey a narrative
through its visual design features. This was inspired by traditional medieval fantasy video game characters, with the
intention of creating a design to promote culture and gender diversity. Research into real human anatomy and fictional
medieval character designs provided fuel for the visual direction, while the development of new design skills allowed me
to further push the quality and creative standards.
I managed the design process by establishing a structured time plan,
including a list of contingencies, that I could use during self-reflection
to track the project progress and make decisions to help reach deadlines.
I ultimately managed to follow the time plan effectively and even complete a task before the expected deadline date. However, after reflecting on this time plan,
I found my predictions to give either too much time or not enough time, to the point where I would be rushing to complete
a task or have too much downtime between tasks. Going forward, I plan on using previous projects where my time management
has been more accurate and successful to help draft time plans for new projects.
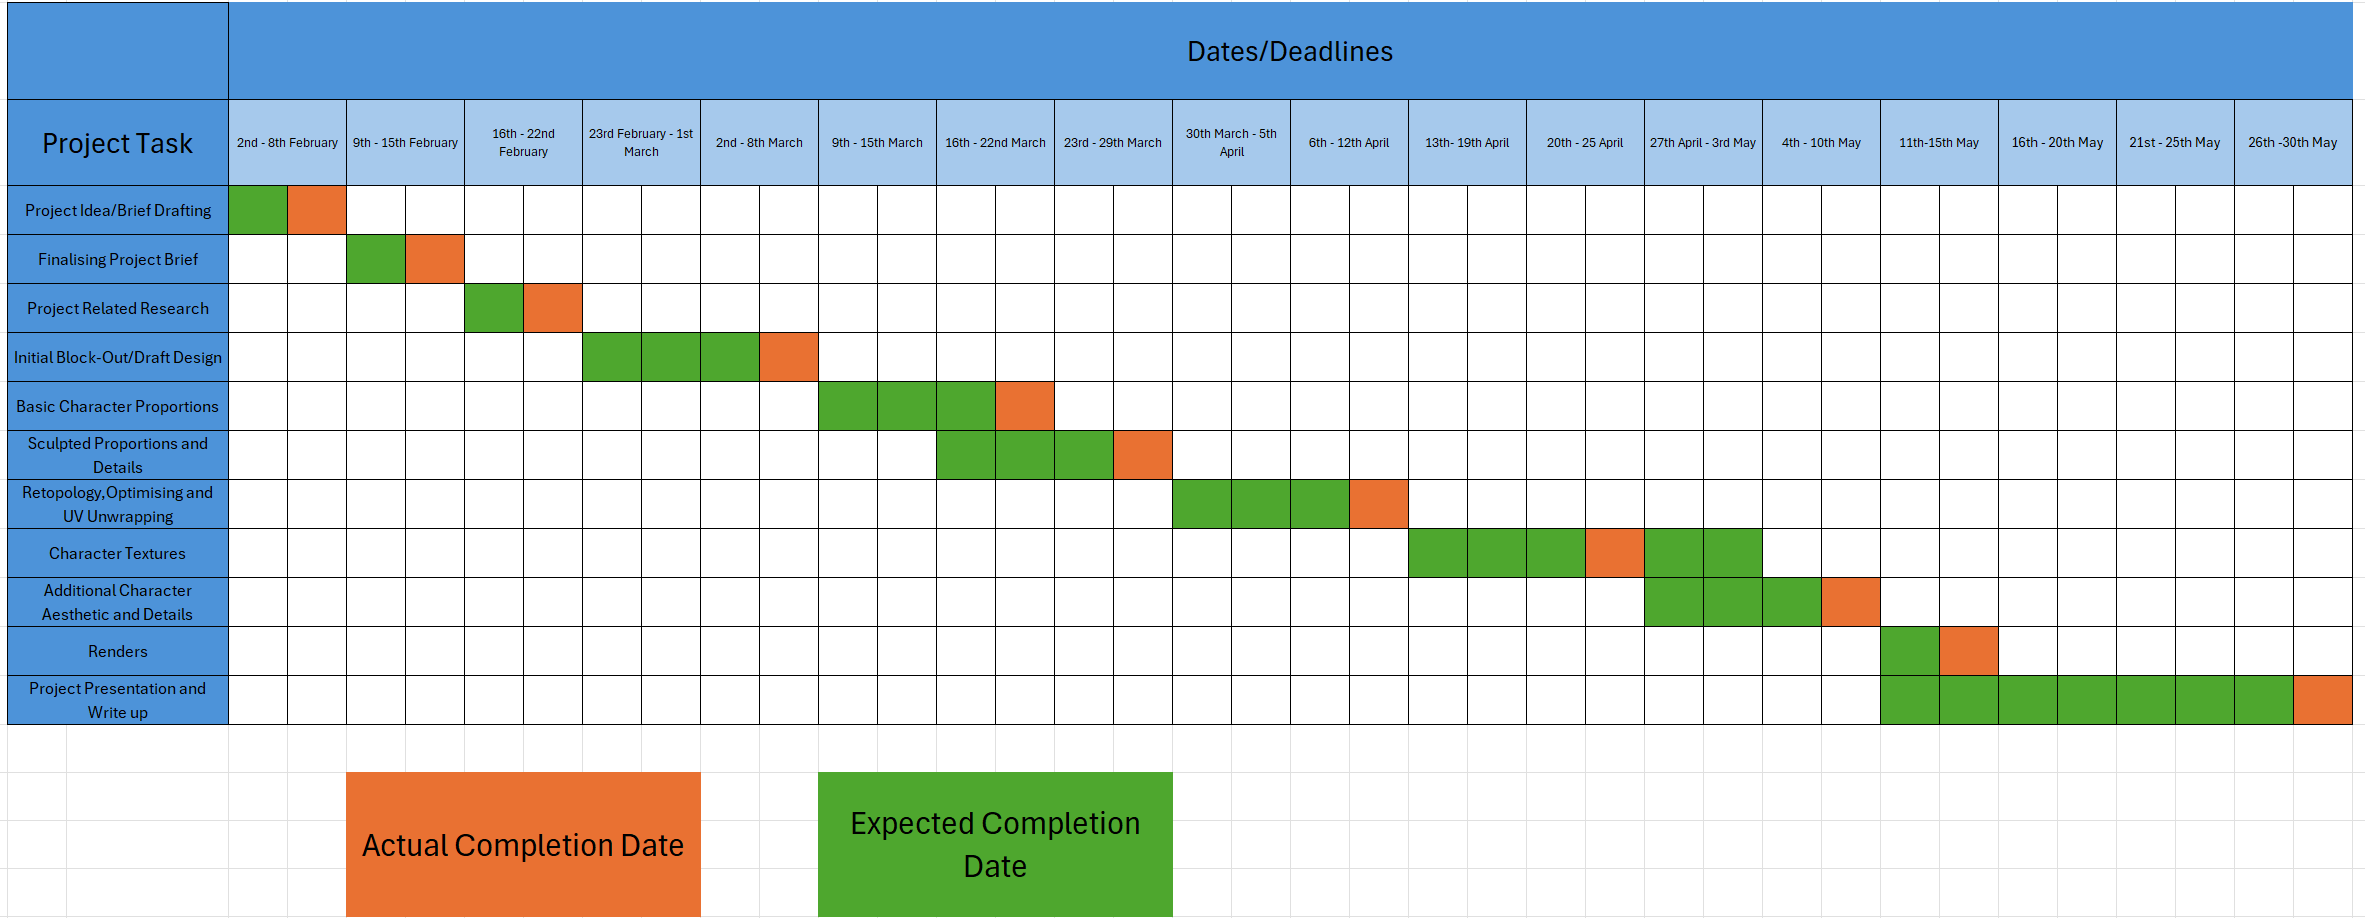
Additionally, I divided the project into broad tasks, each with a different brief and set of goals, which I tacked by creating a visual timeline using Trello, with deadlines and contingencies included from the organised Gannt chart. I decided to create this visual layout in an attempt to tackle a personal weaker skill area of project time management and organisation. In order to ensure I could improve this skill, I referred to previous projects where I both lacked and succeeded in project organisation, which provided the framework for this visual timeline.
I also included a list of skills that I expected to be useful in this project, which helped in the idea drafting and researching stage of the project as I could effectively prepare by learning these new skills before starting the practical development. I found creating this kind of visual representation of the project timeline to be a useful tool to check each week, reminding myself of my current progress in the project, the next steps I needed to take, as well as the opportunity to record my progress including successes and faults and how I managed to overcome them. This practice has provided me with a basic framework that I can take into future projects to aid in managing and organising tasks and deadlines effectively.
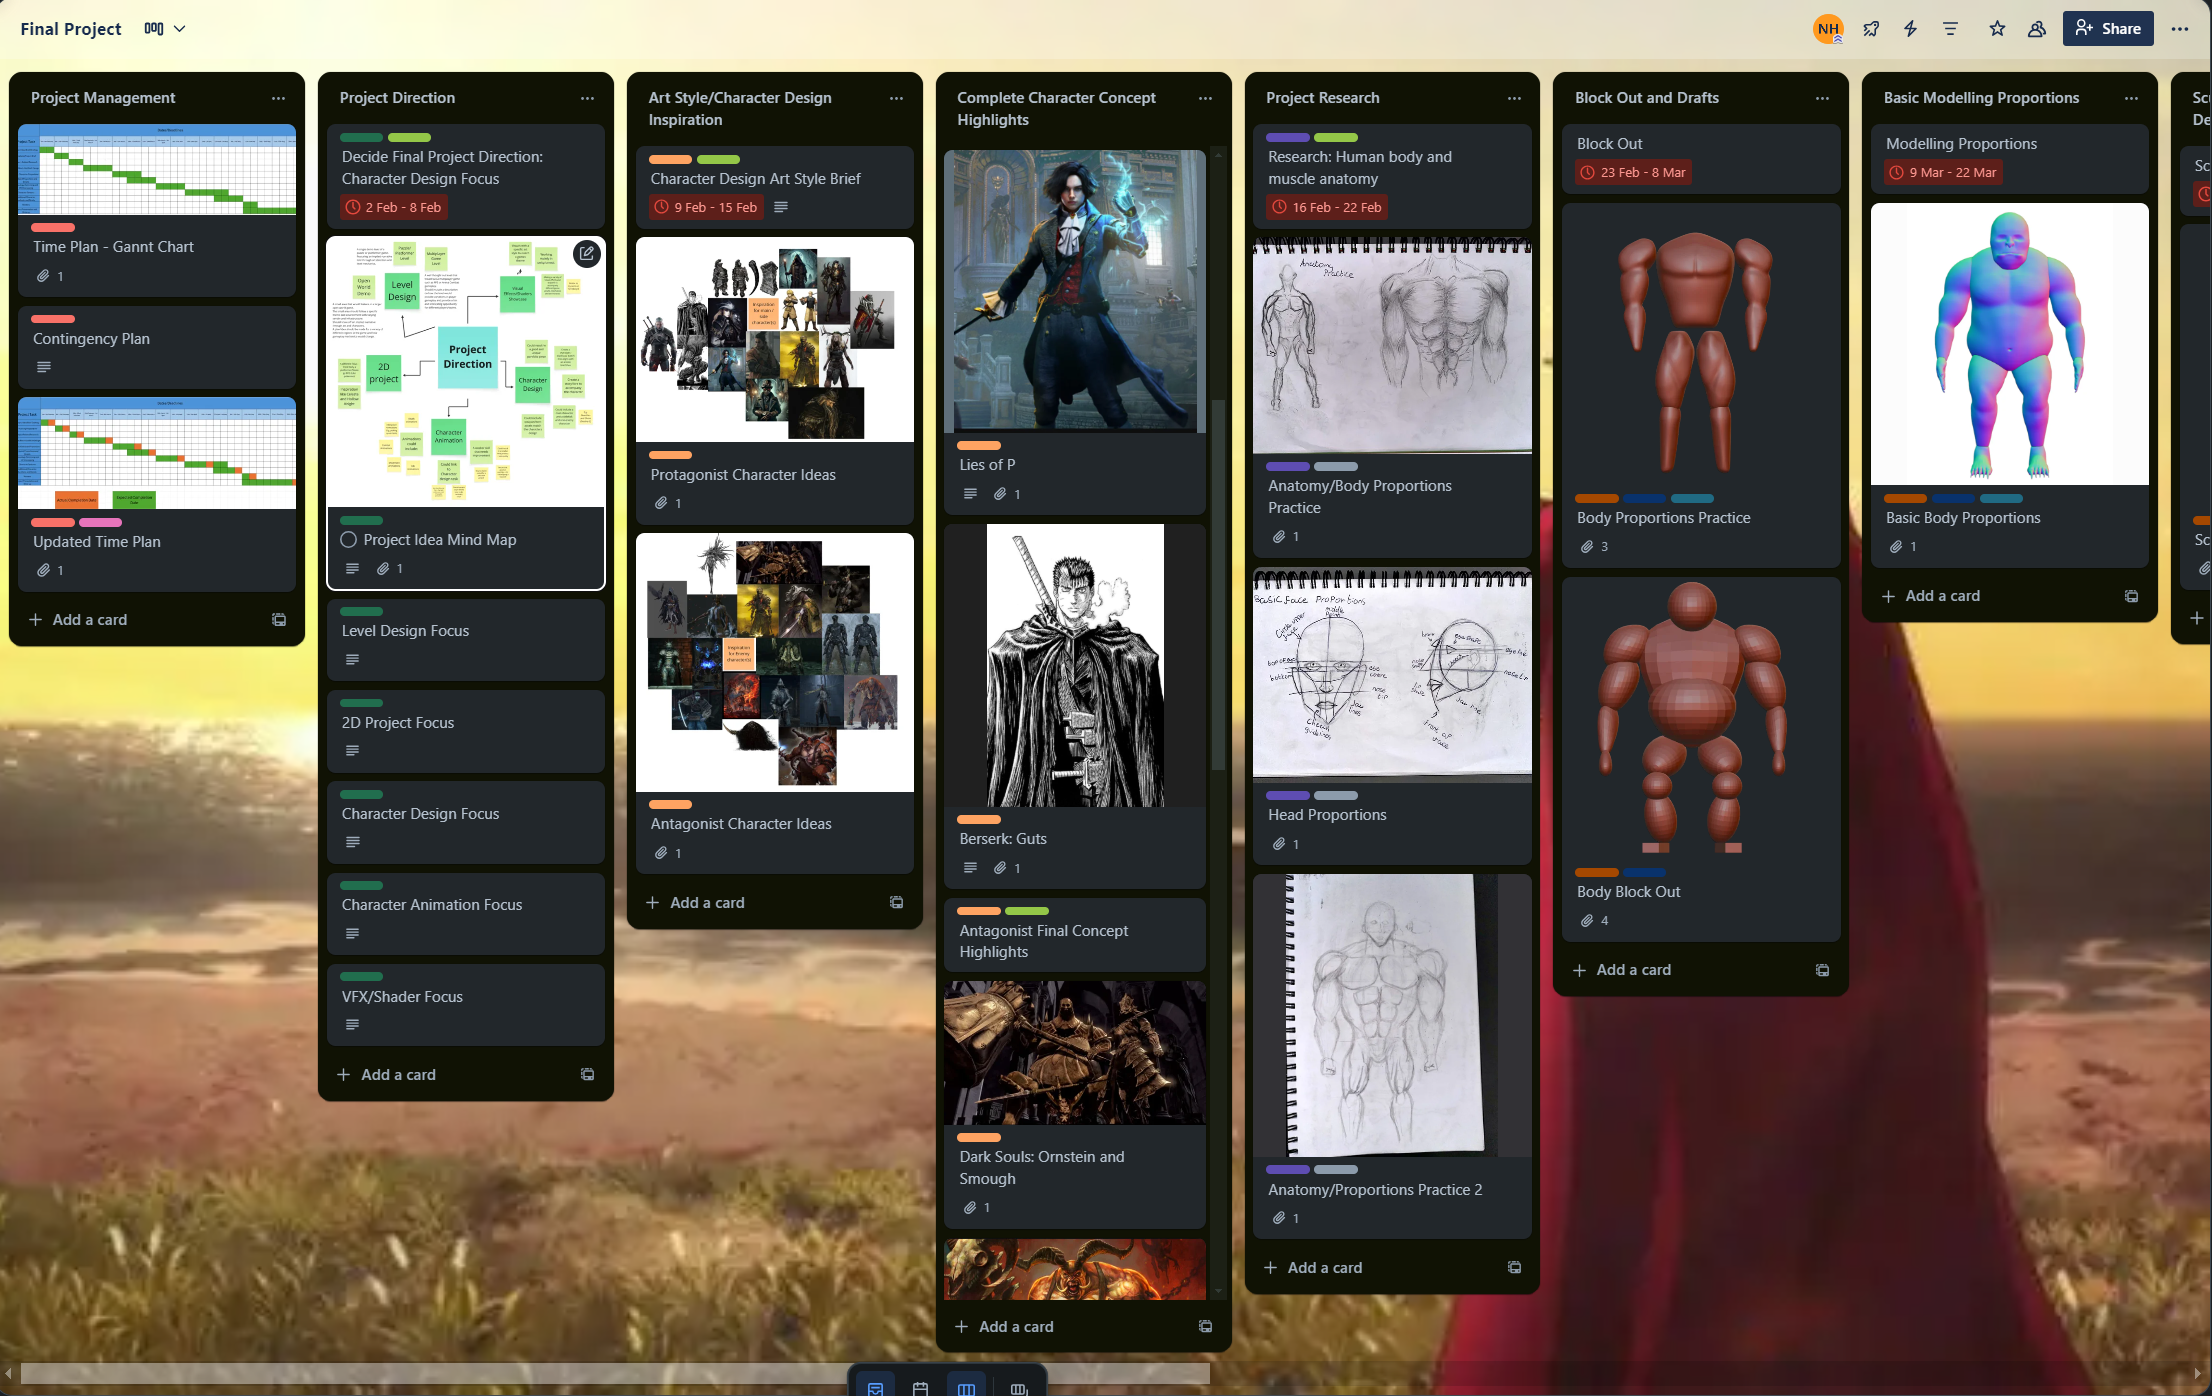
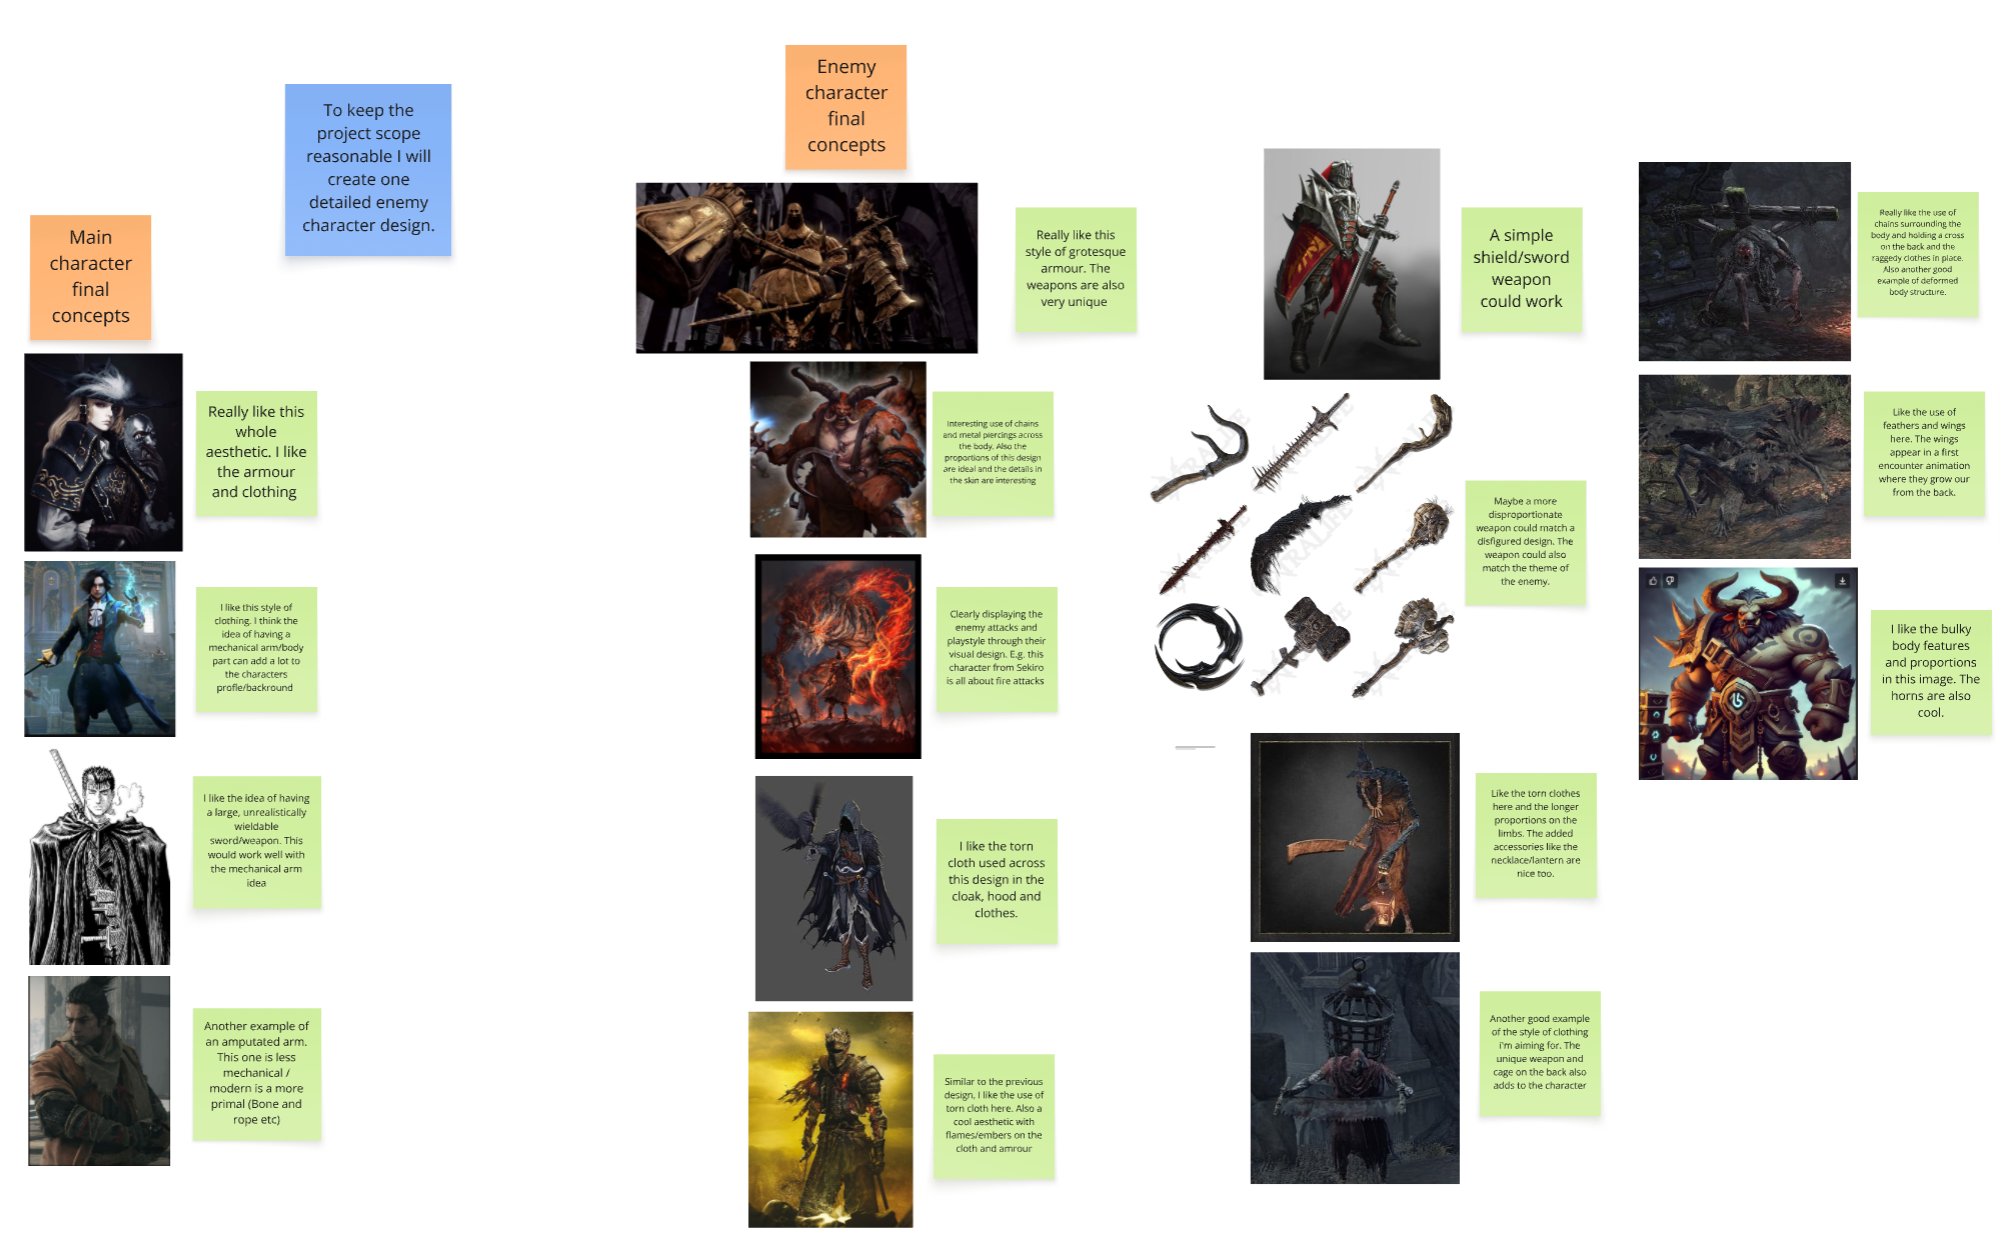
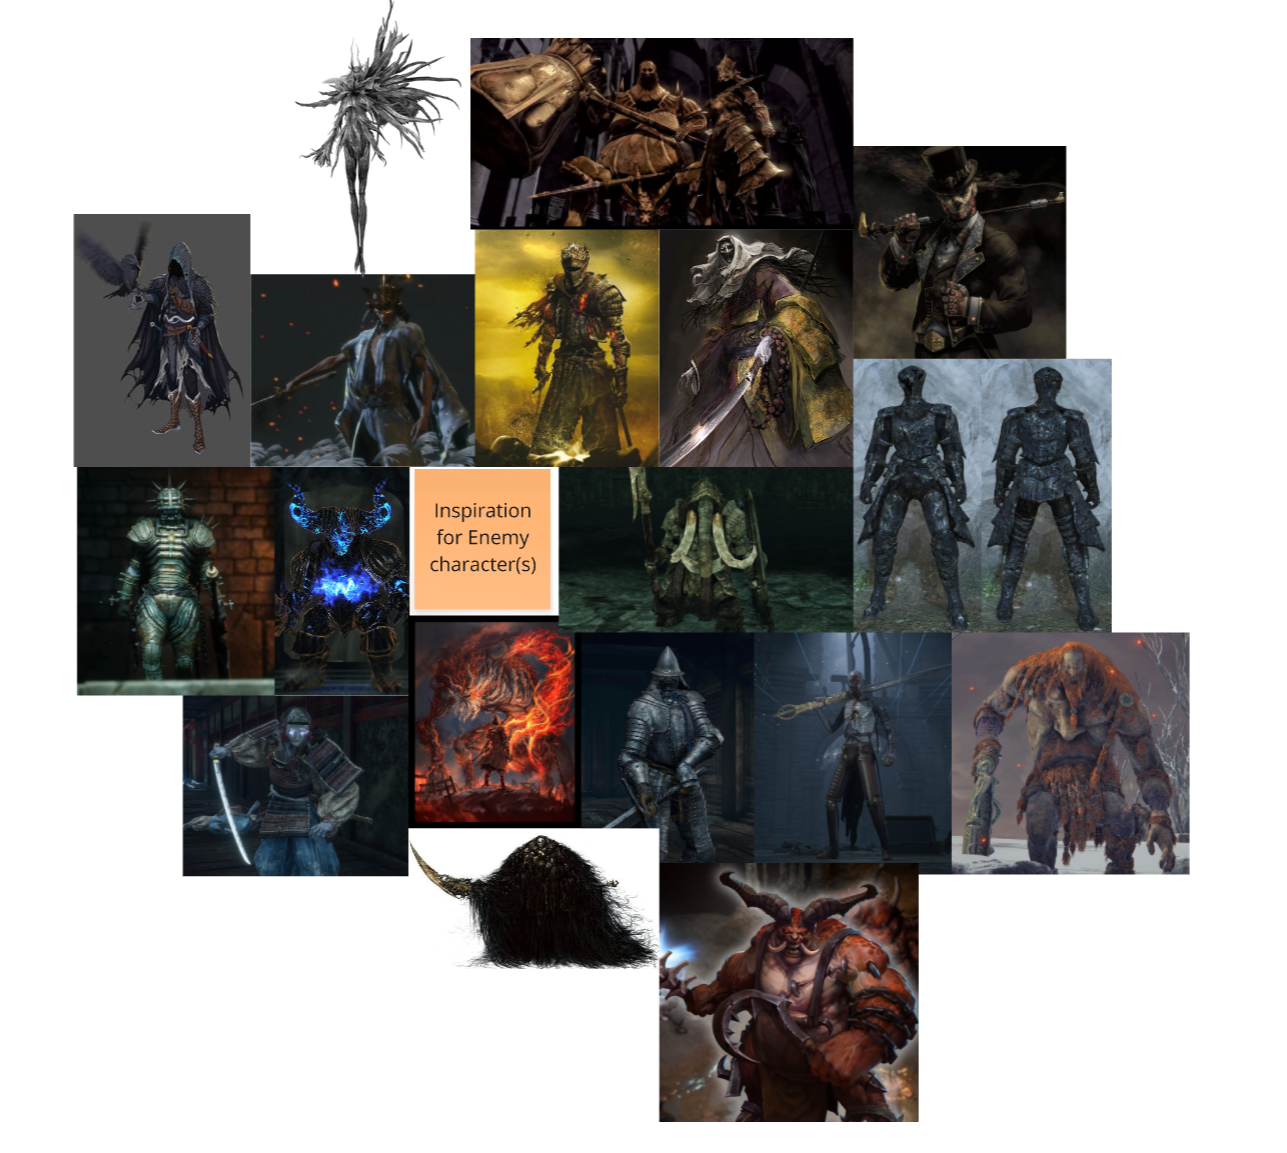
This character required a specific design brief, so I created a mind map of different visual ideas from different themes and genres.
I decided to create a design with links to the medieval and dark fantasy genres, with large inspiration from games such as Dark Souls (Dark Souls I, 2011),
Elder Scrolls (The Elder Scrolls Online, 2014) and World of Warcraft (World of Warcraft, 2004). The reason for this decision is because of a personal interest with different medieval fantasy
games and media, as well as a belief that this genre has created some of the most visually unique and interesting character designs in
video games.
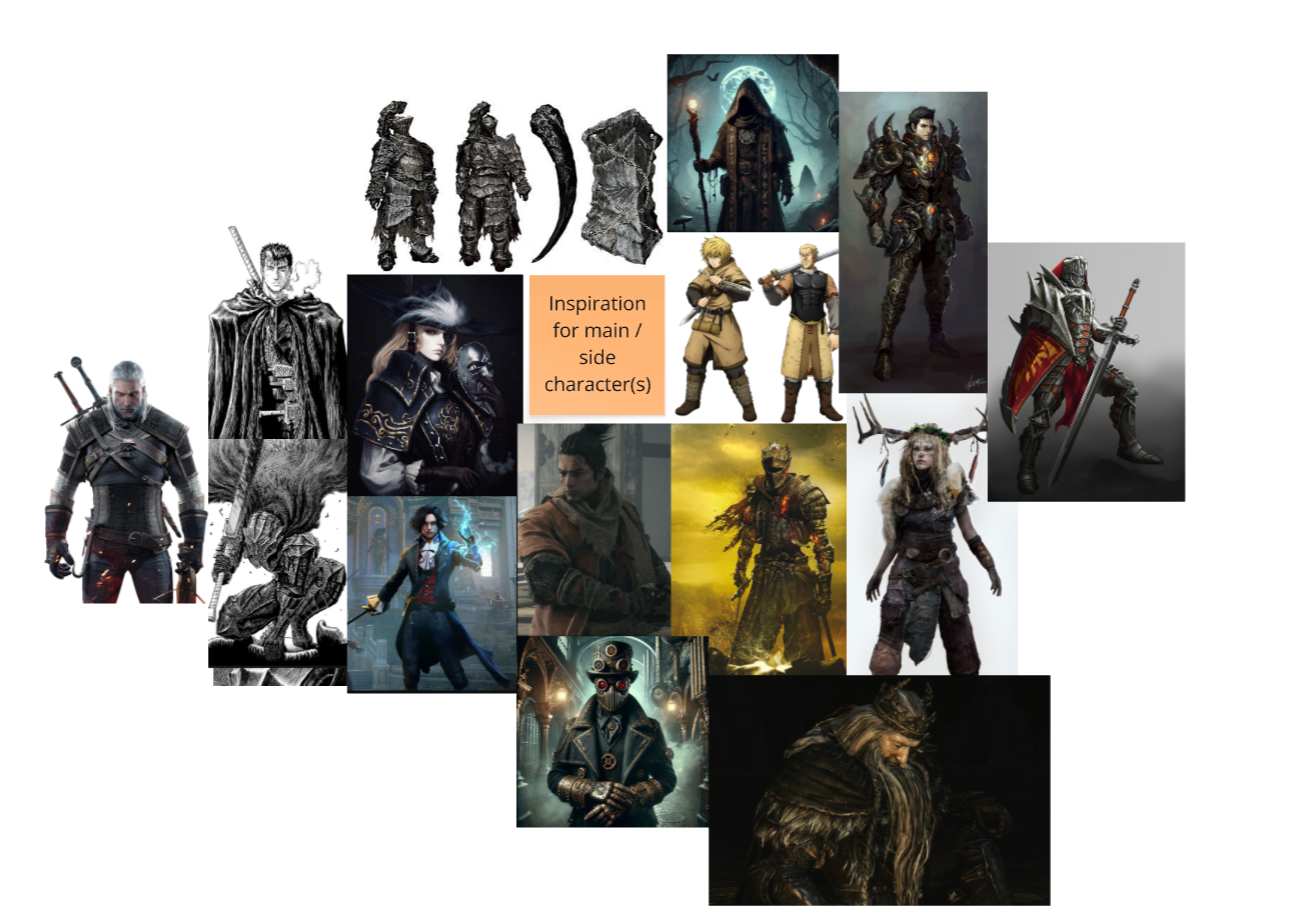
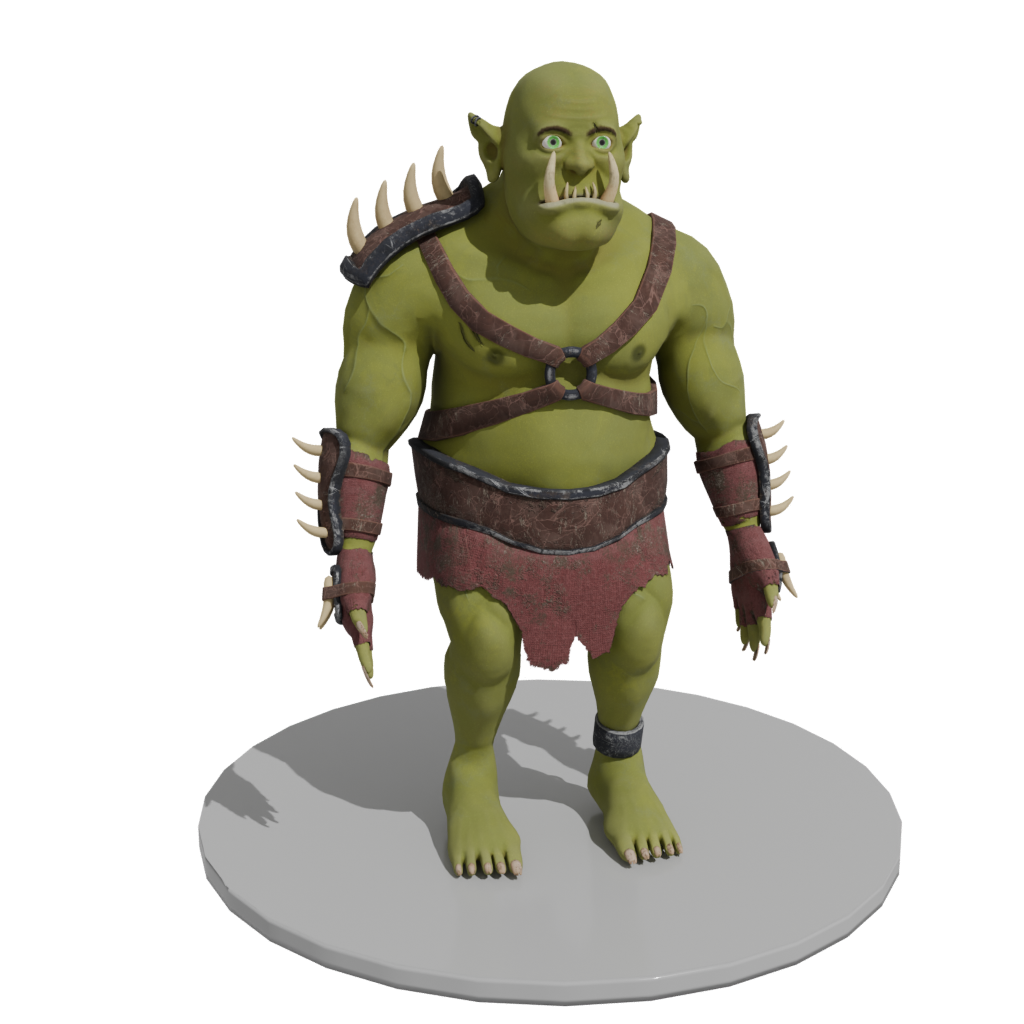
I gathered references for both protagonist and antagonist characters that fit the medieval fantasy theme. I ultimately
decided to create an antagonist character, as I saw more potential for a high-quality character piece with unique details and visual
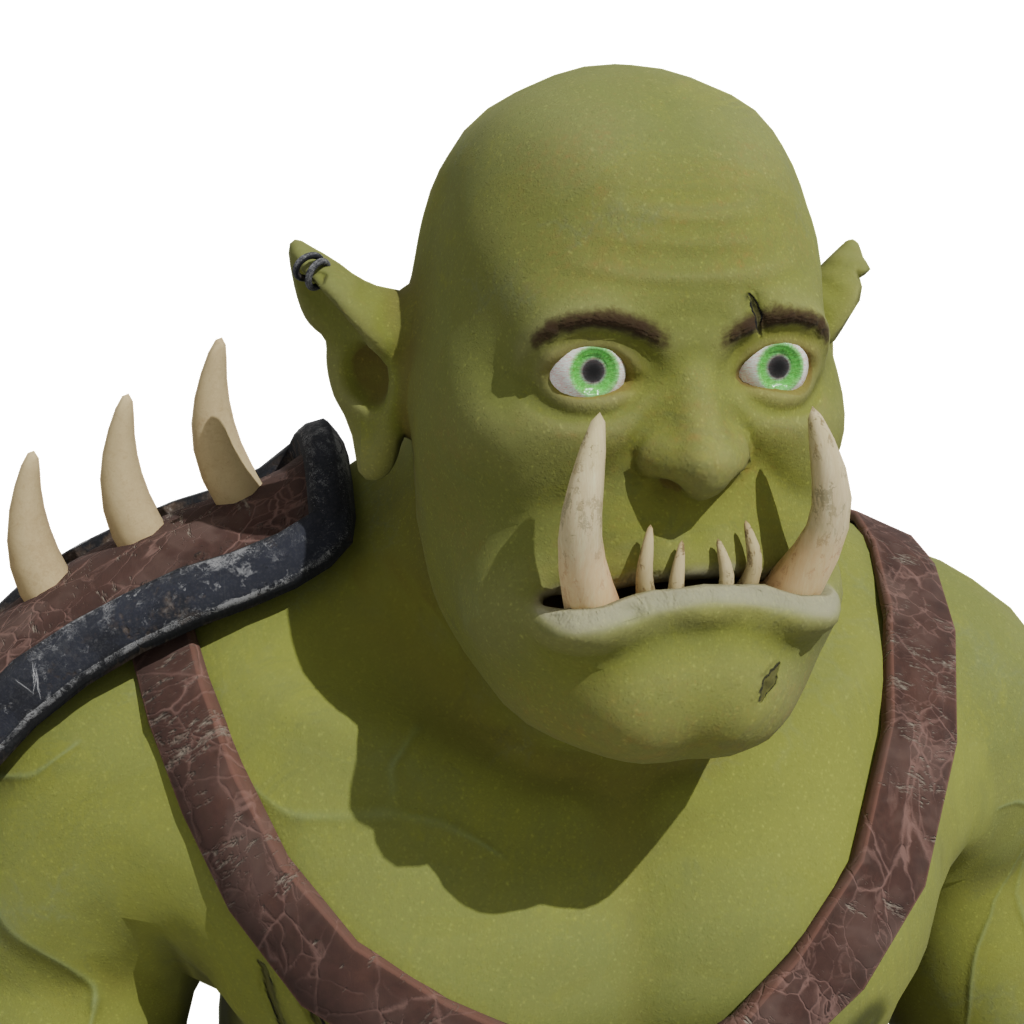
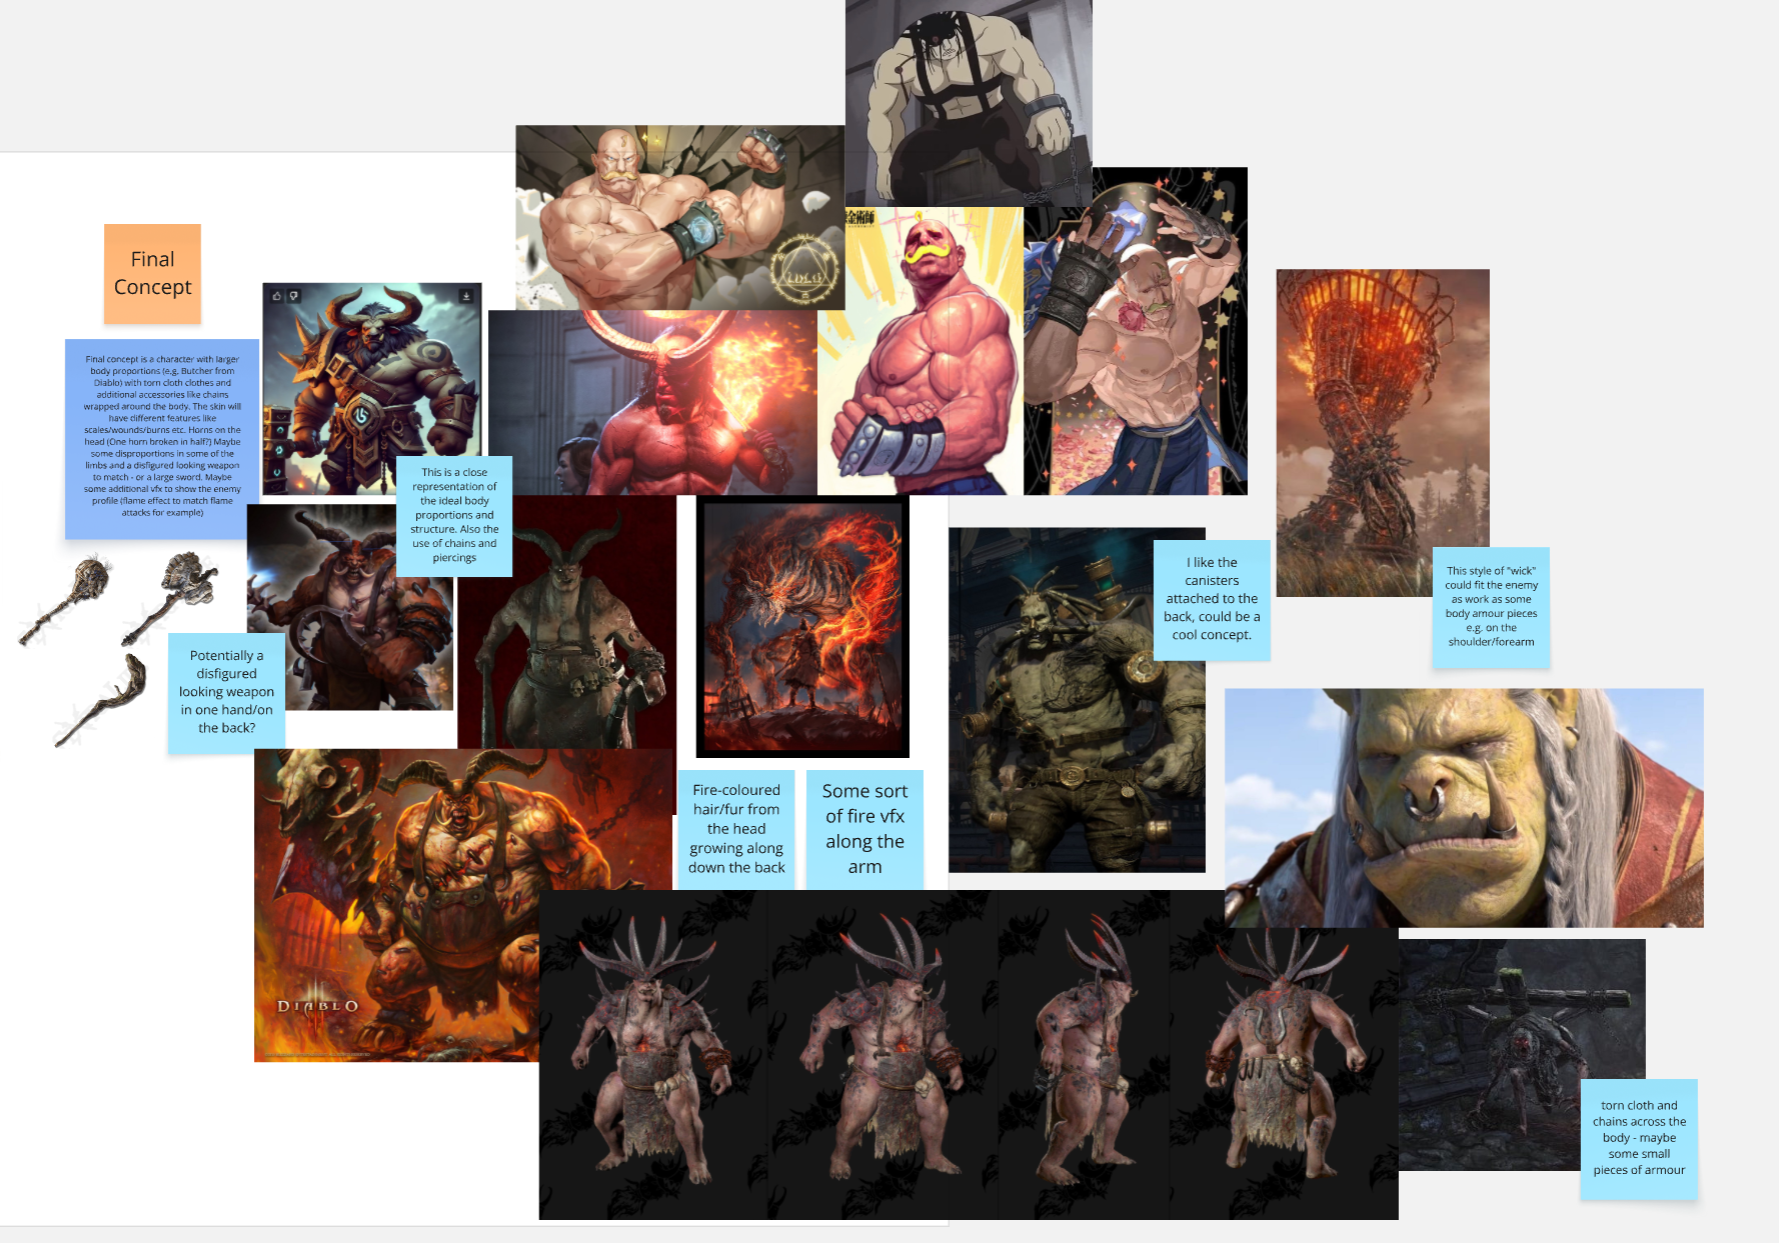
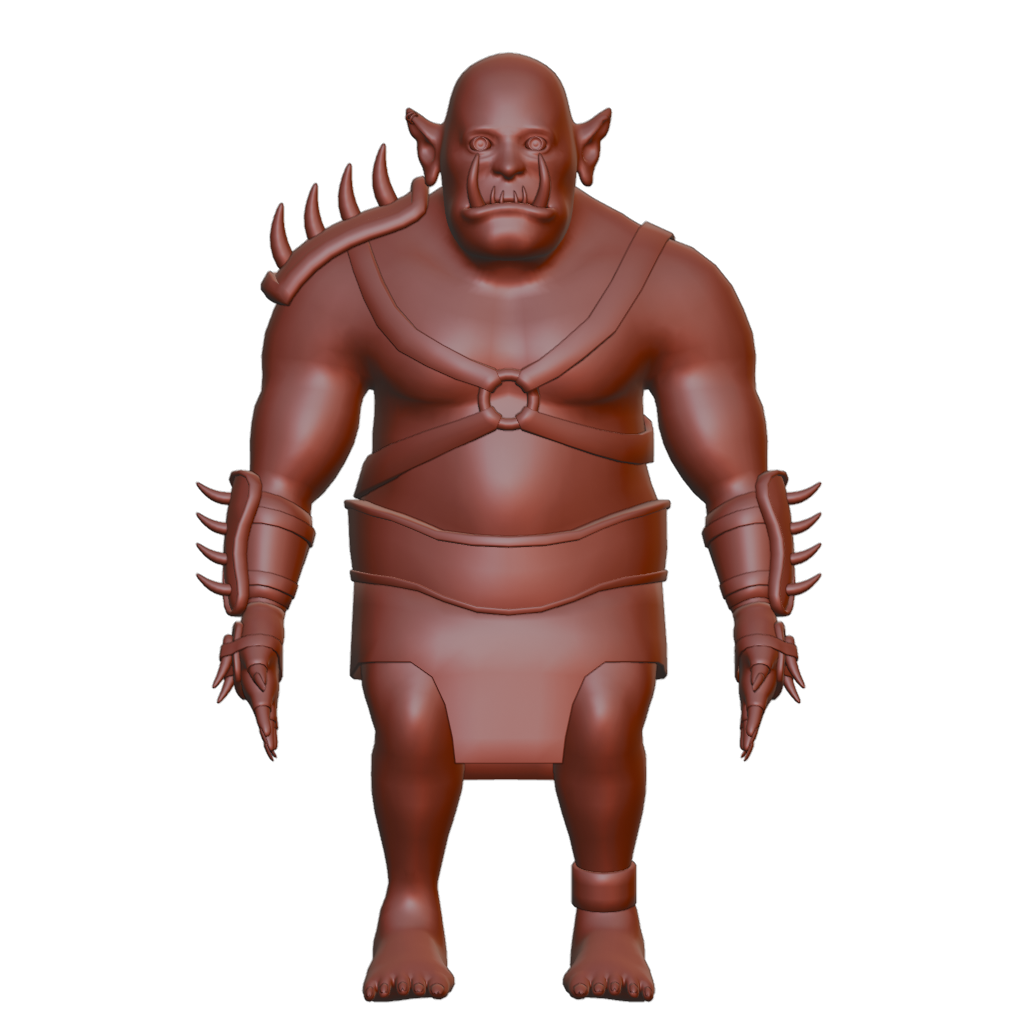
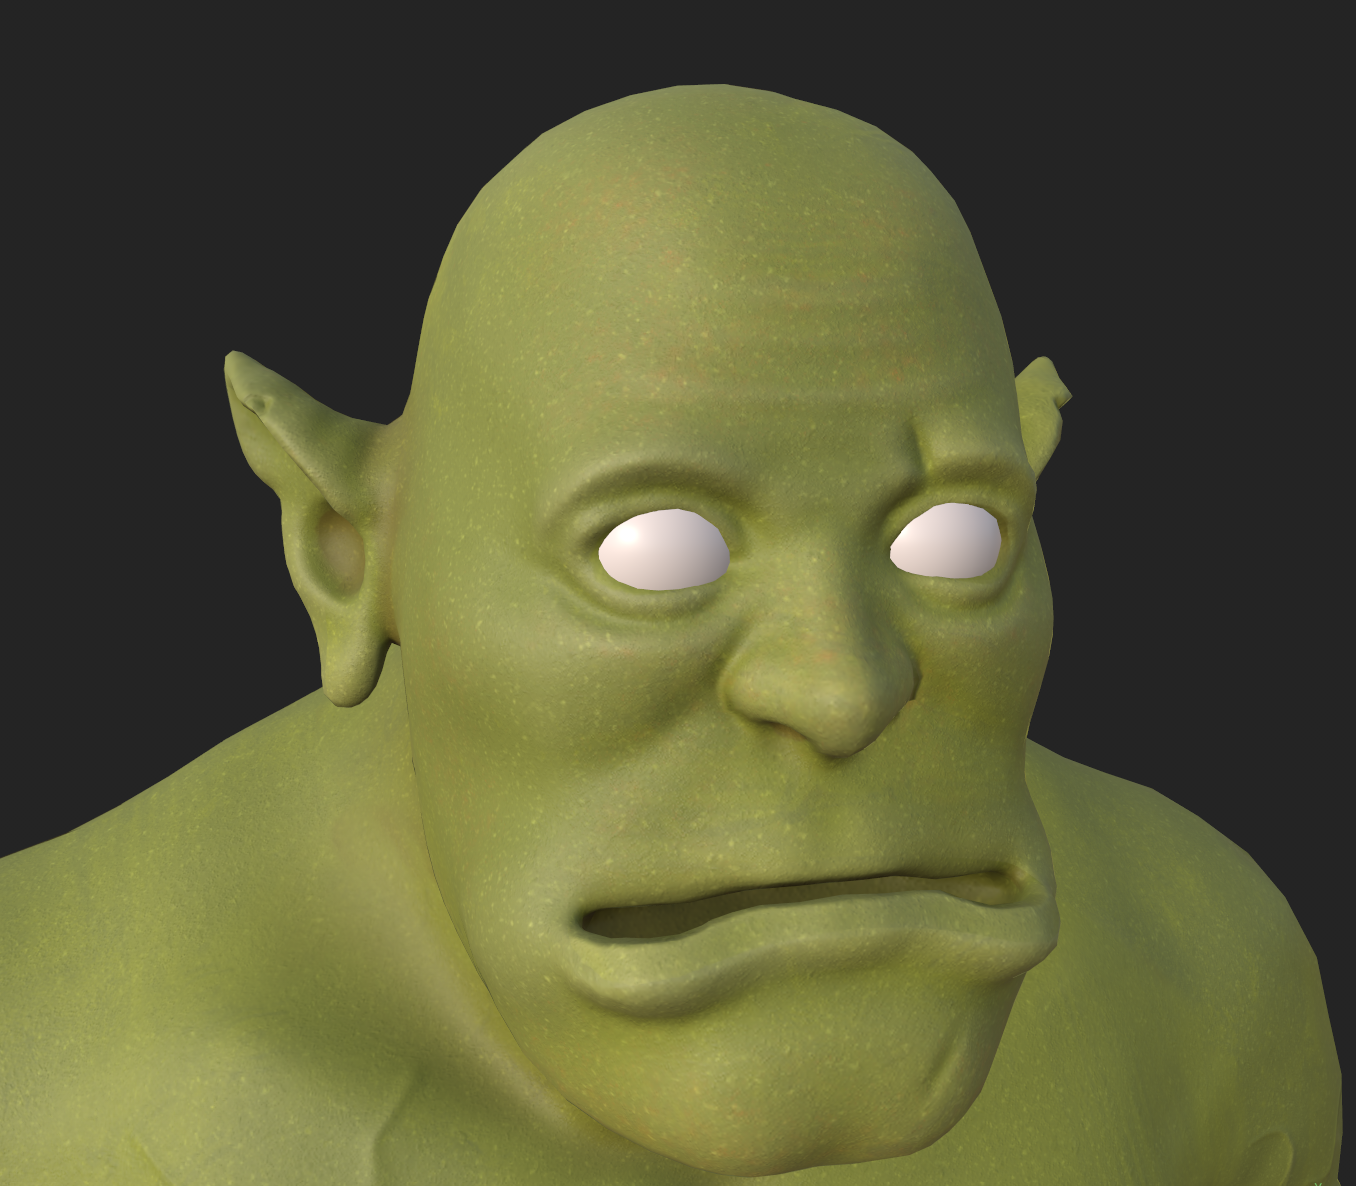
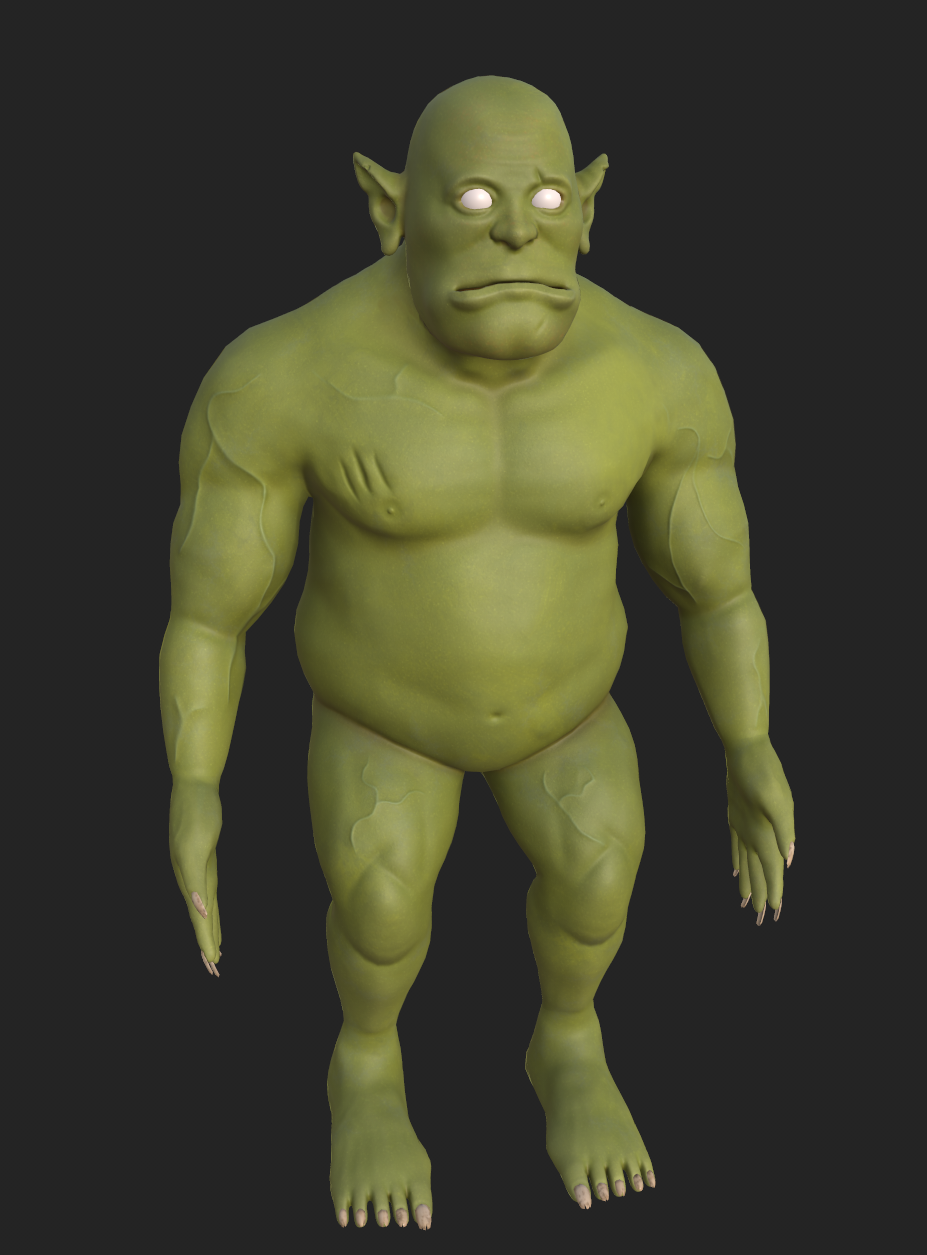
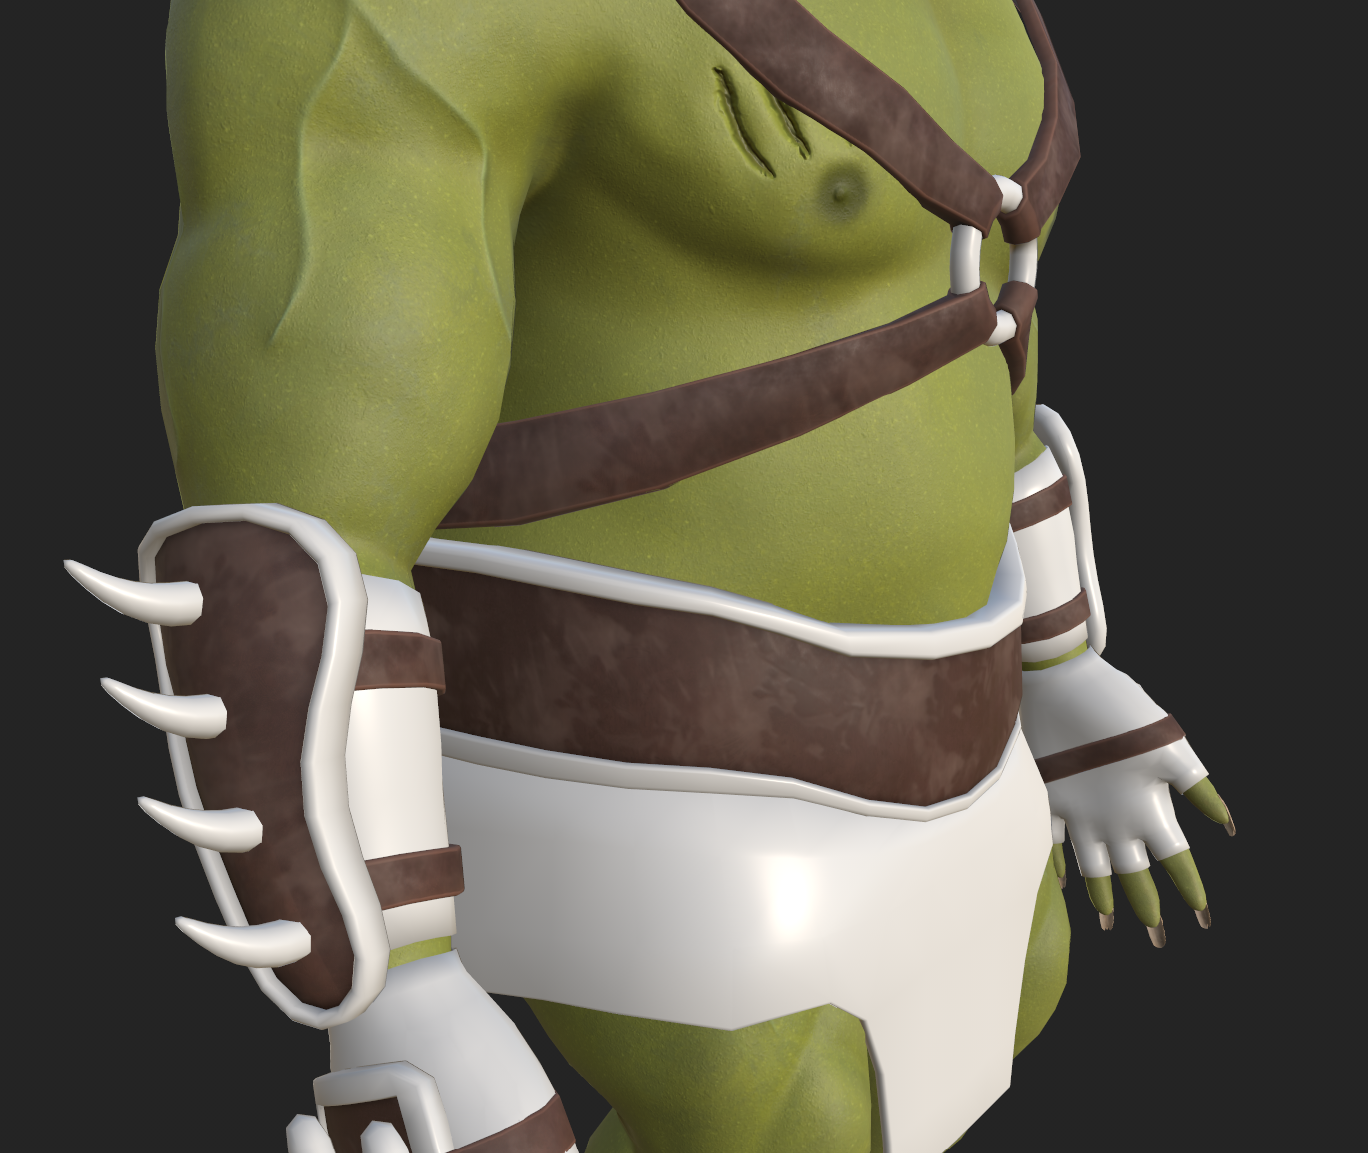
narrative design. I refined this decision and focused on a warrior orc character, that featured stereotypical facial features,
battle scars and worn armour pieces. I chose this specific design as I believe that there is a lot of potential for unique visual storytelling
and promoting gender and cultural diversity.
I drafted a few notes for the characters profile, including possible links and solutions to Sustainable Development Goal 10, which states,
'Reduce inequality within and among countries' (United Nations, 2015). The chosen design is a staple for medieval fantasy games and media and has countless
different designs and modes of application from several different video games. This means that there is large potential for applying this character
design to portray a diversity of different cultures and genders, while also reaching for an innovative design. For example, this specific design can
support diversification in cultures through the representation of different orc tribes, each with their own traditions. In a larger scale game concept,
the use of different orc tribes and genders provides opportunities to promote diverse cultures through visual designs that portray different cultural
behaviours and narrative storylines that promote the coming together of different tribes and cultures to benefit the larger population.
I believe that an orc warrior character has large applications to innovative design in the medieval fantasy genre,
which can be achieved by primarily stepping away from the traditional stereotypes and developing diverse, rich
cultures and stories behind each different orc character. For example, a mix of genders and body types rather than a hyper-masculine muscular male,
more cultural depth with different tribes and character origin stories, orcs with friendly intentions or a diverse line-up of roles including warriors,
archers and mages aside from the single stereotypical warrior role, could all be features tied to each character to differentiate them from the stereotypical norms.
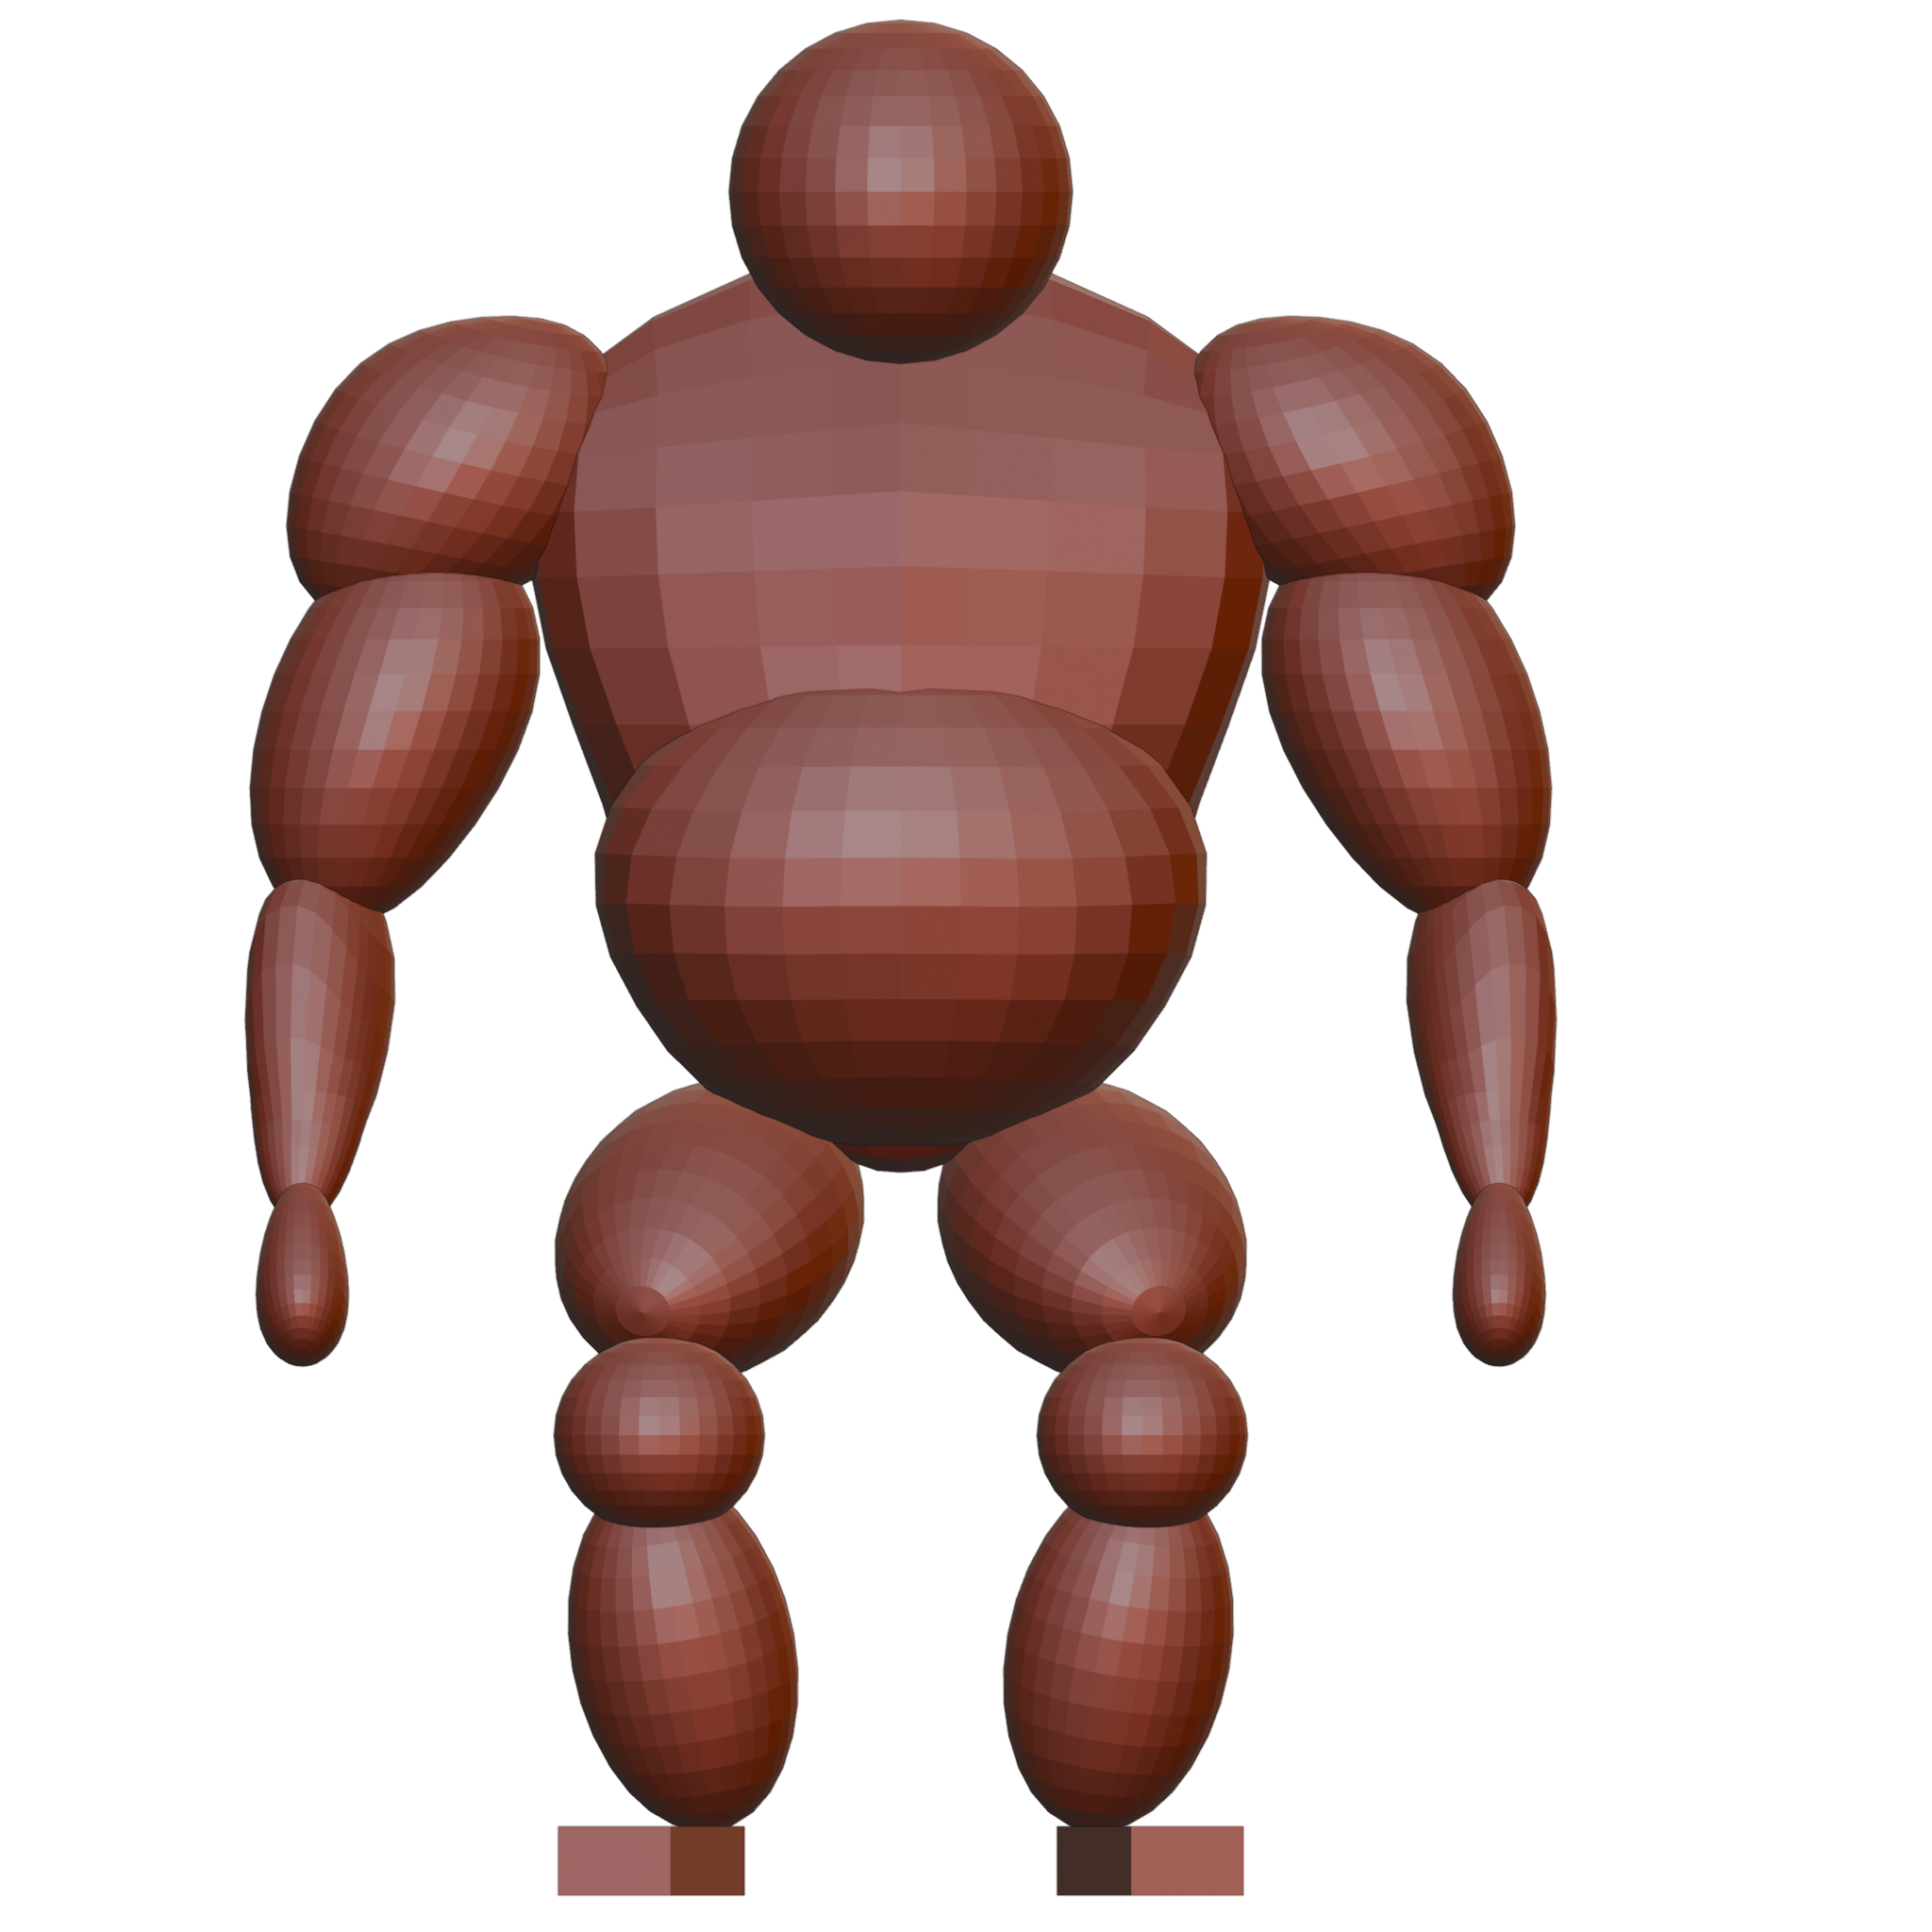
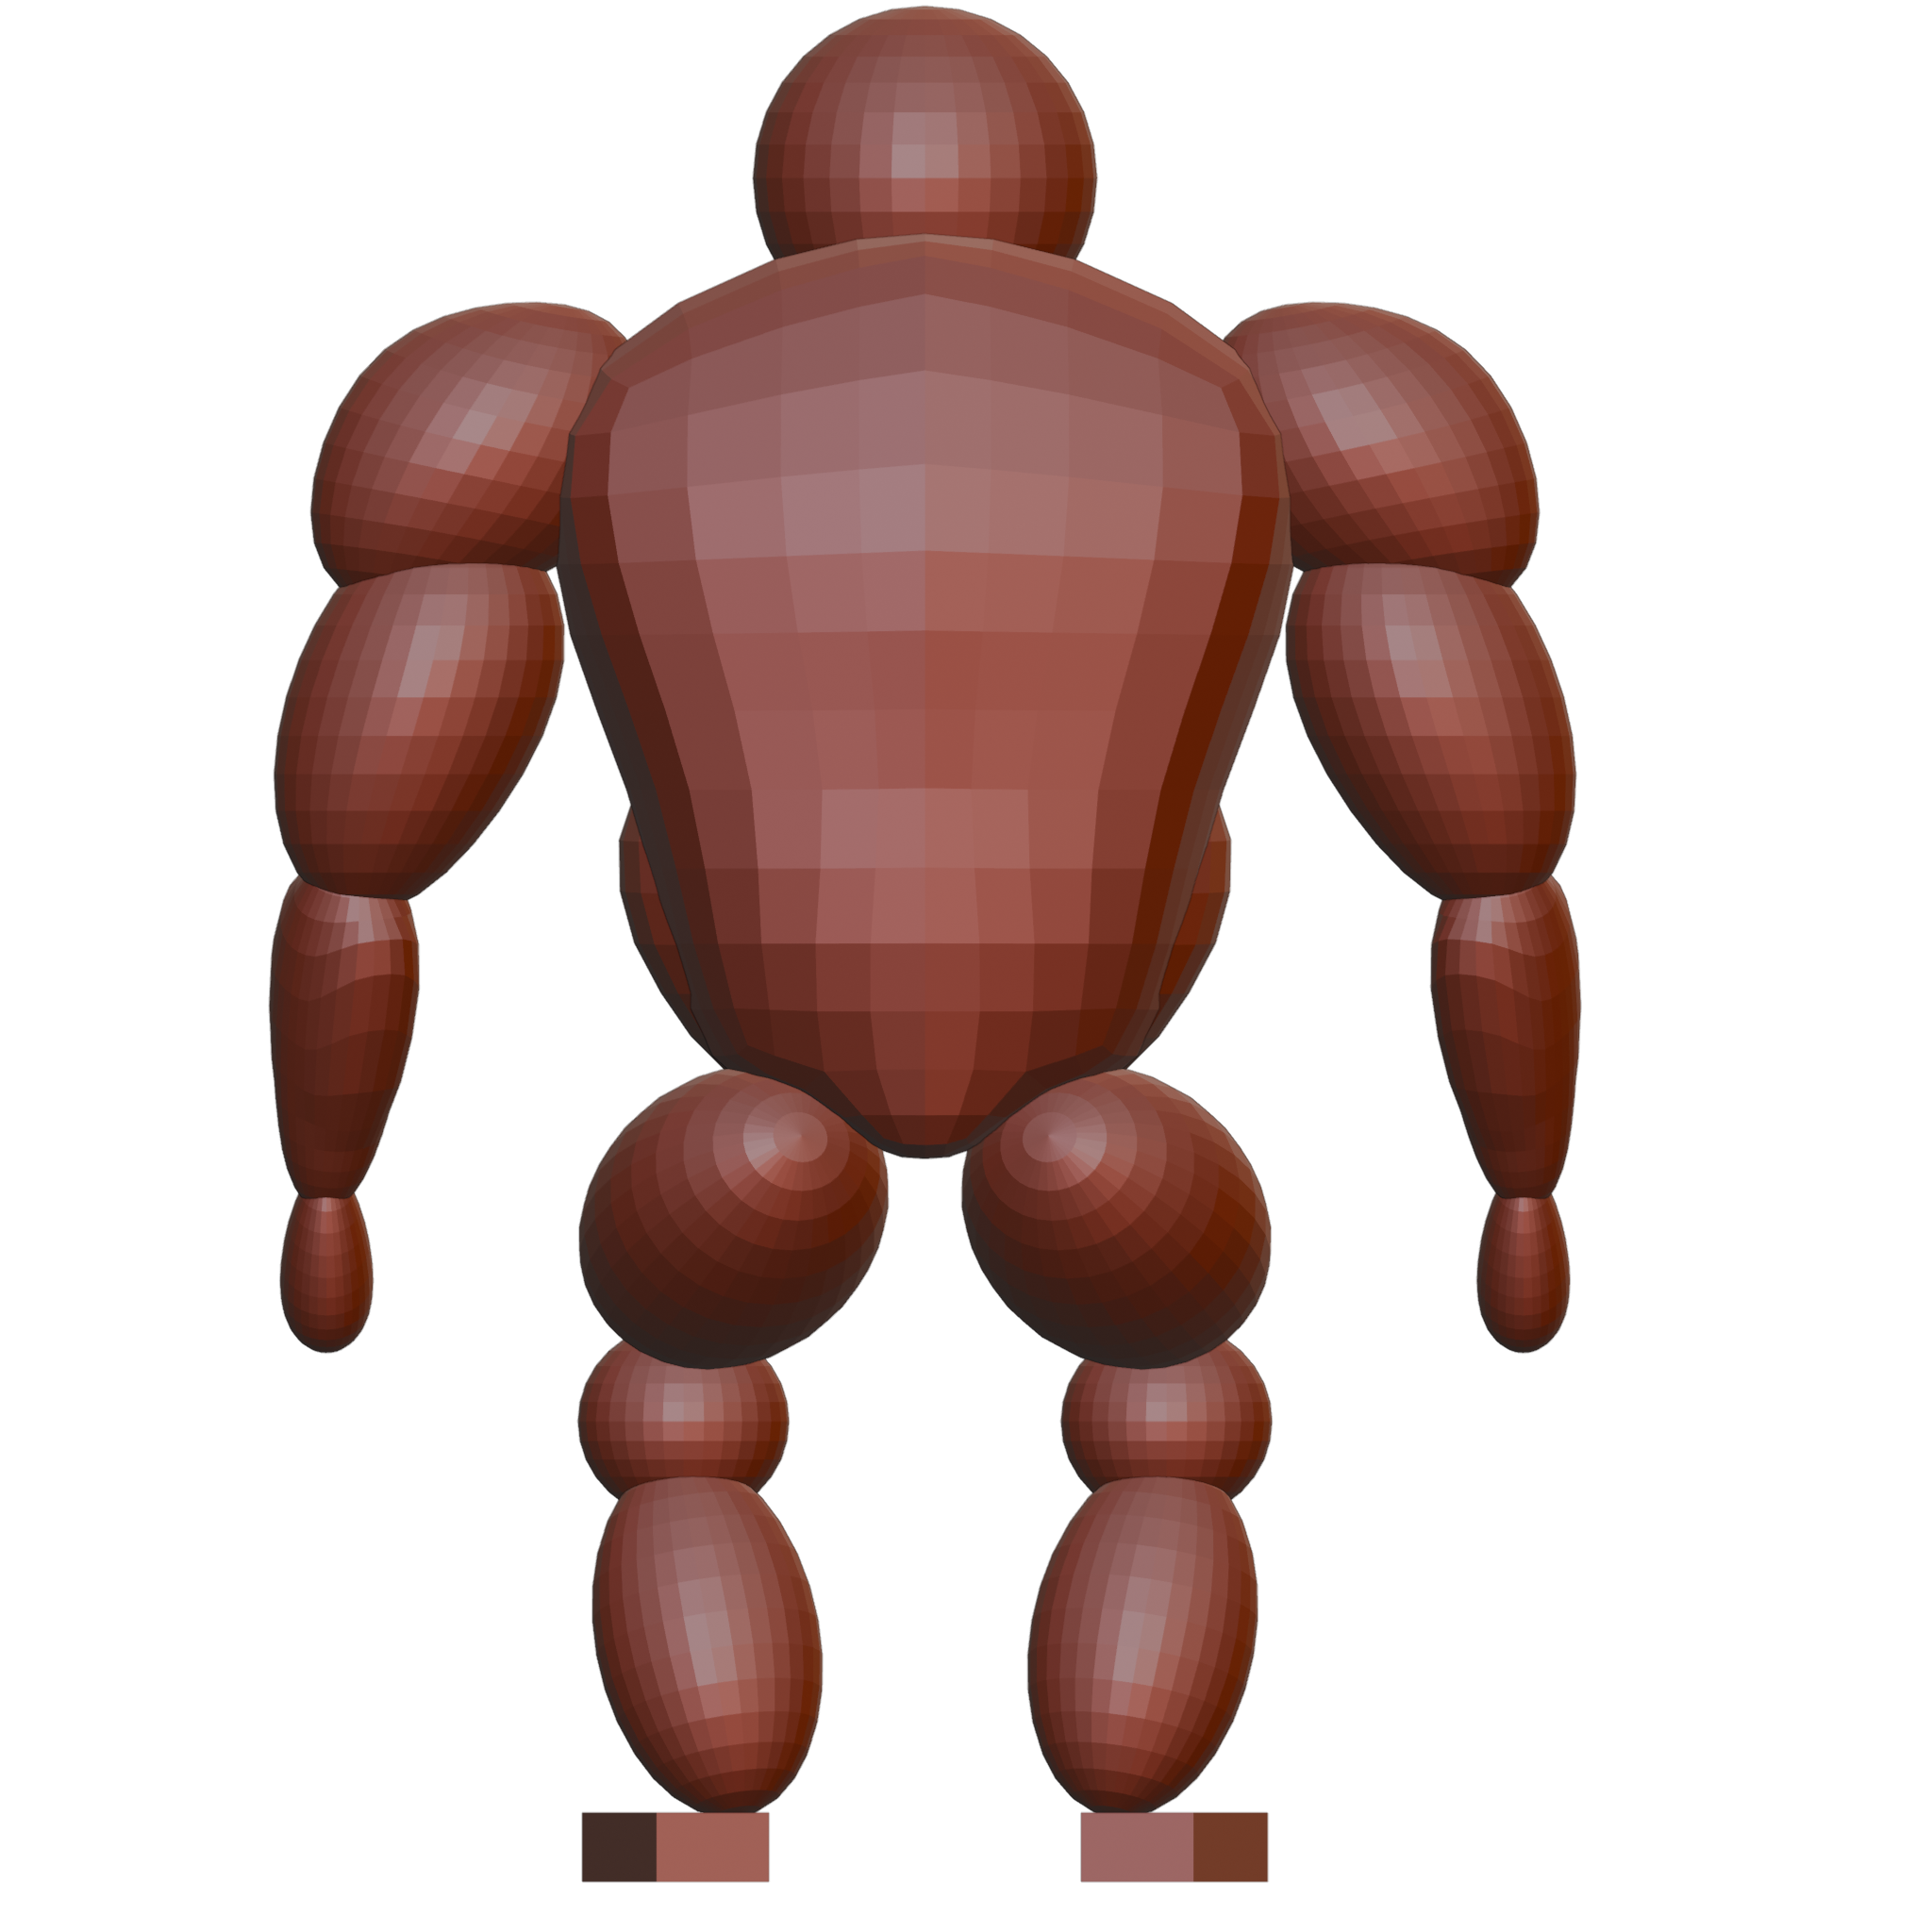
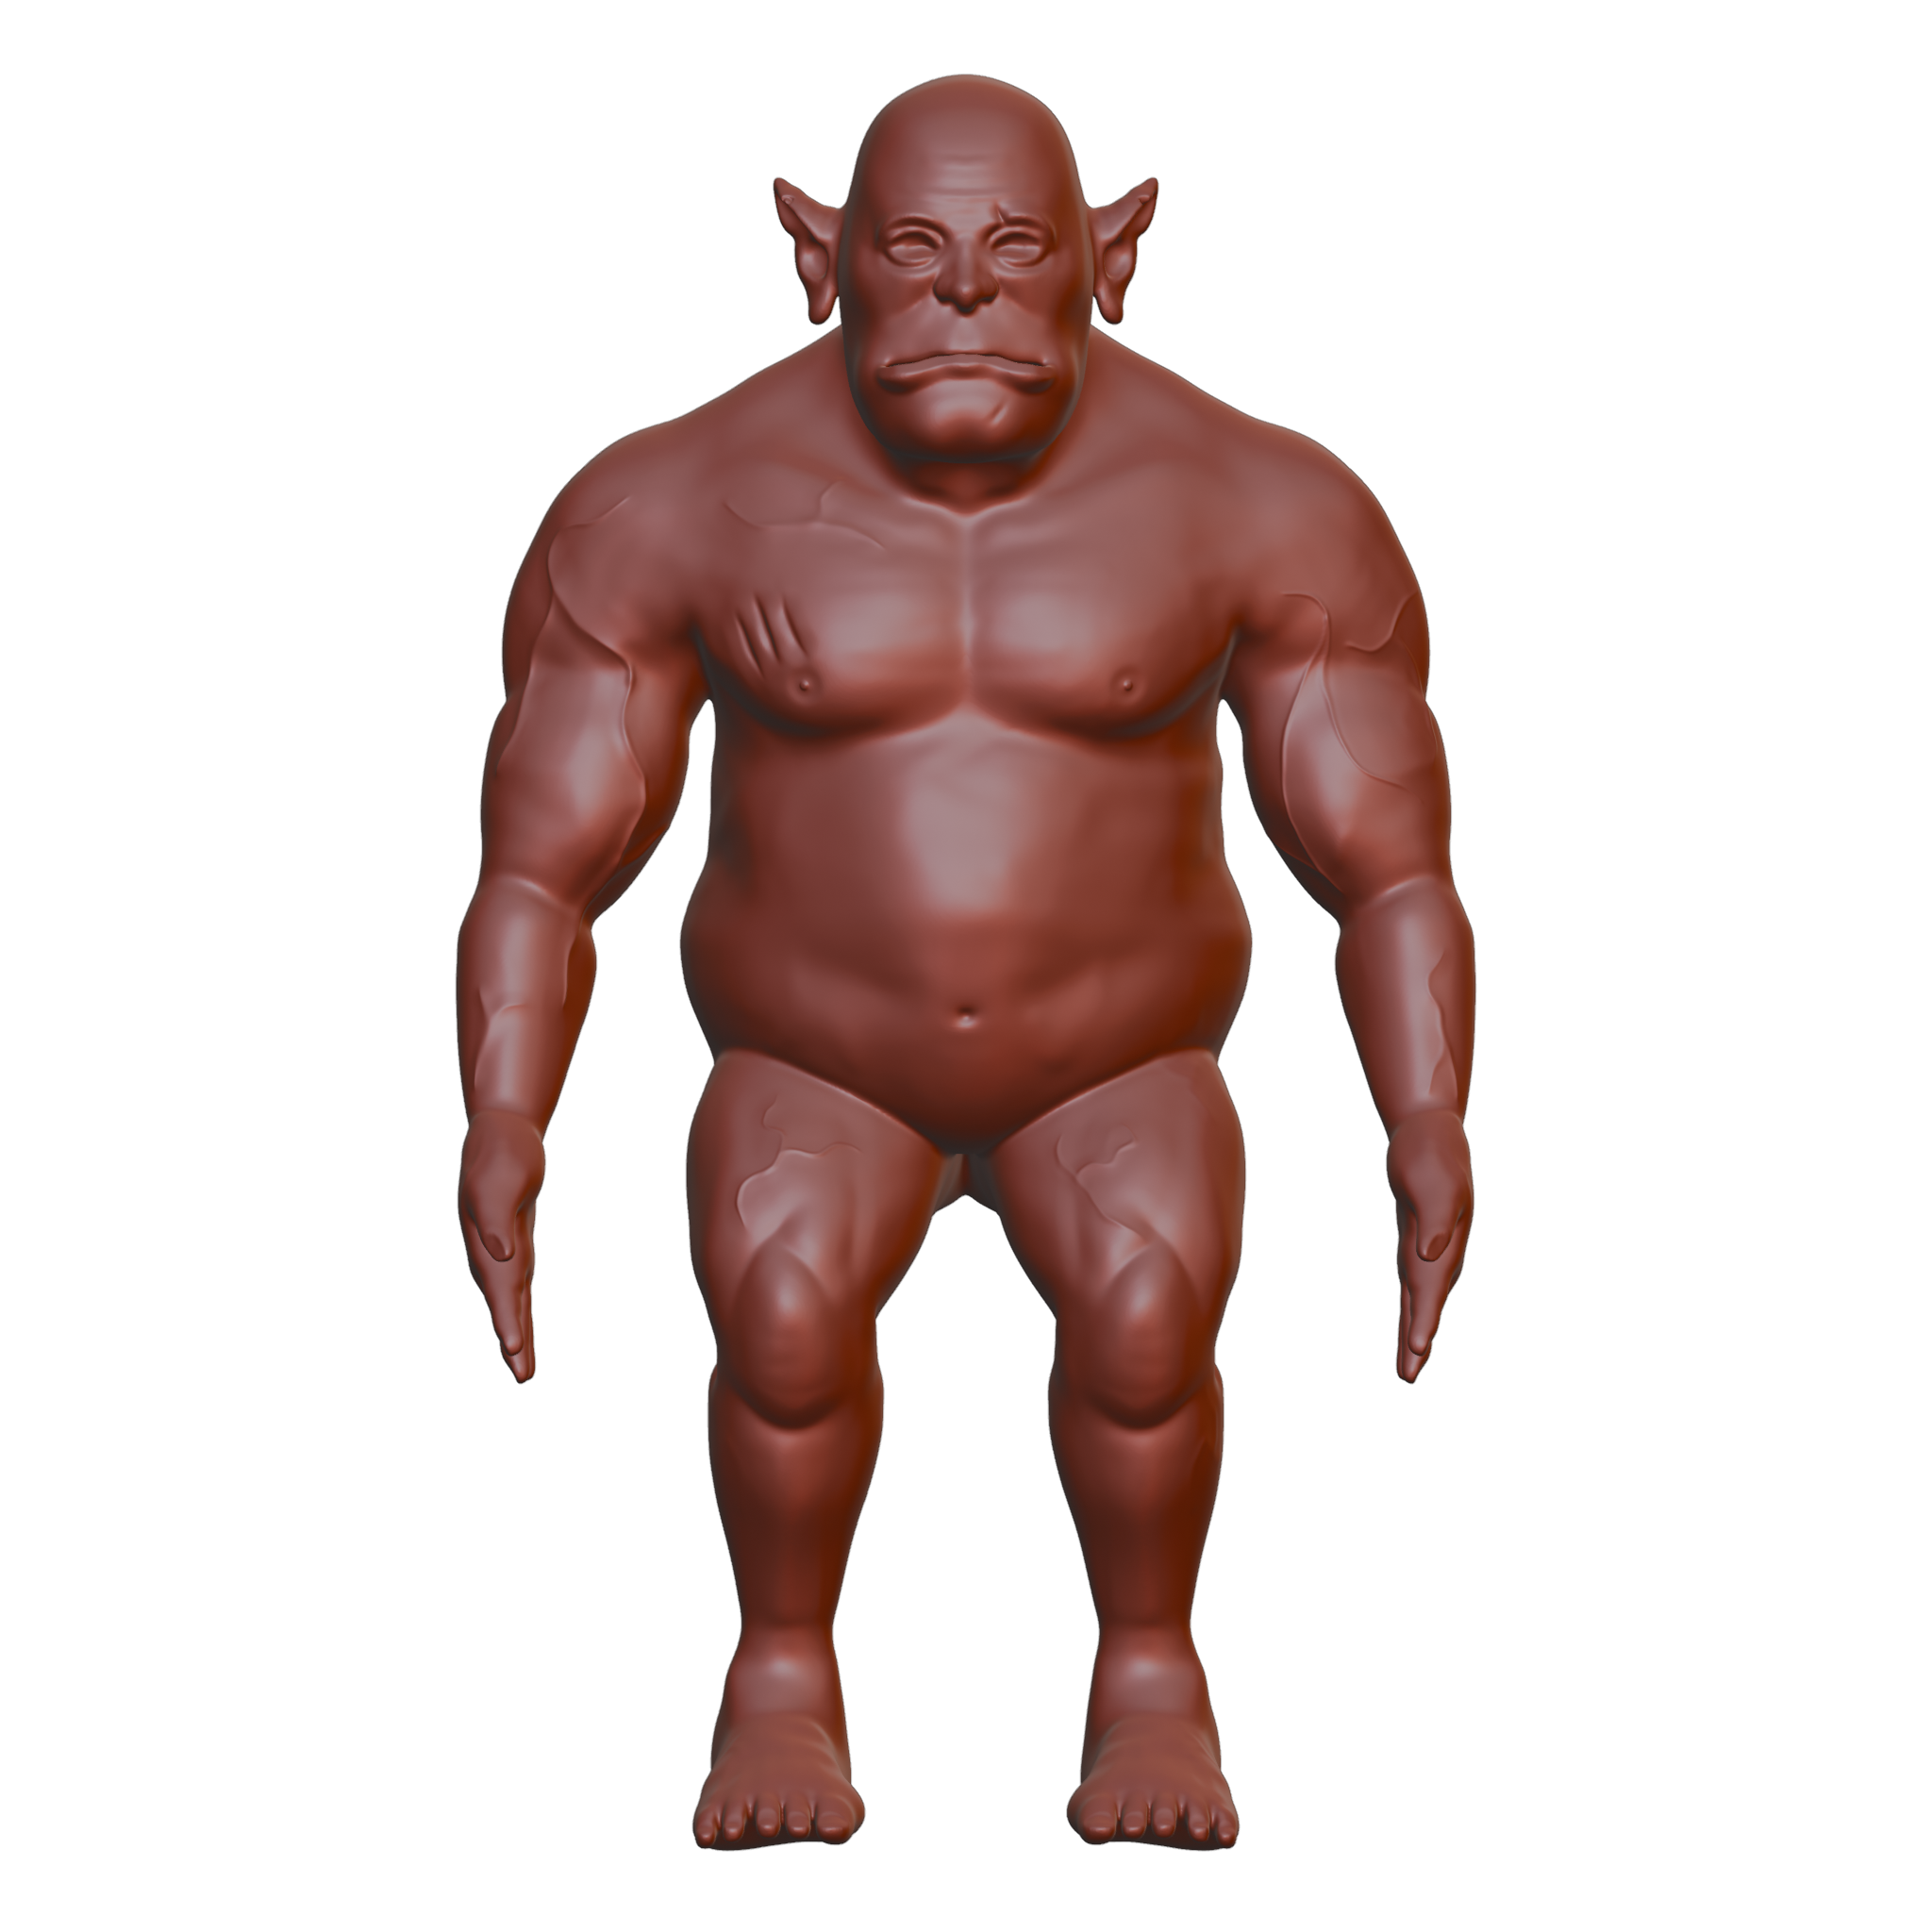
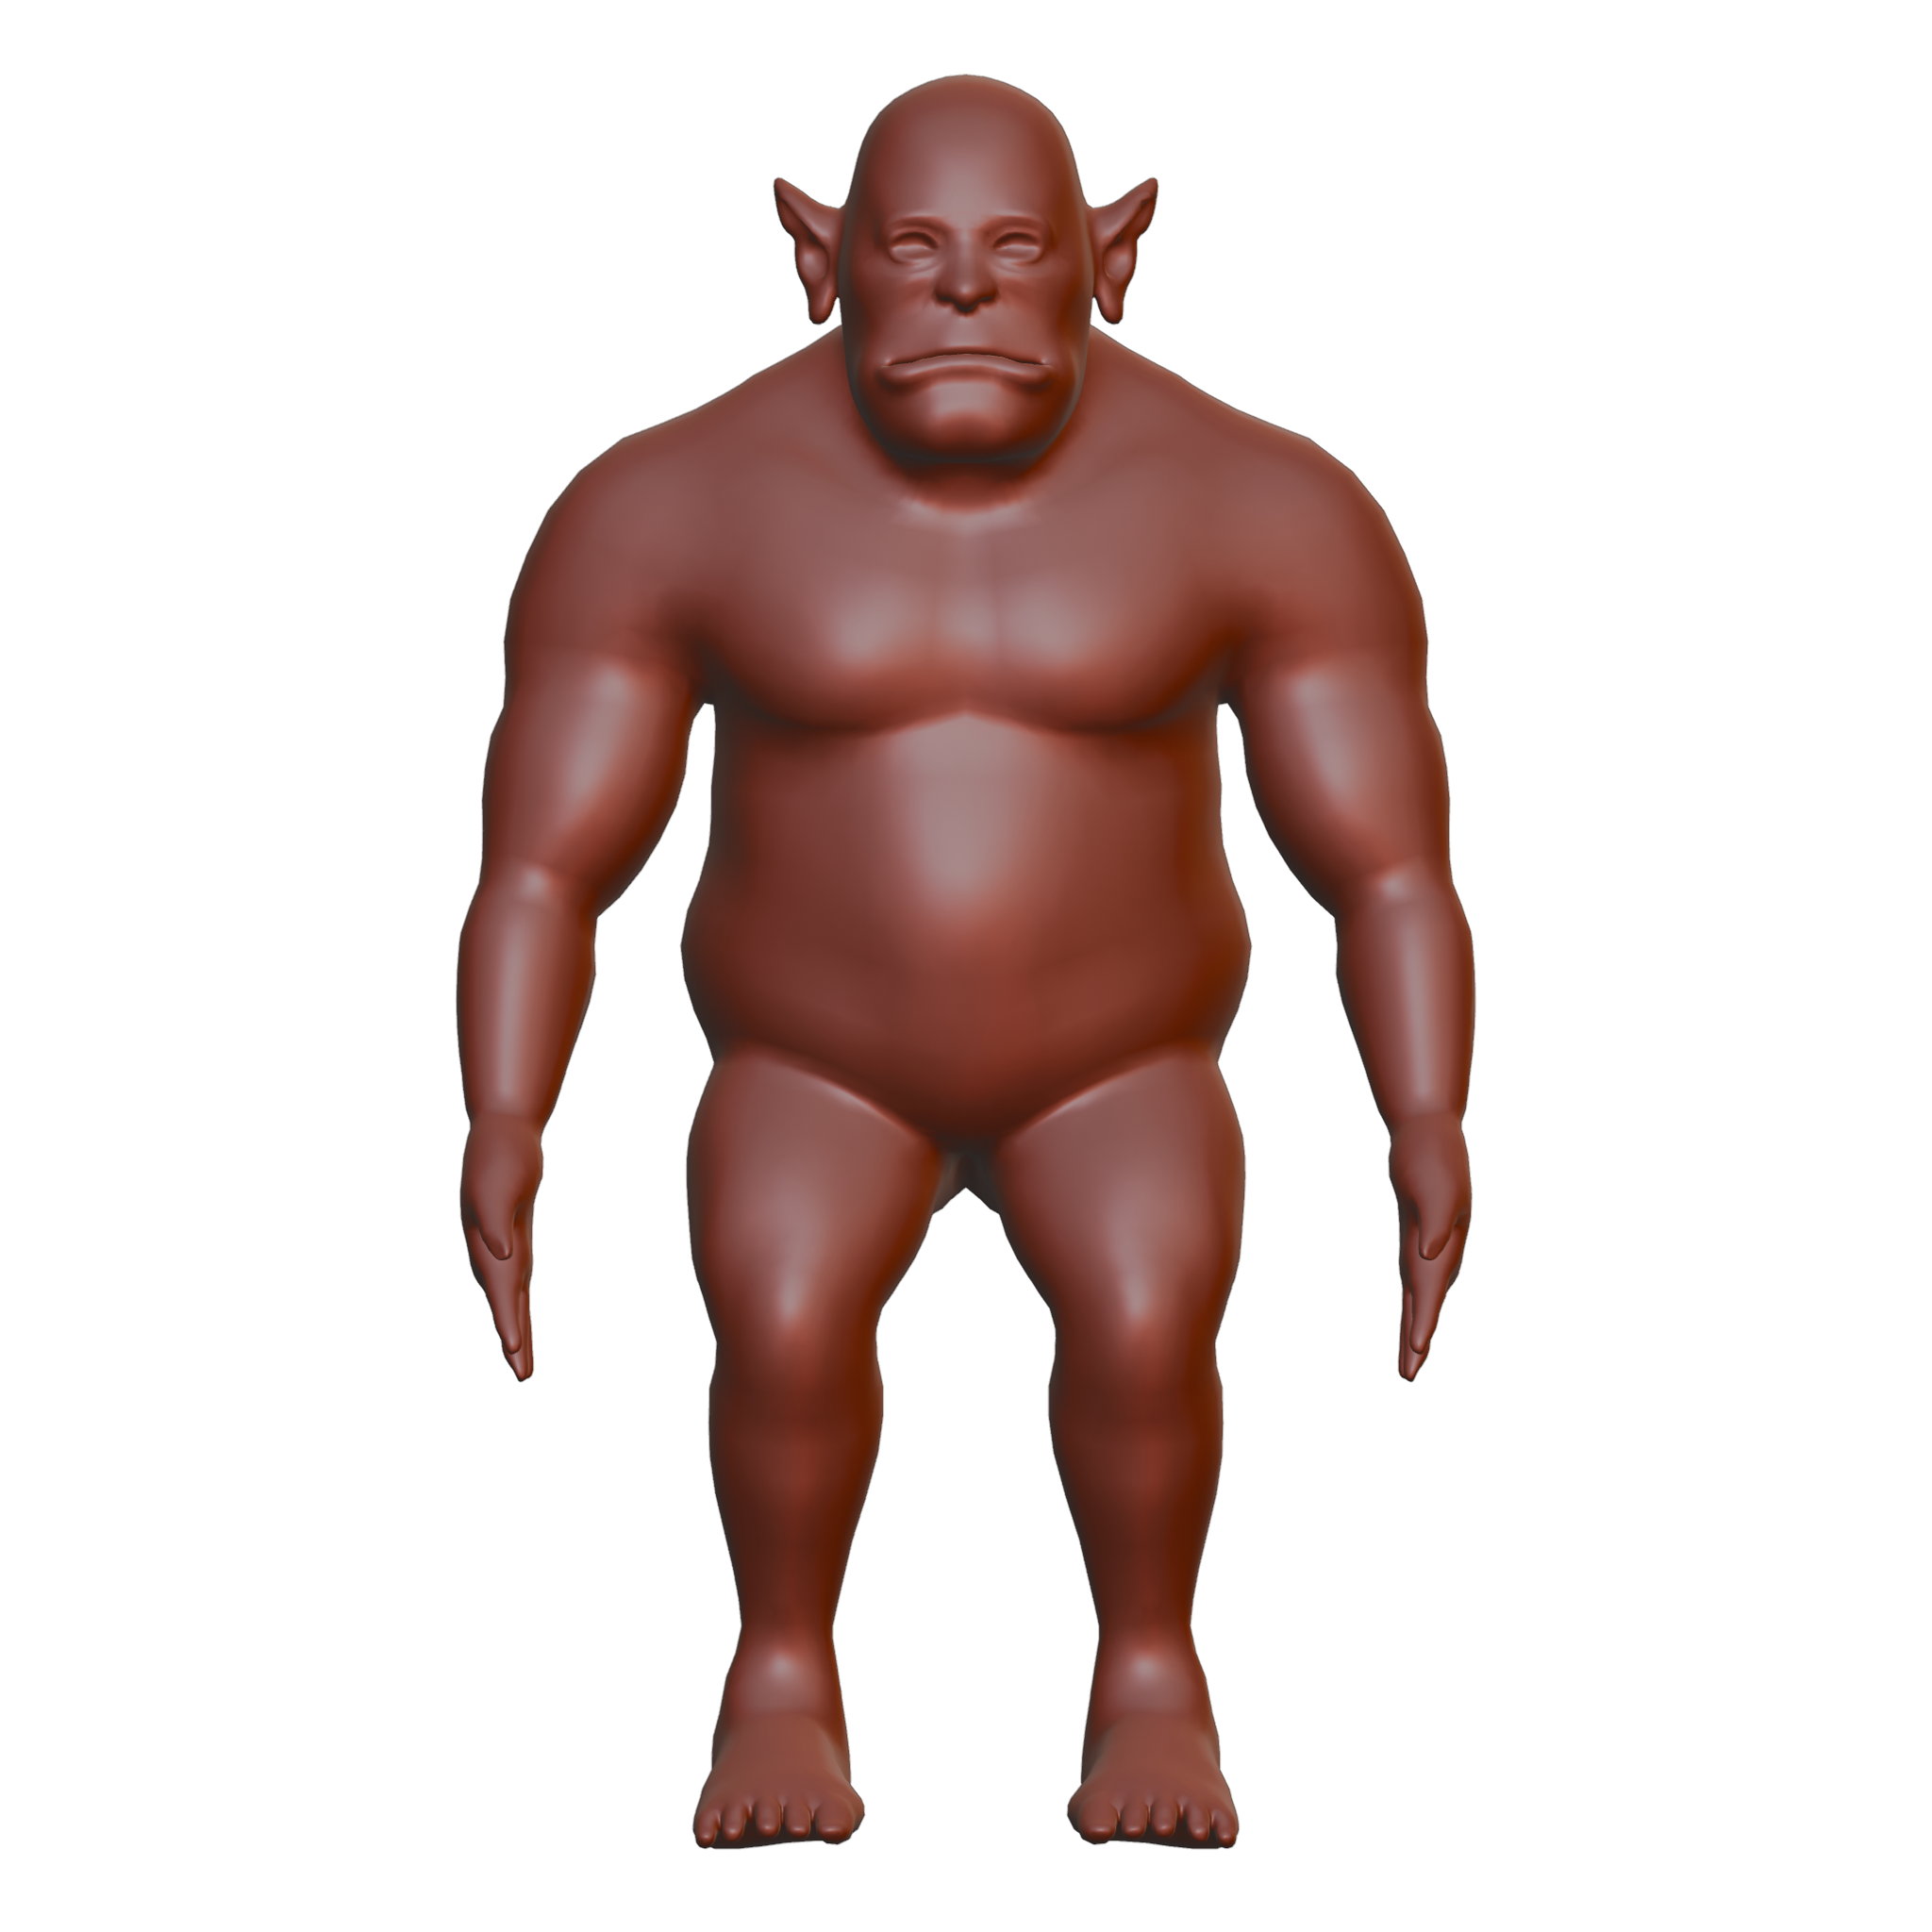
I made use of silhouette theory and research into muscle anatomy to achieve a design that steps away from the regular muscular figures in orc character designs while ensuring a character with visual strength and a dedicated warrior role. This specific design follows a bulky body proportion with lightly toned muscles in the limbs and upper chest and higher body fat in the stomach area. I believe this mix perfectly displays the story of a warrior orc character as the muscles are gained through endless wars and battles, while the body fat is built up through a greedy appetite and constant pillaging of settlements for food and treasures.
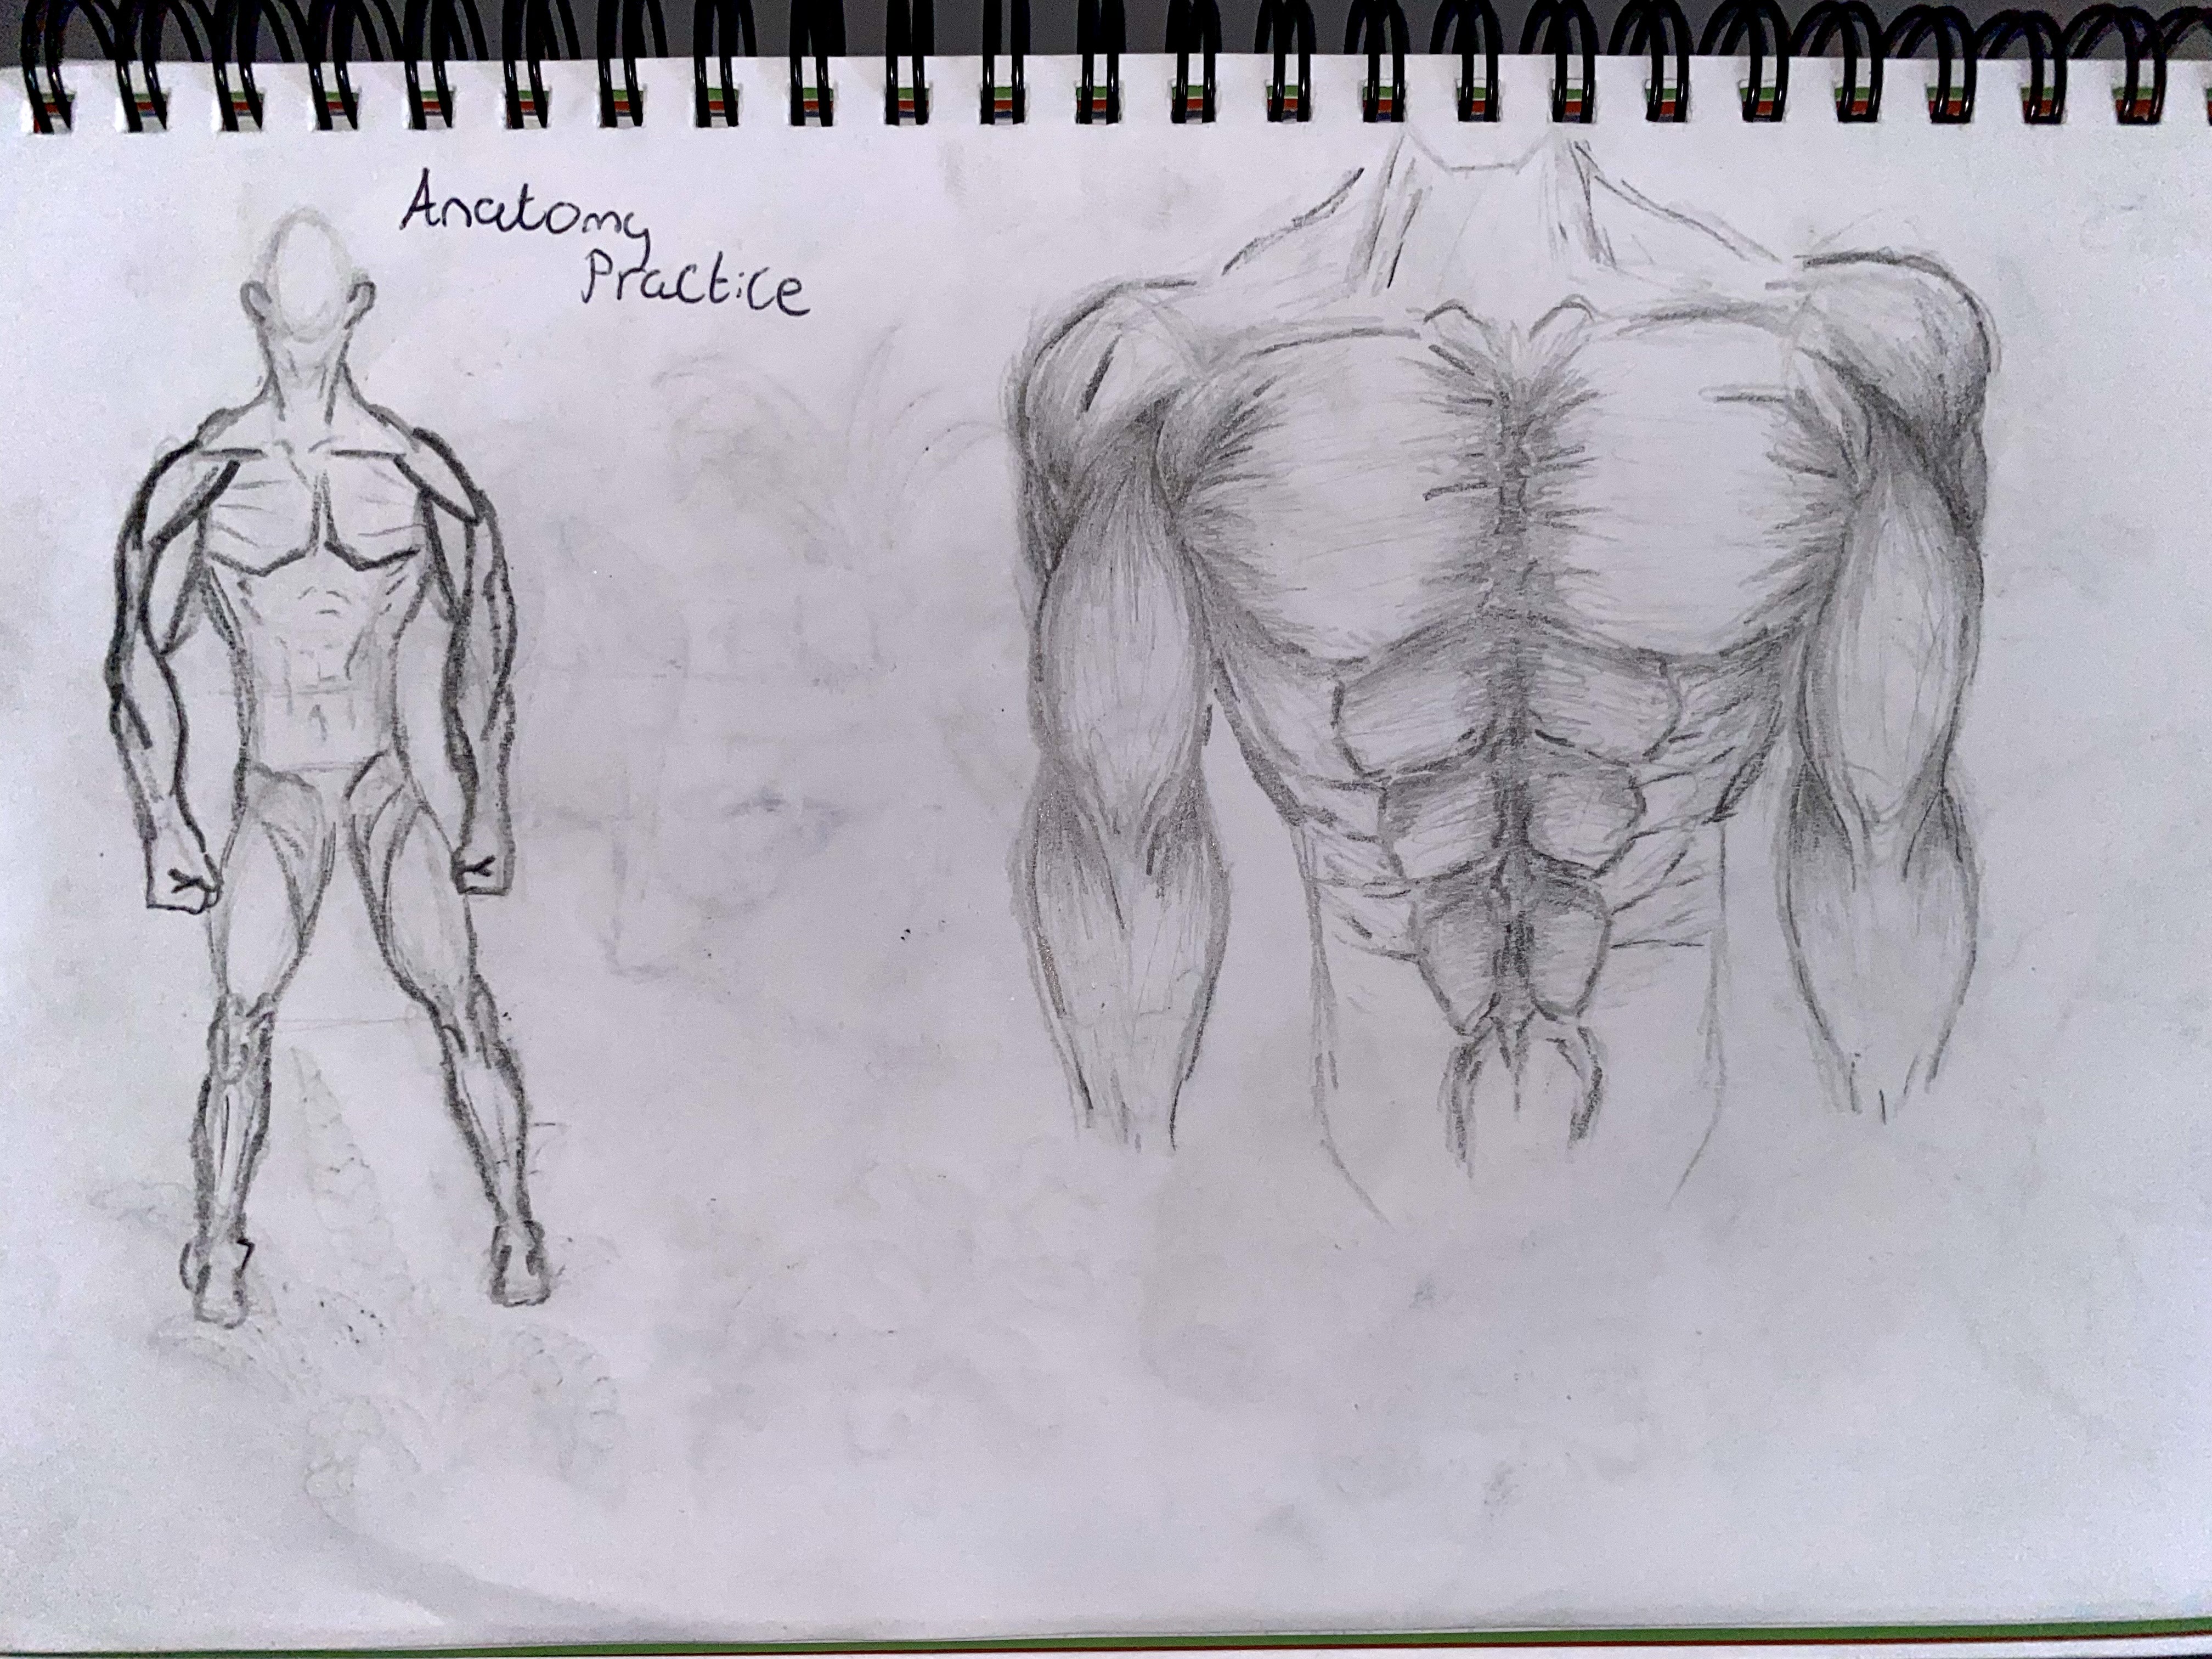
During my research, I followed online tutorials that outlined the basics of sketching anatomy and bodies (DrawlikeaSir, 2020), and I practiced re-creating human bodies with sketches and basic modelling and sculpting in Blender while using an interactive muscle anatomy guide as a reference (Talyor, 1998). This practice specifically involved researching specific muscle groups, how they connect and how their appearance varies with different muscle sizes. This research provided an essential framework to follow when starting the character modelling process.
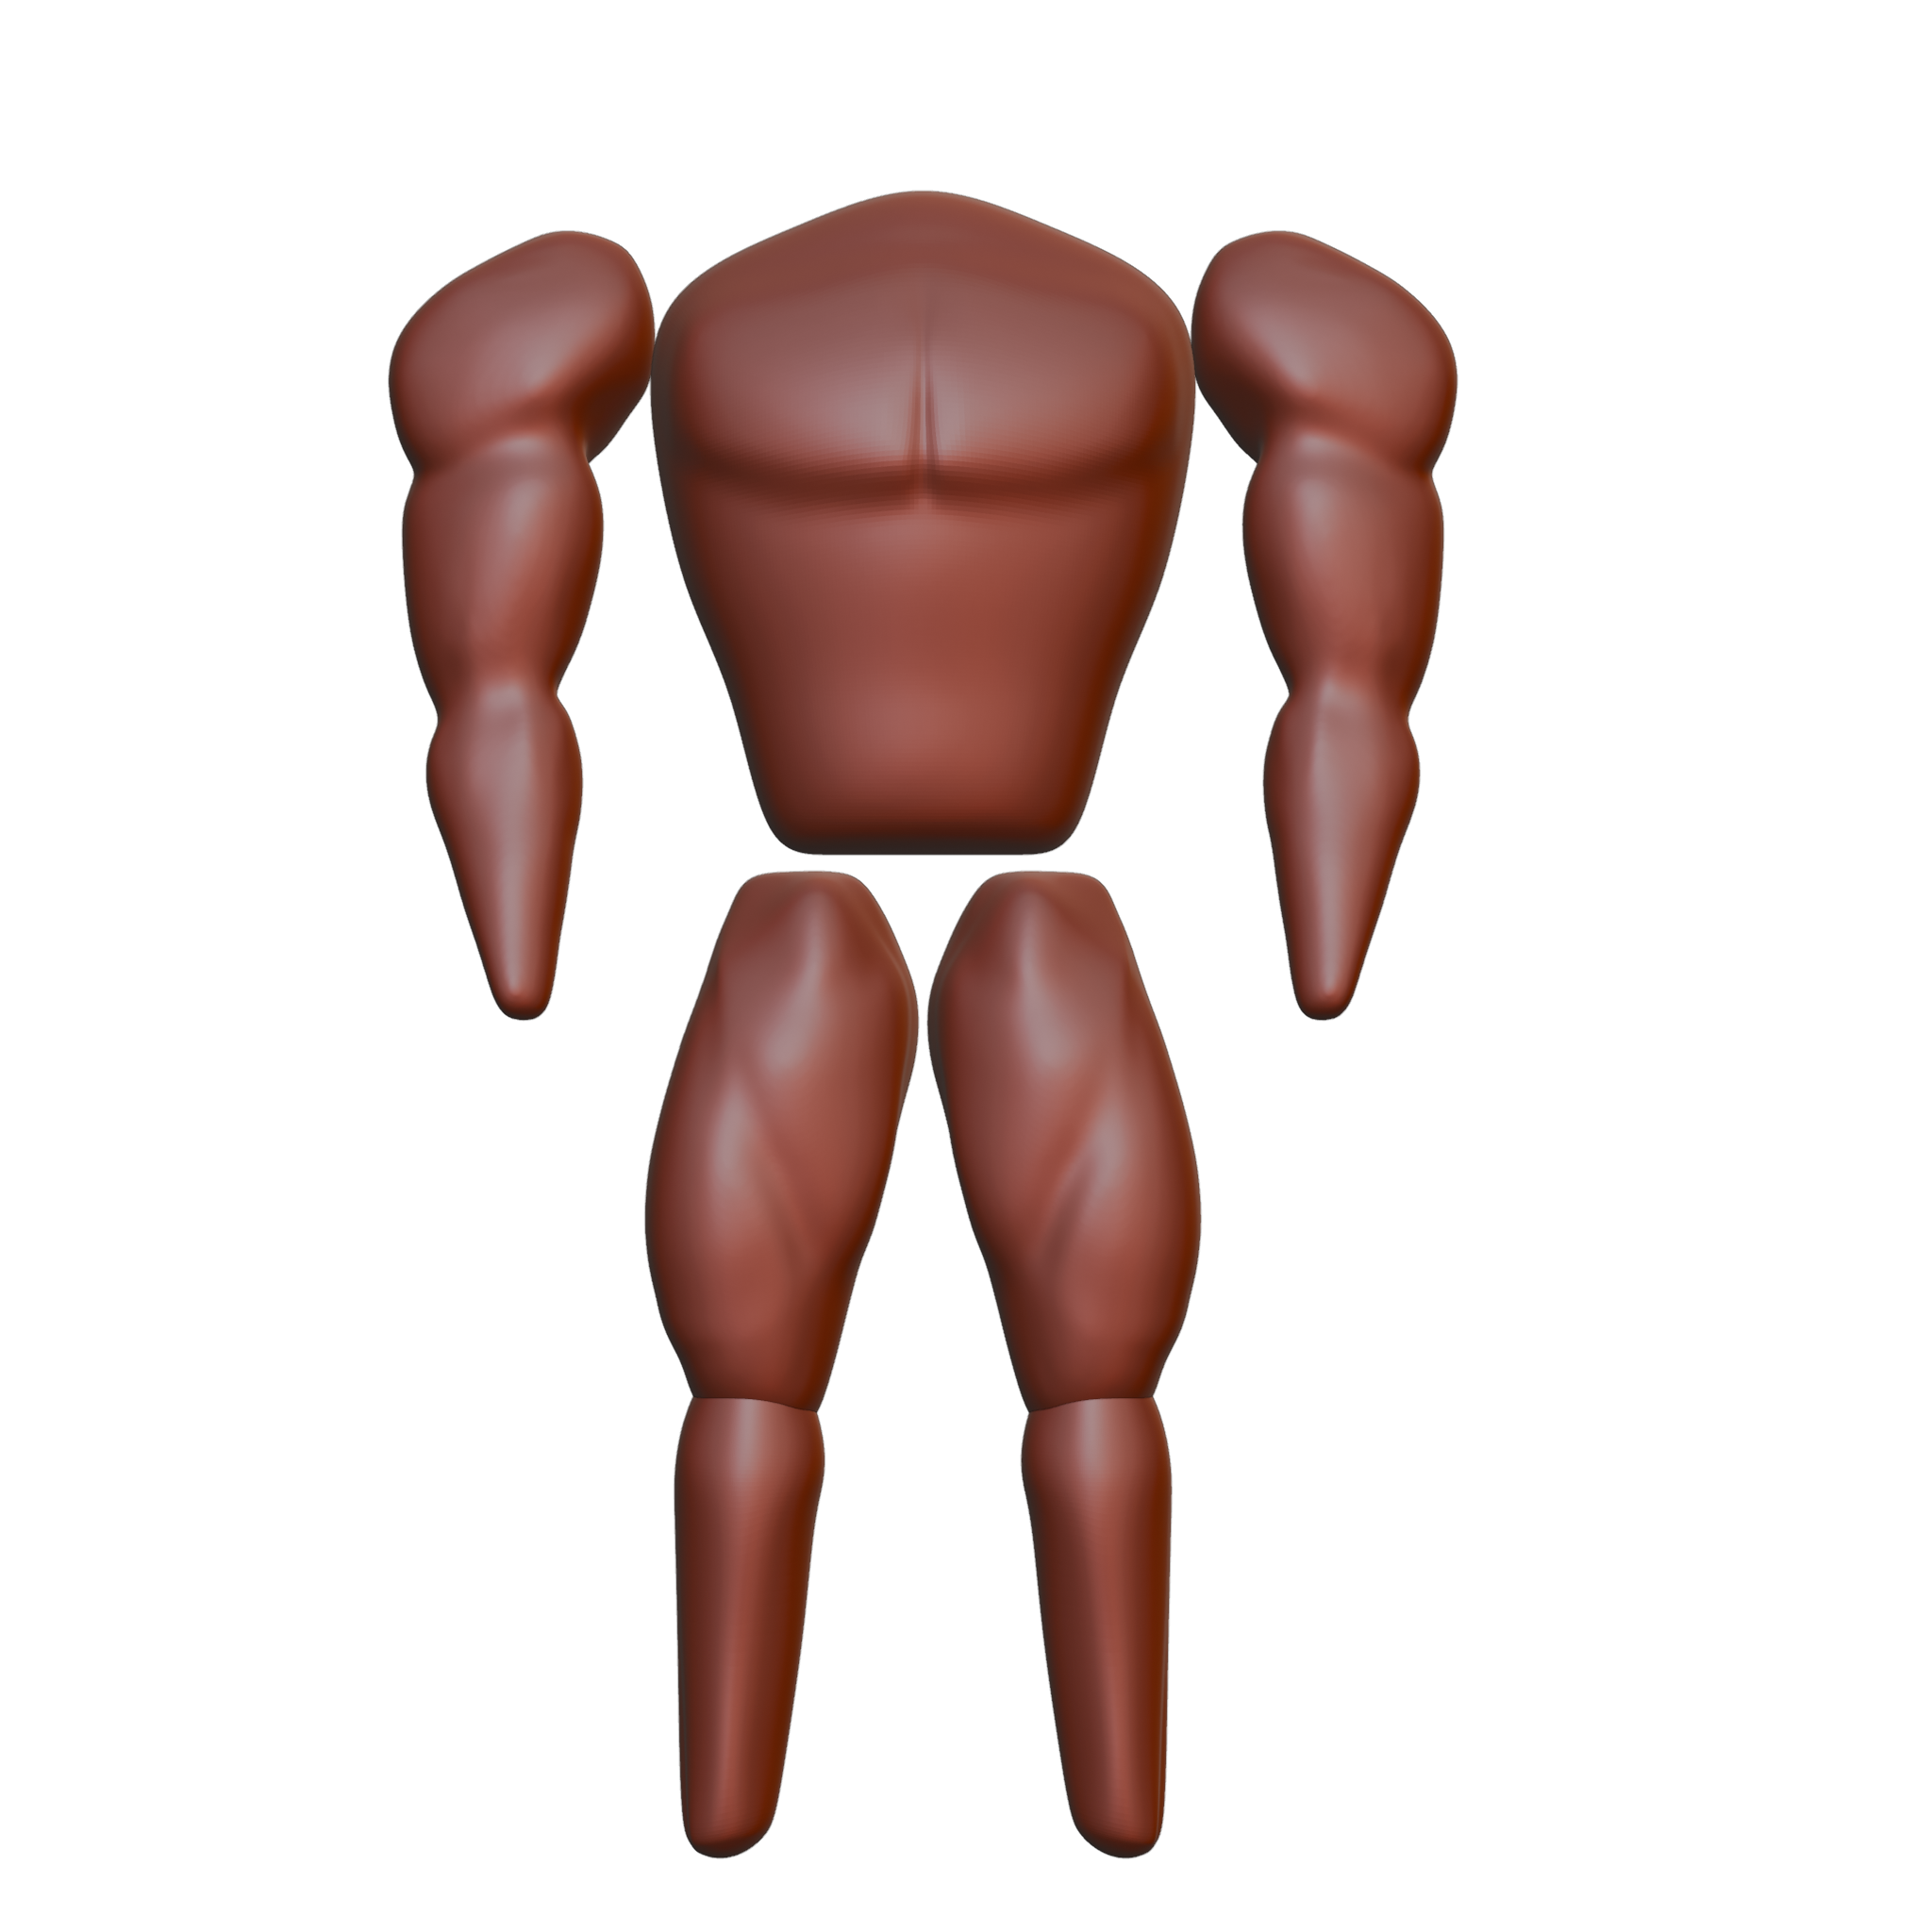

Using Blender, I started the design process by creating a body block out using basic 3D shapes to create the torso, limbs and head. Each shape was individually scaled and shaped differently to meet the rough proportions in the intended design.
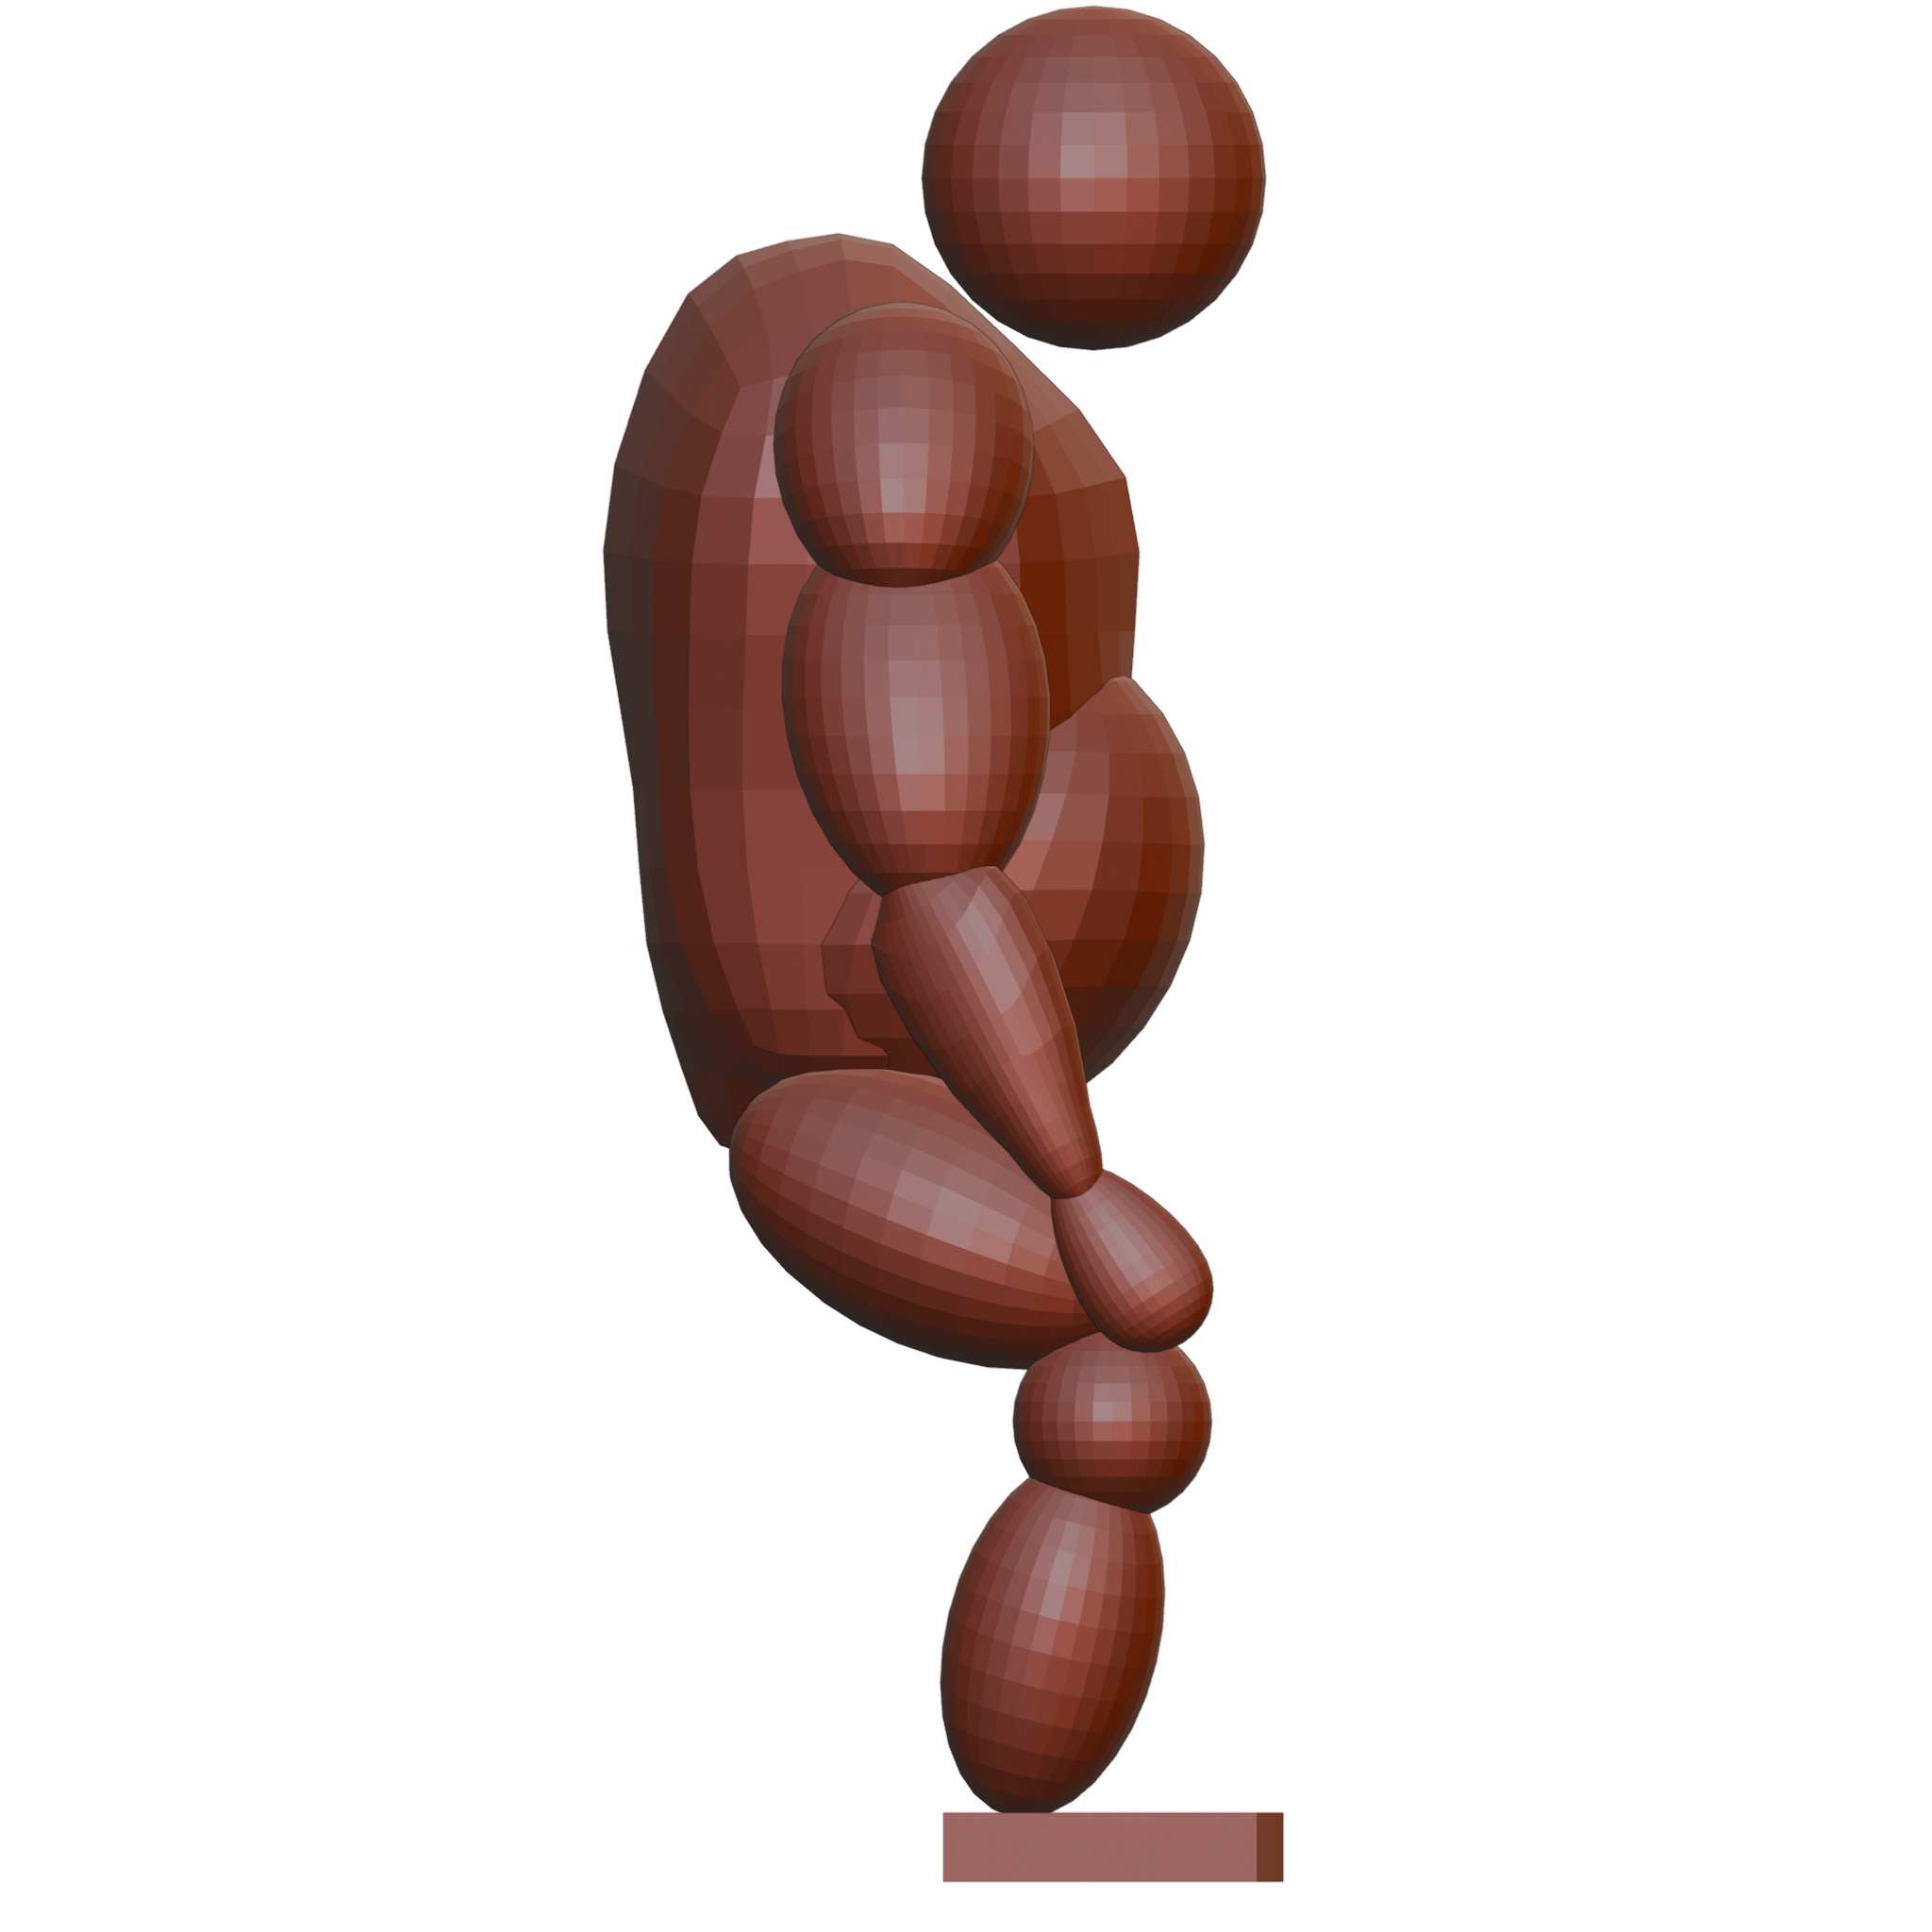
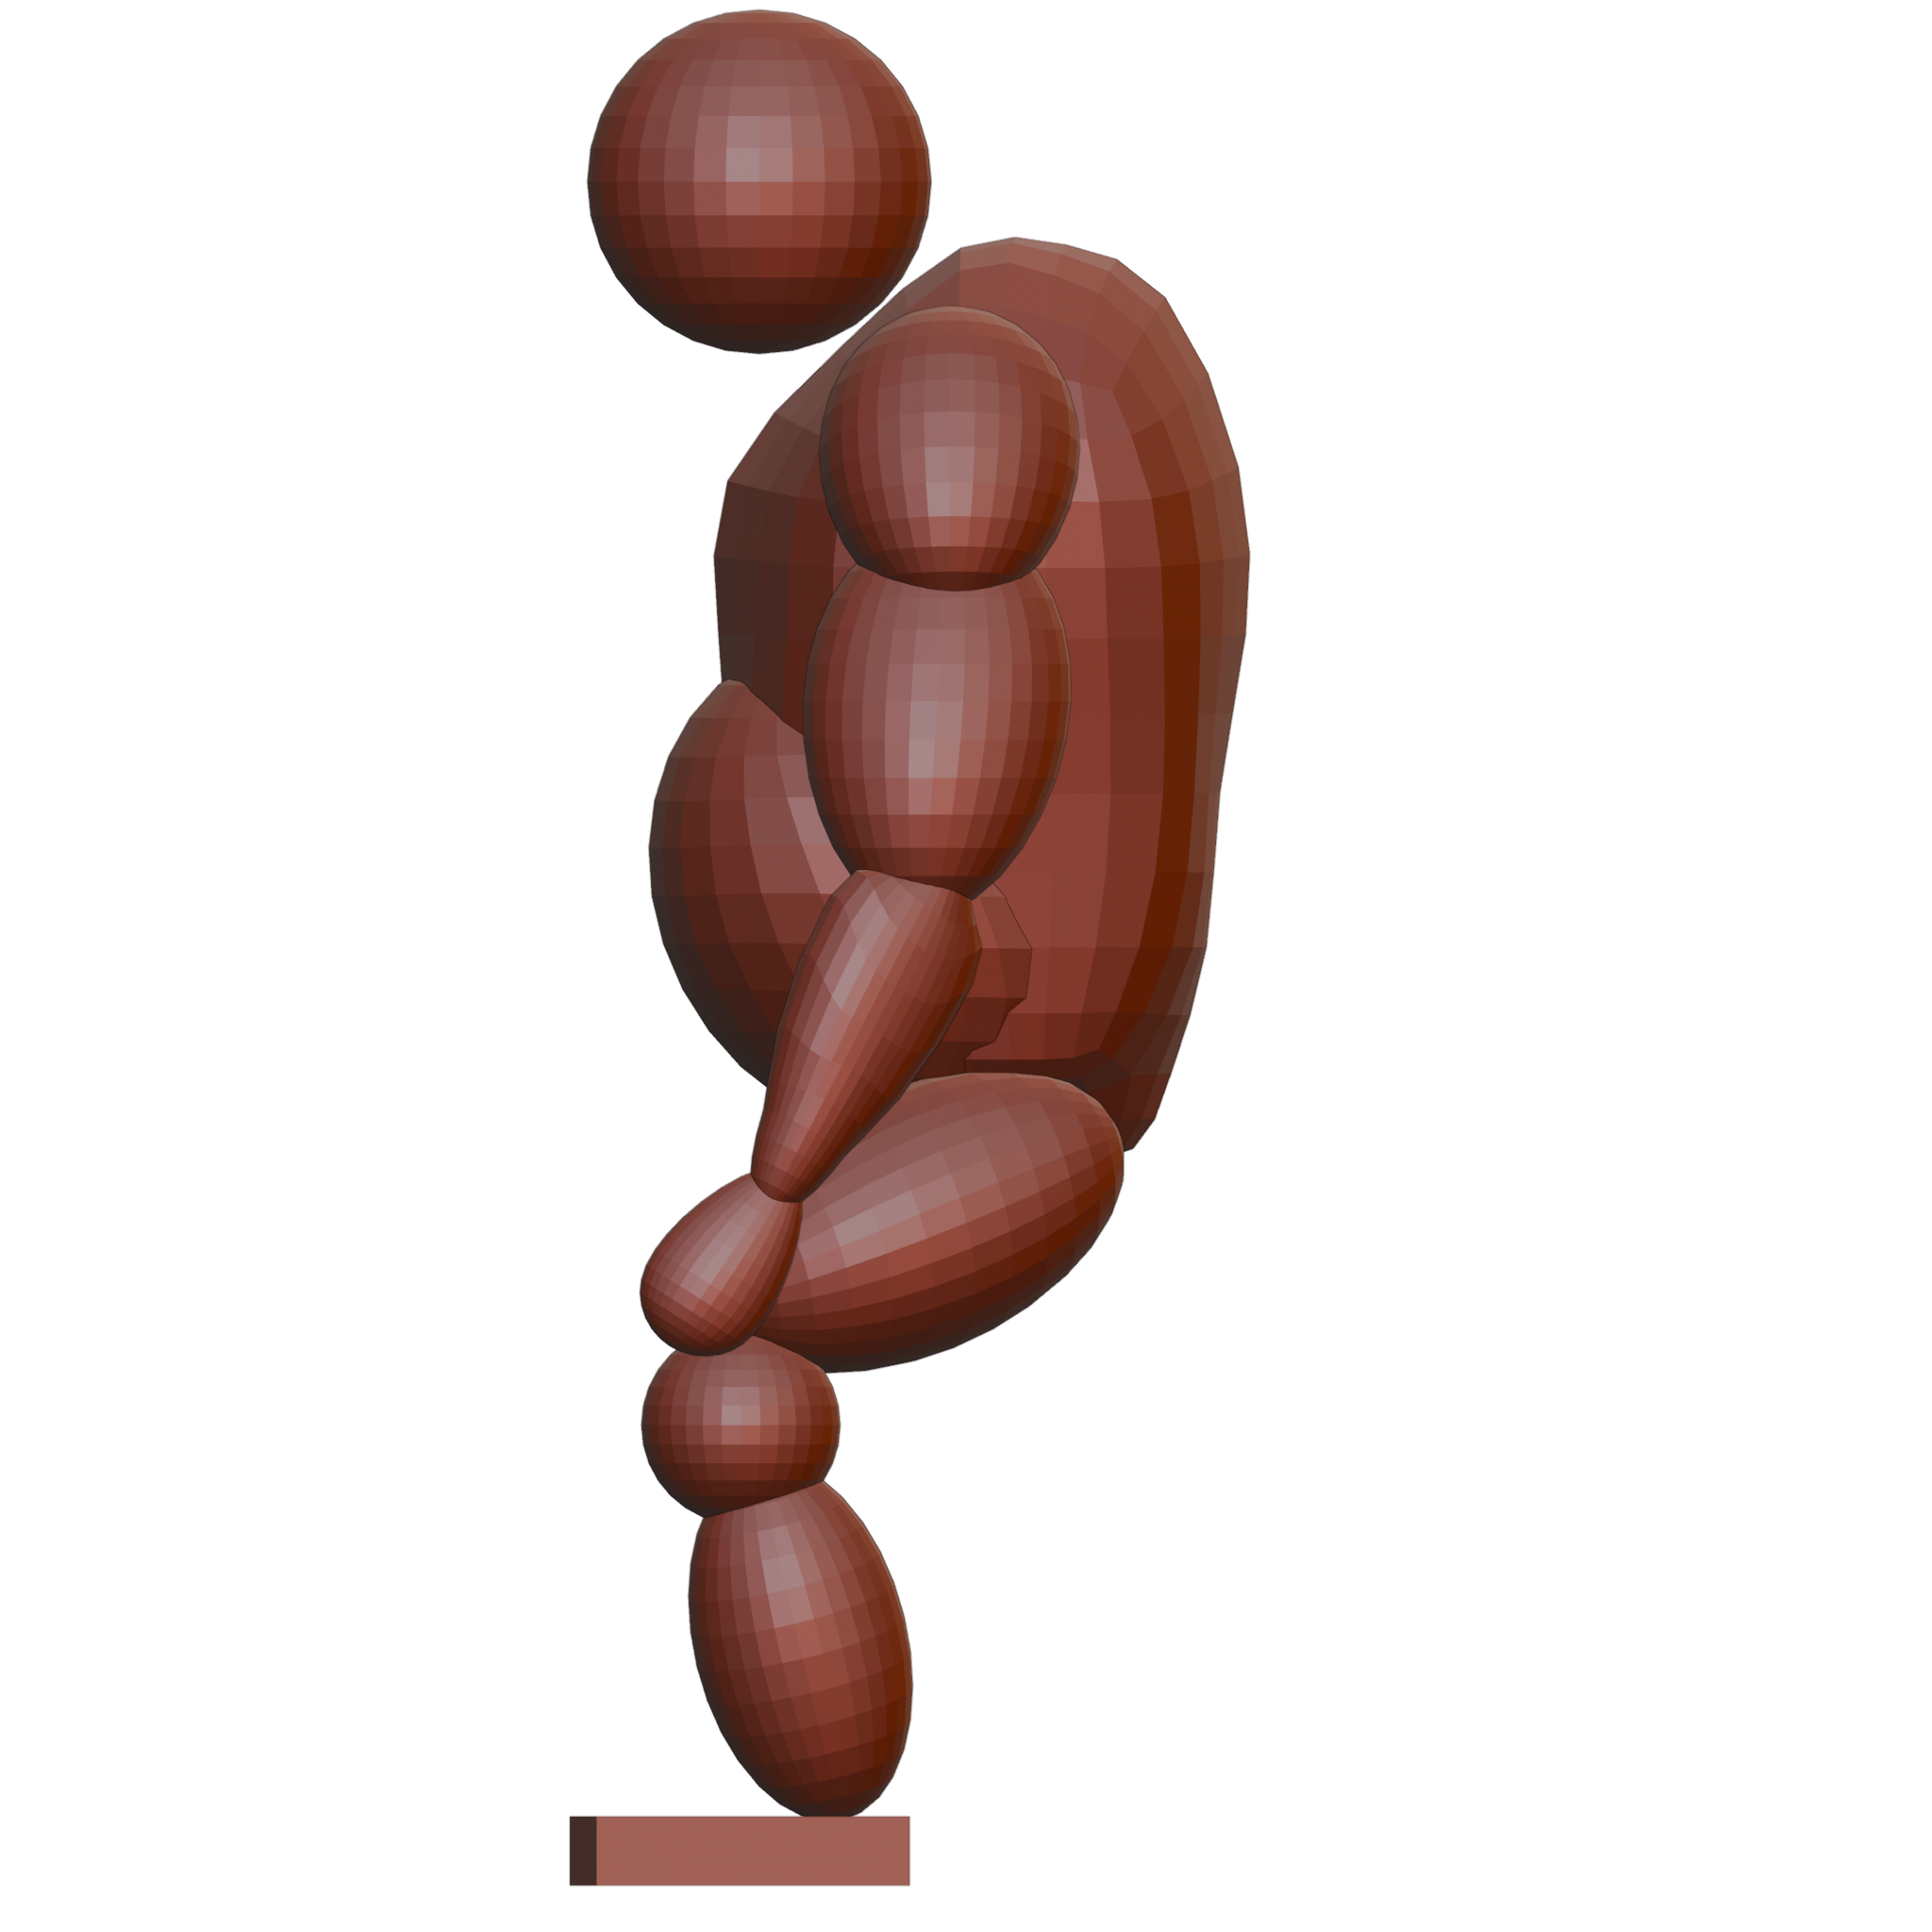
I used the re-mesh tool to add more polygons to each body part, which allows for easier sculpting.
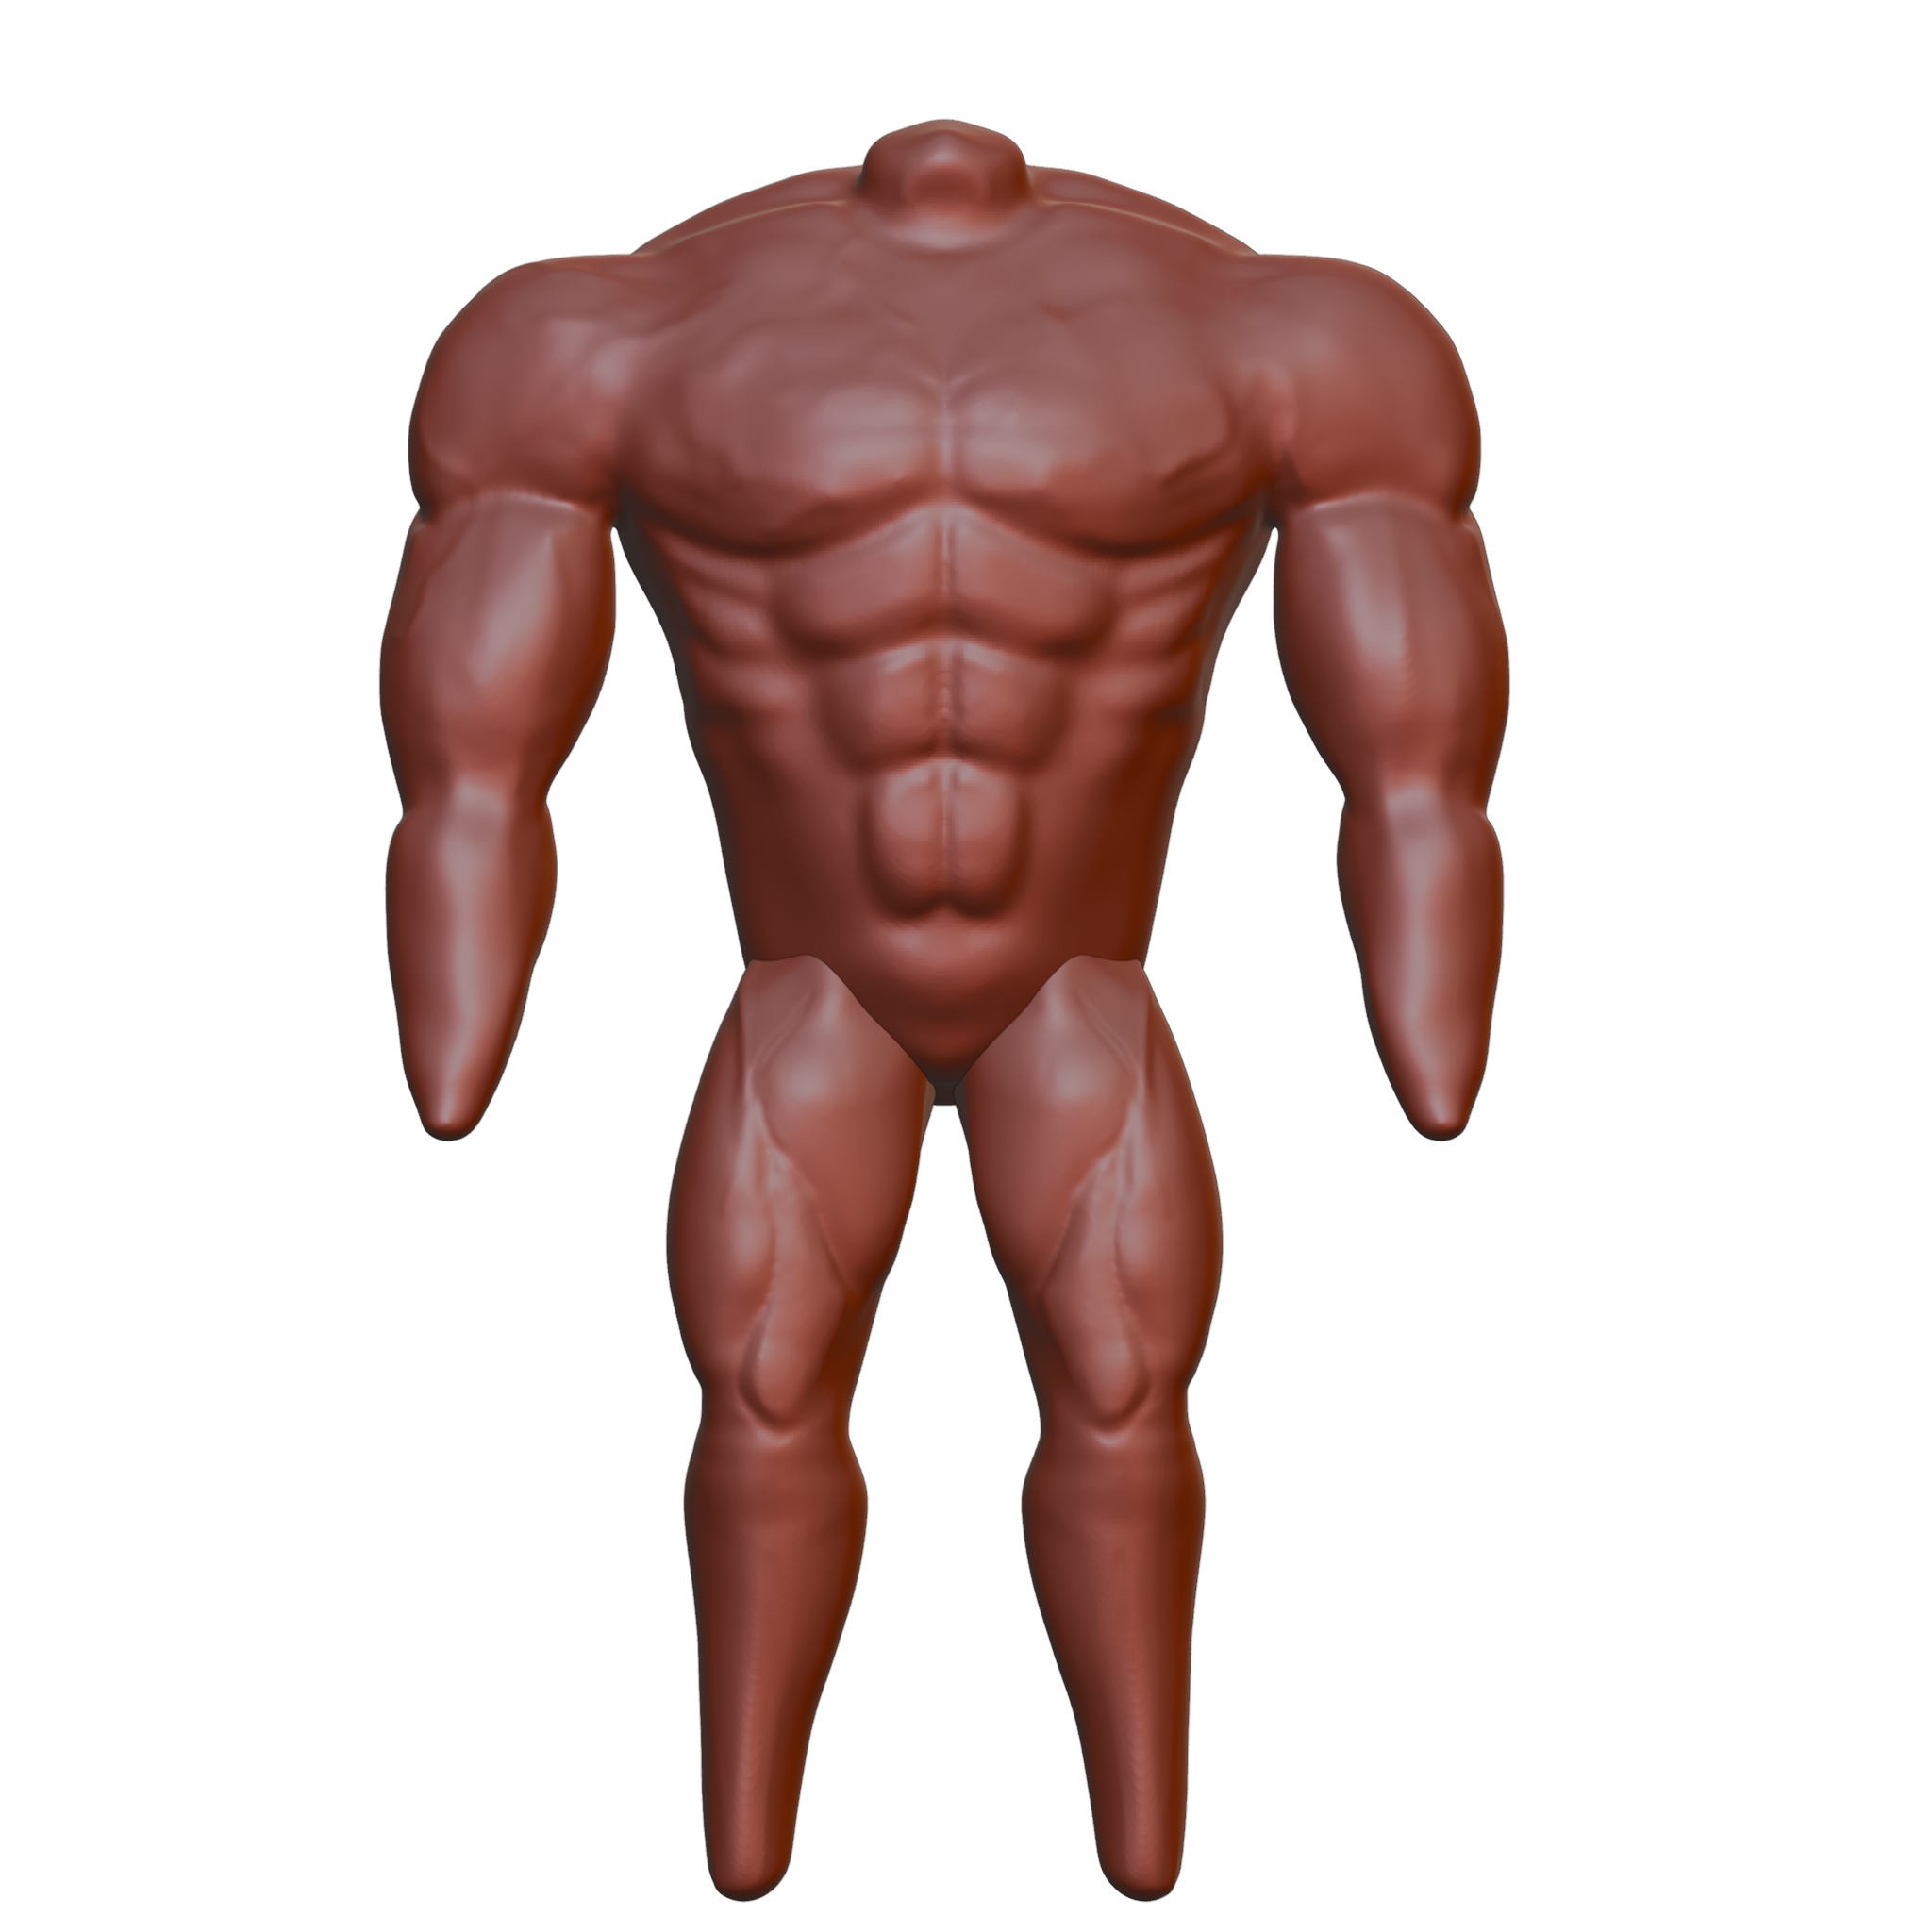
I moved onto more finely sculpting the proportions by using the different grab tools to create a more desired muscle anatomy for the character.
I also used the deflate and crease tools to create light definition between the muscles. I inflated the stomach, while adding very faint abdominal muscles,
and used the scrape, grab, inflate and crease tools to create a slightly toned upper chest.
Using the same tools, I created arms with a
subtle definition between the bicep and triceps muscles with slightly more definition in the lateral shoulder muscles. Additionally,
I thickened the forearms as warrior characters would have this feature from constant swinging of heavy weaponry.
I used the same tools to create the legs; however, I decided to include more toned muscles, specifically around the knees as this
character would be familiar with carrying heavy armour and equipment over long periods of time. Lastly, I used a free reference image (Mugurel, 2021)
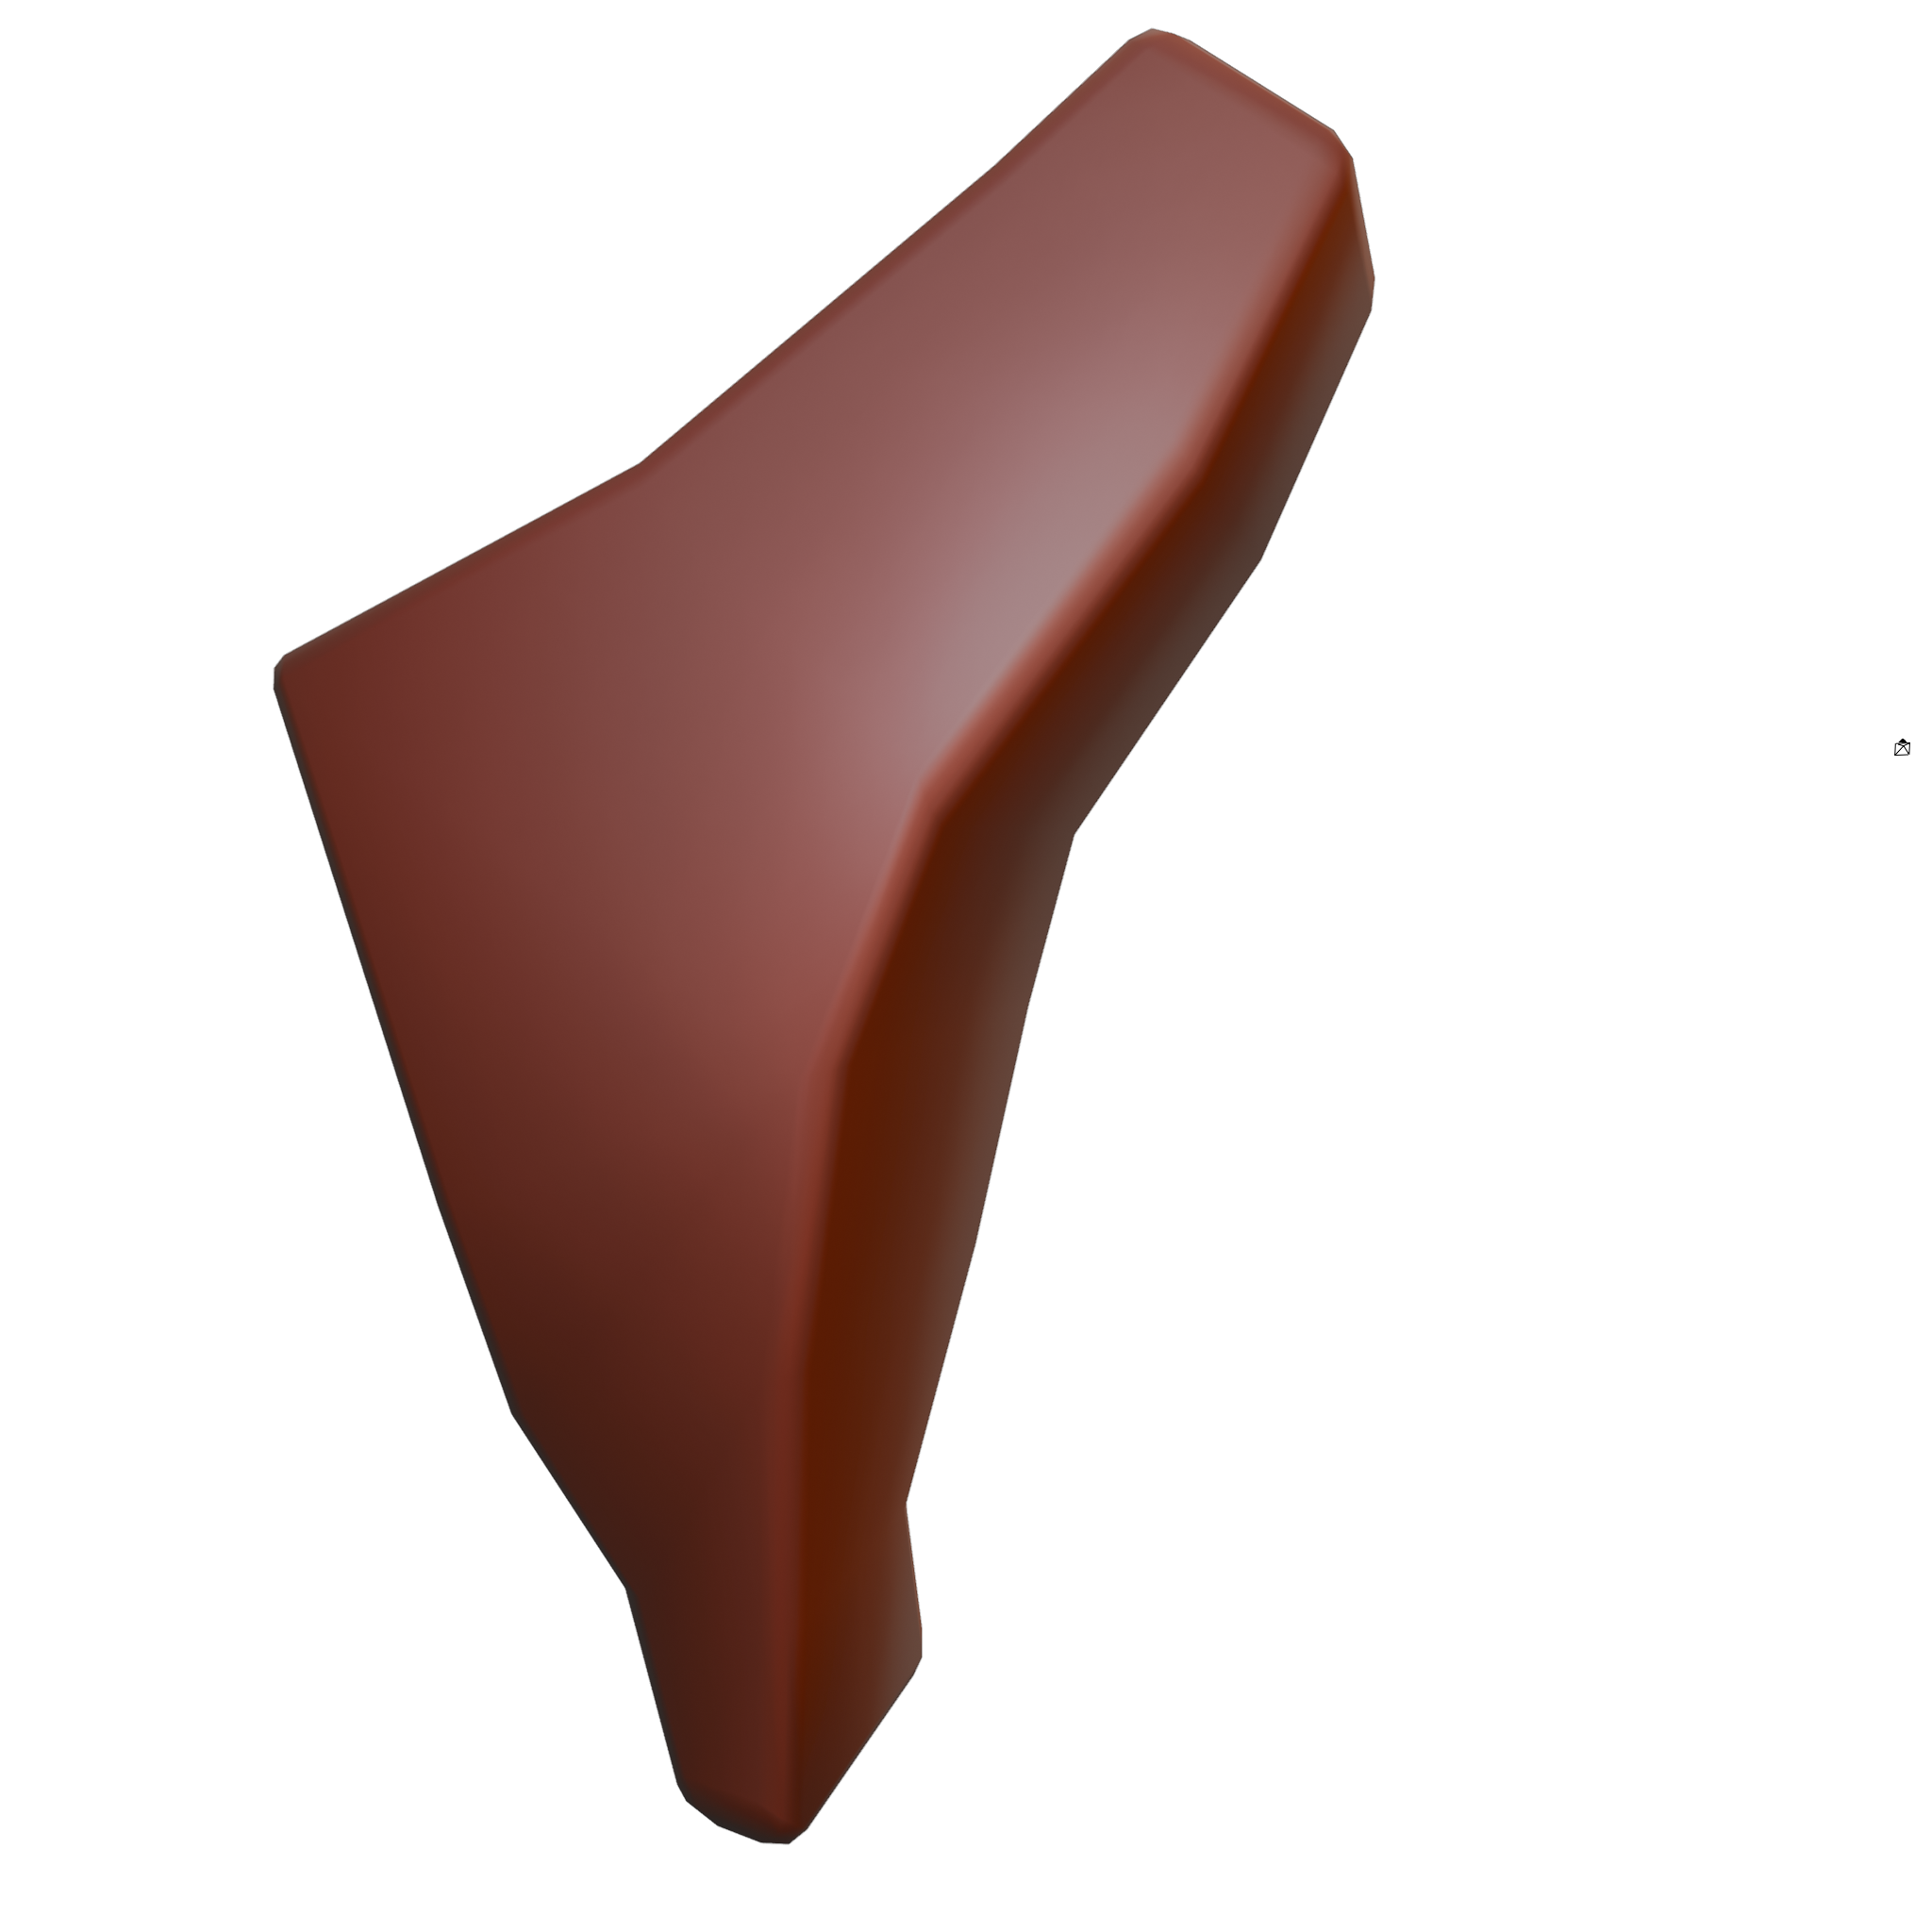
to create a block out for the hands, before adding extra clay and sculpting creases into the fingers and palms.
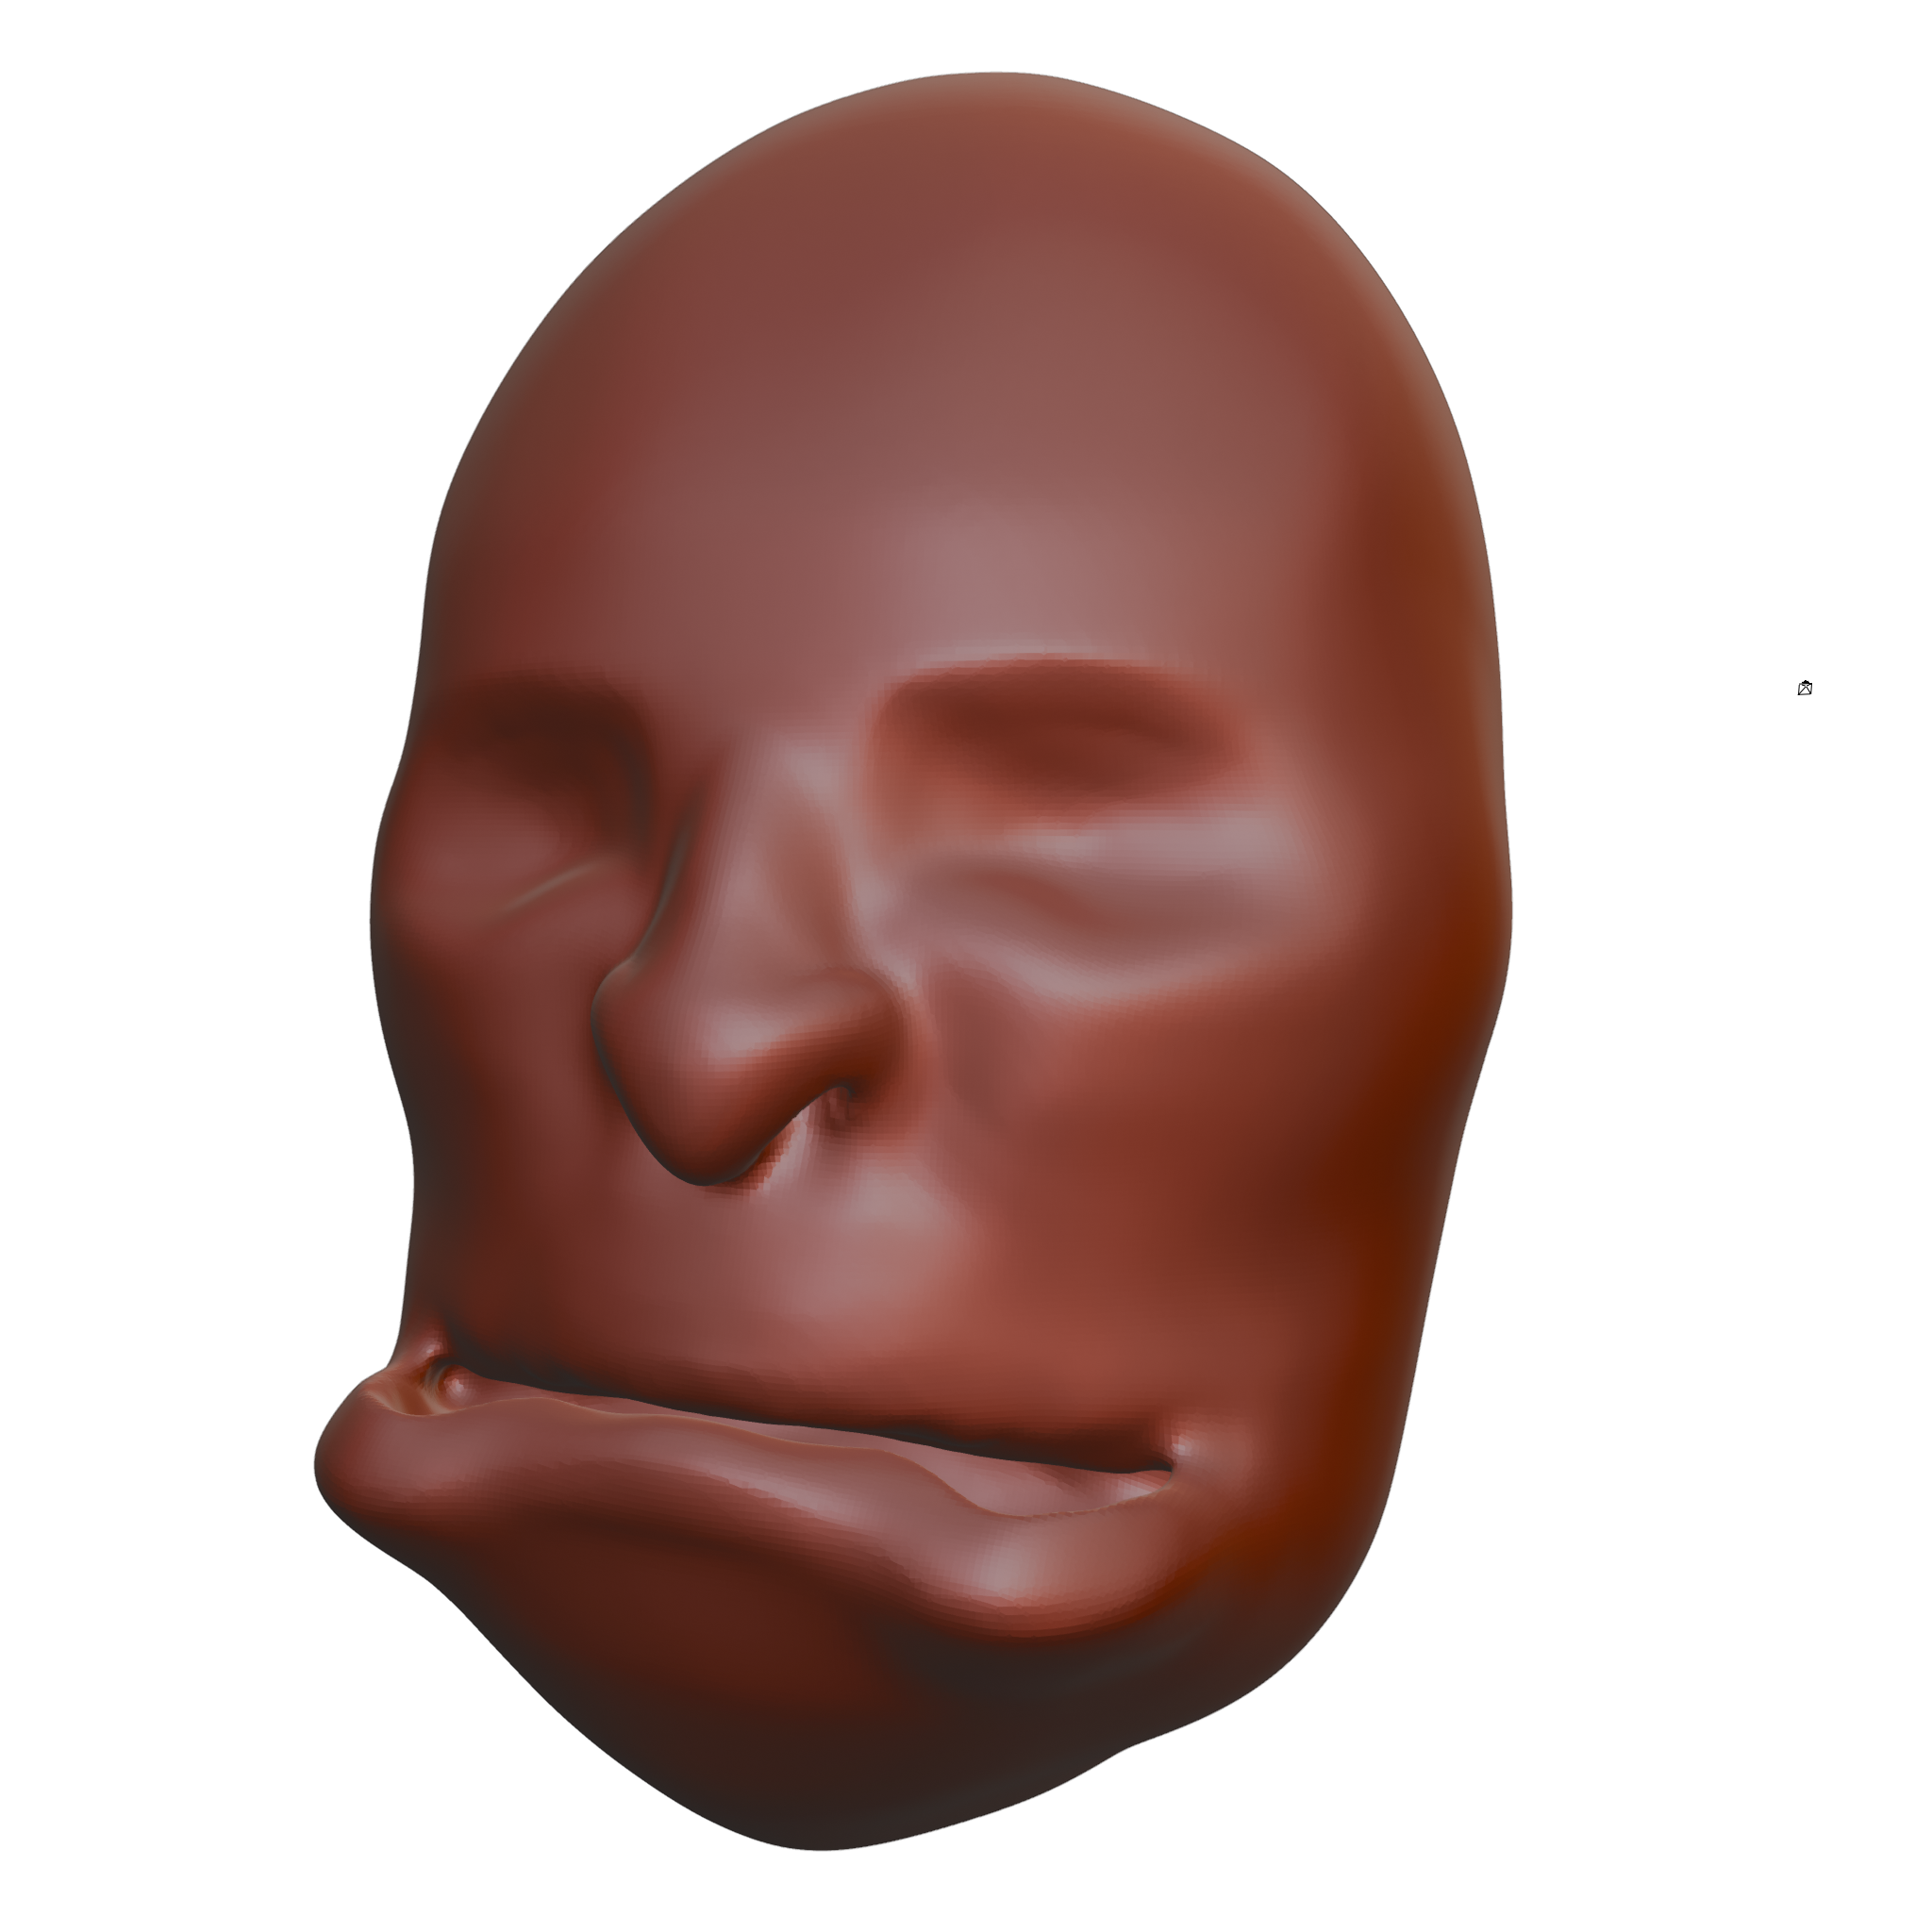
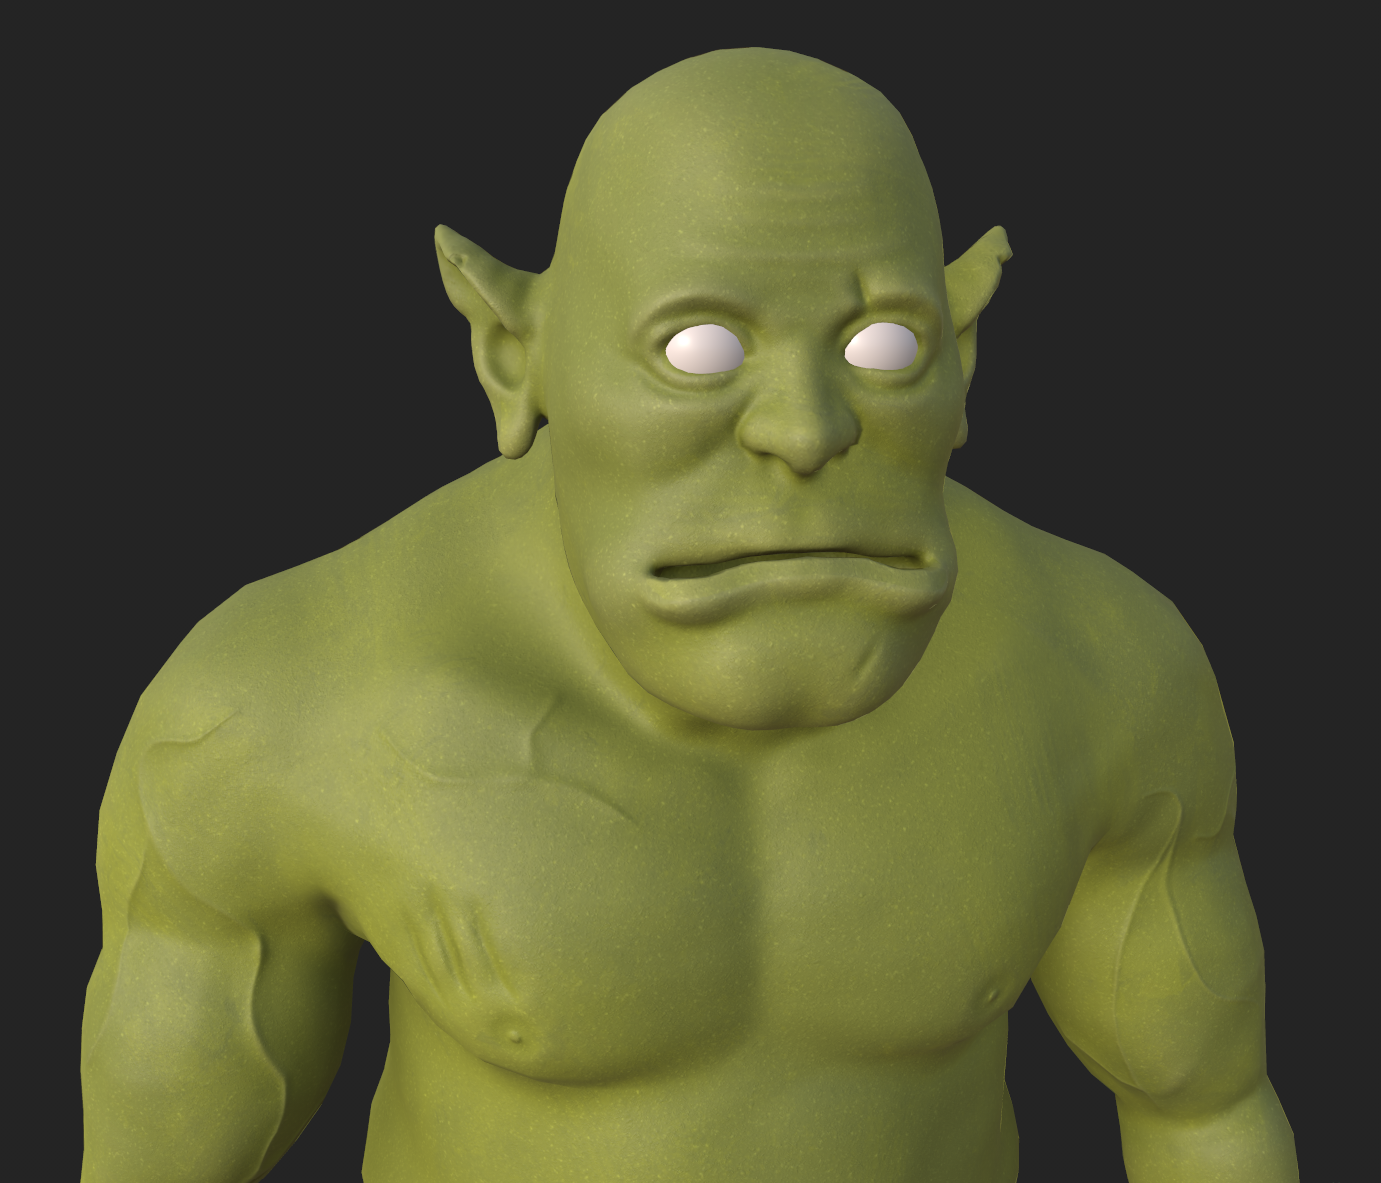
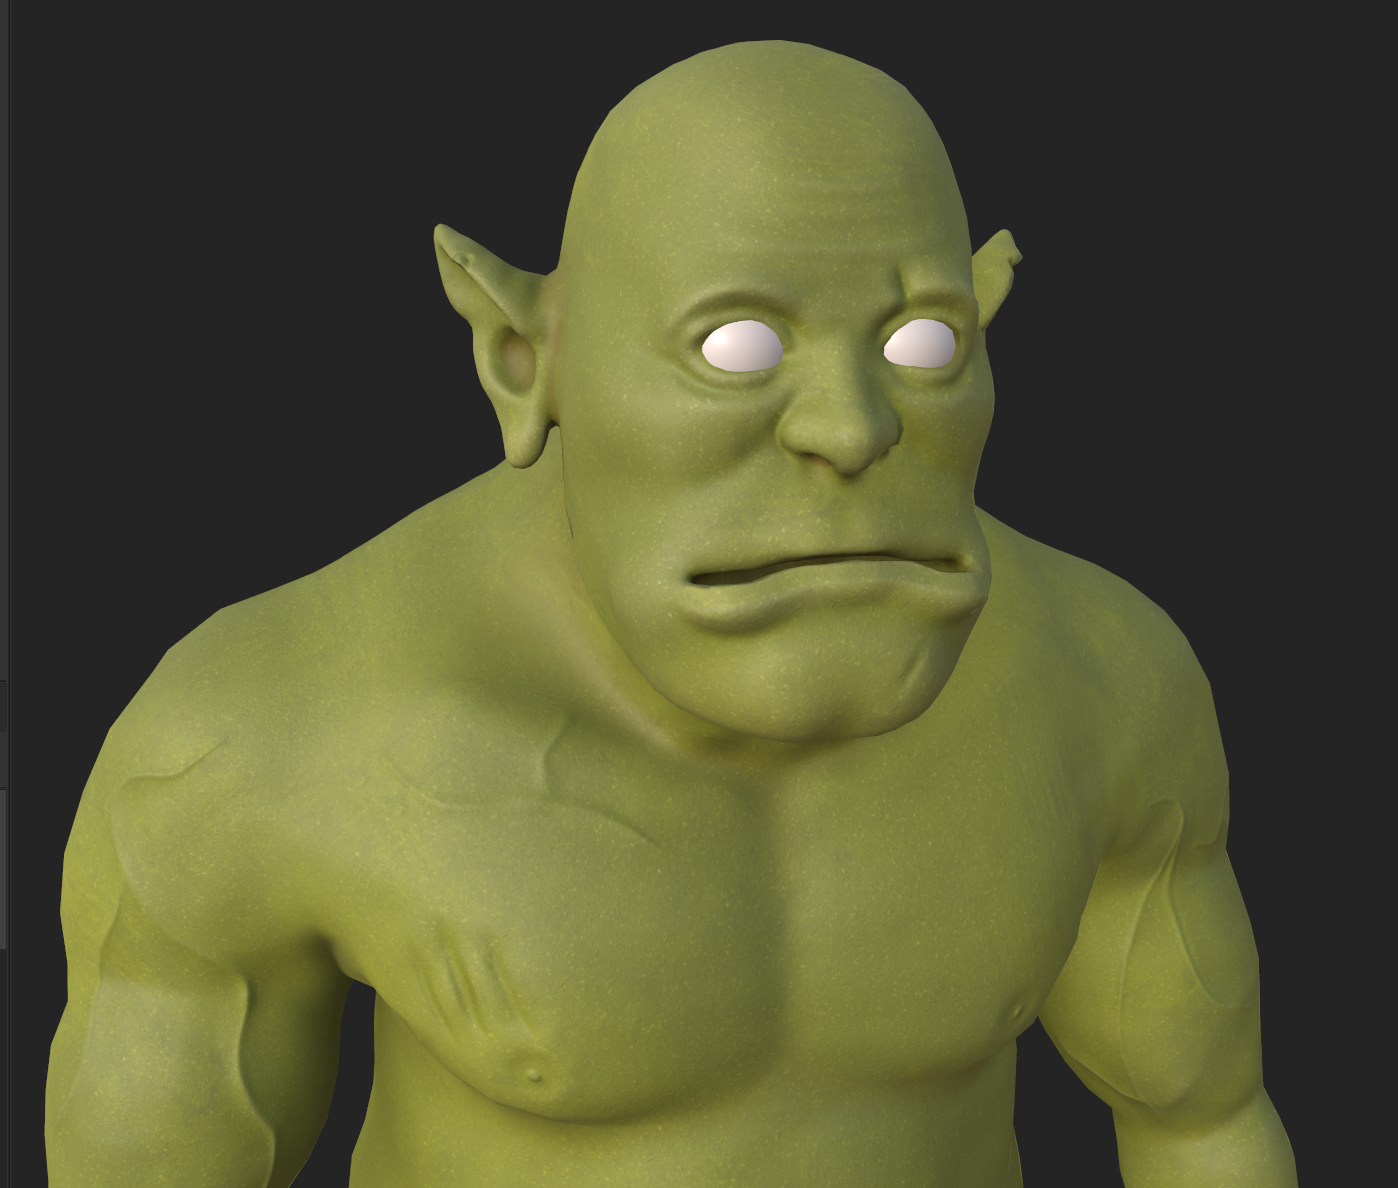
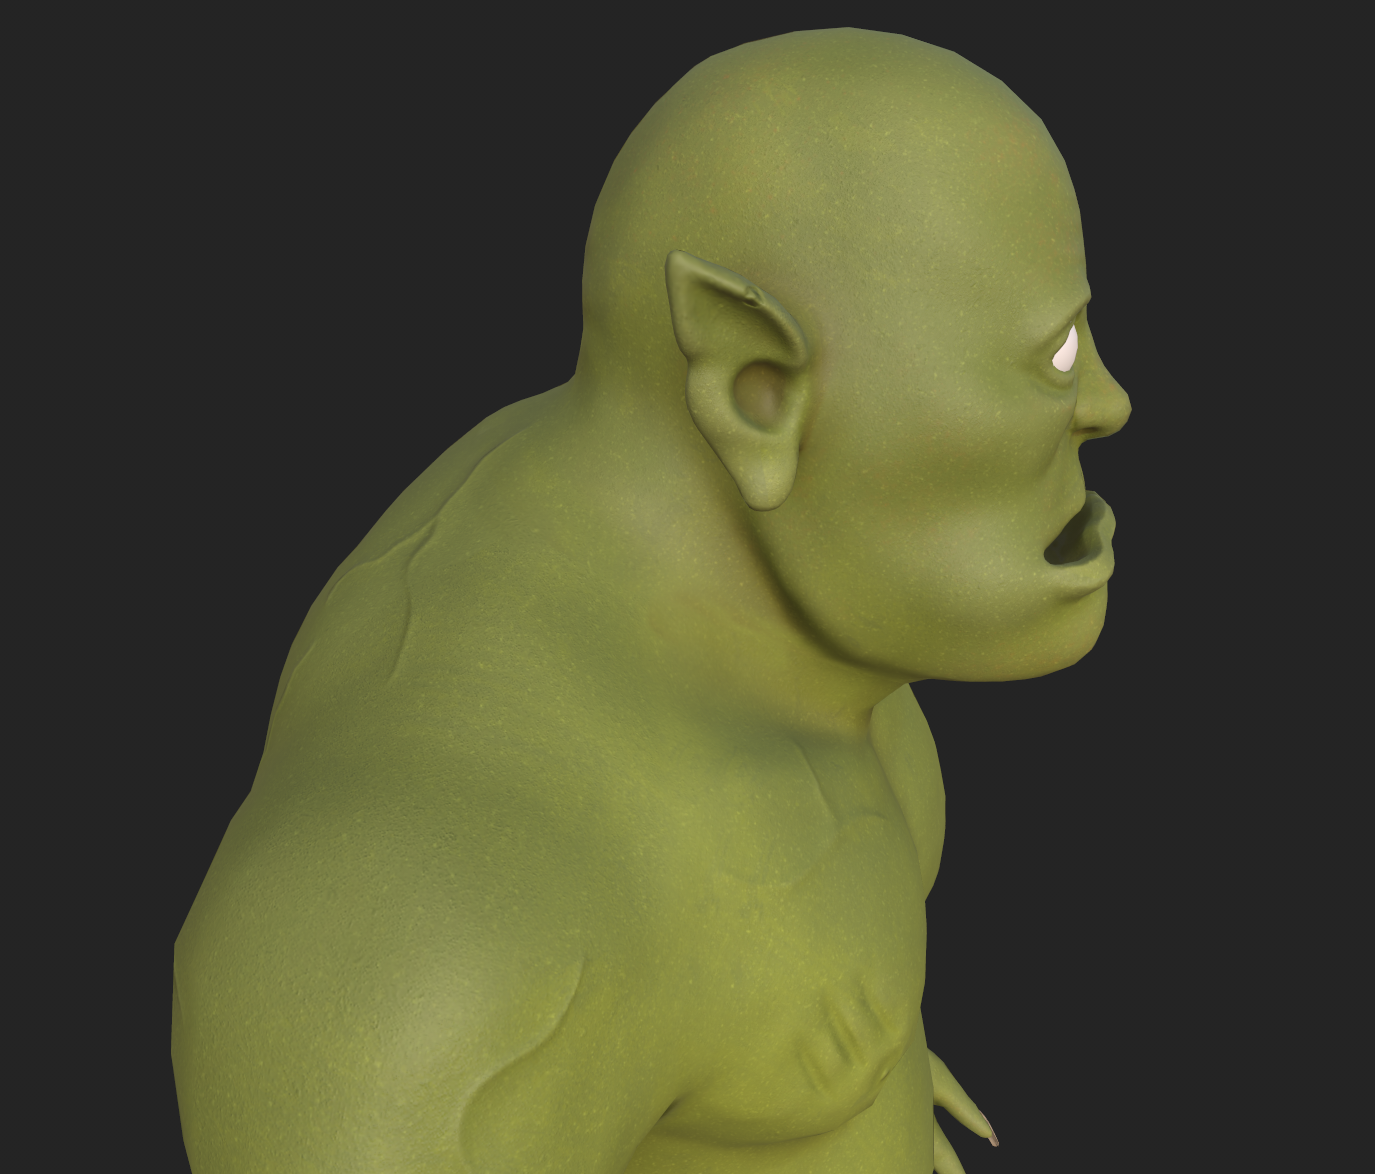
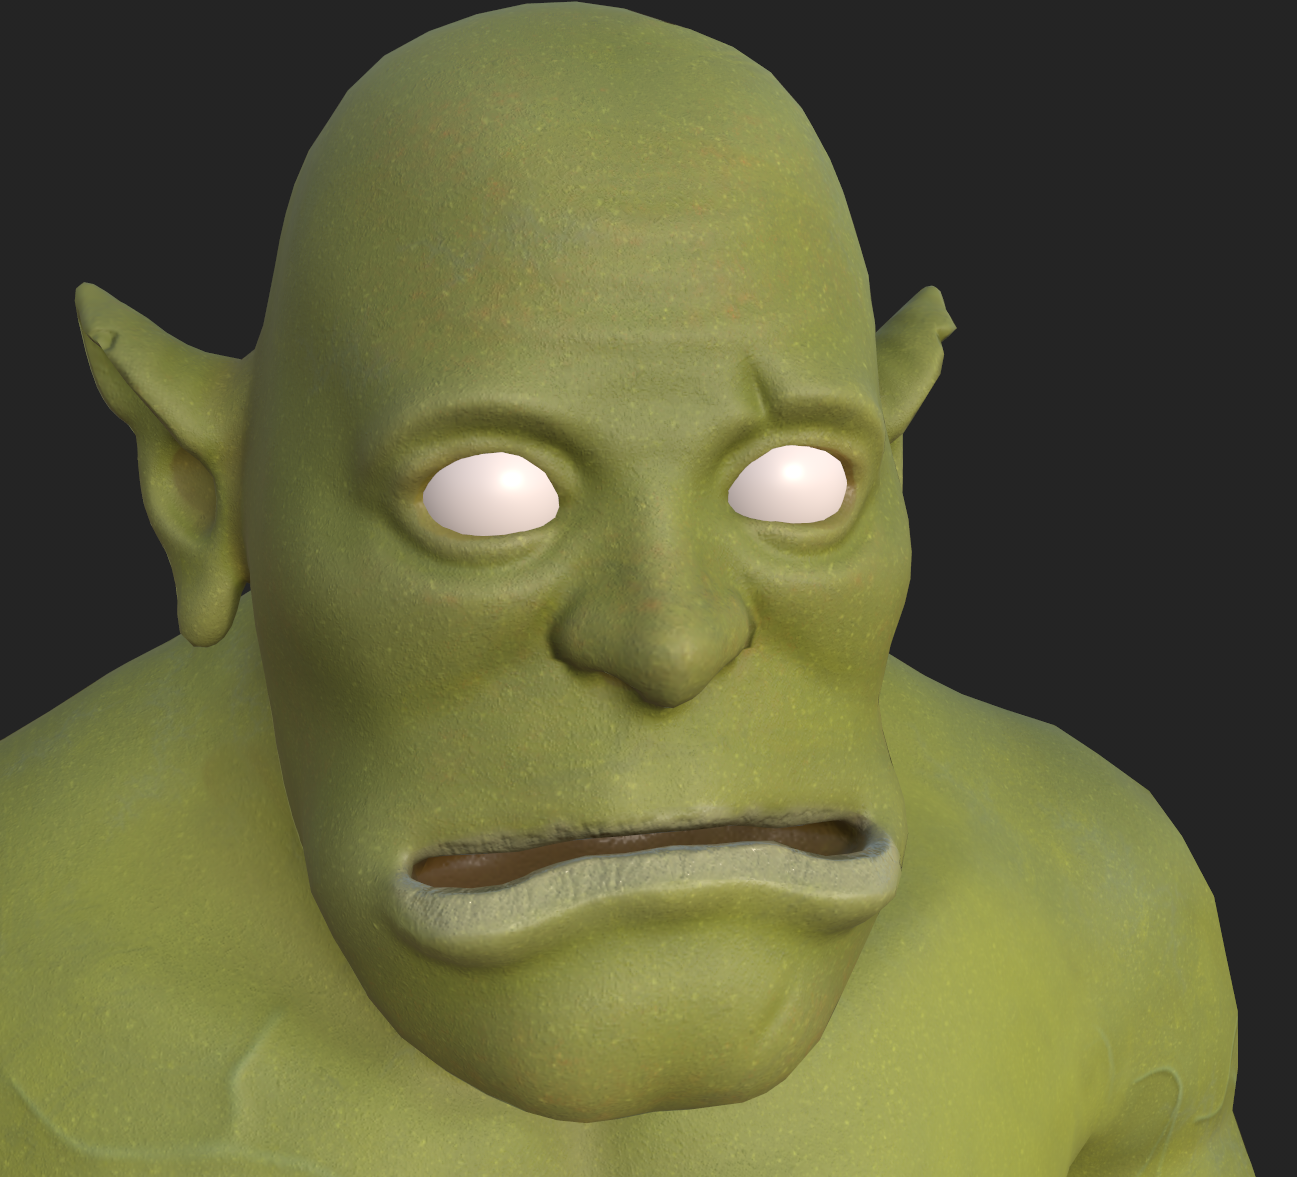
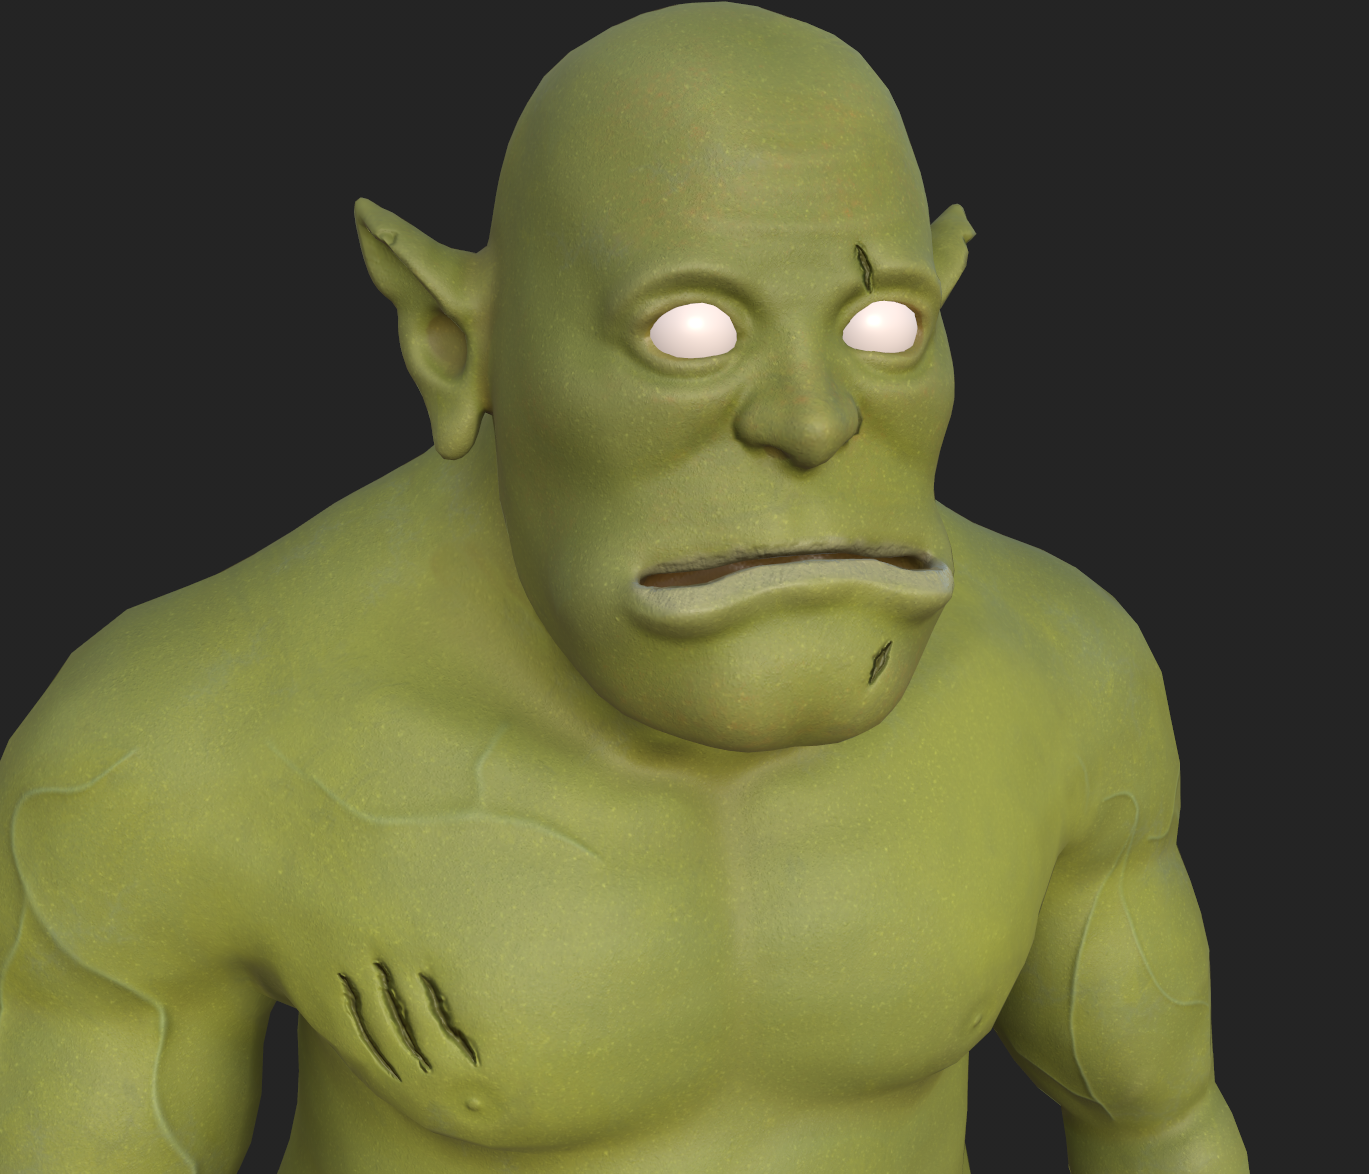
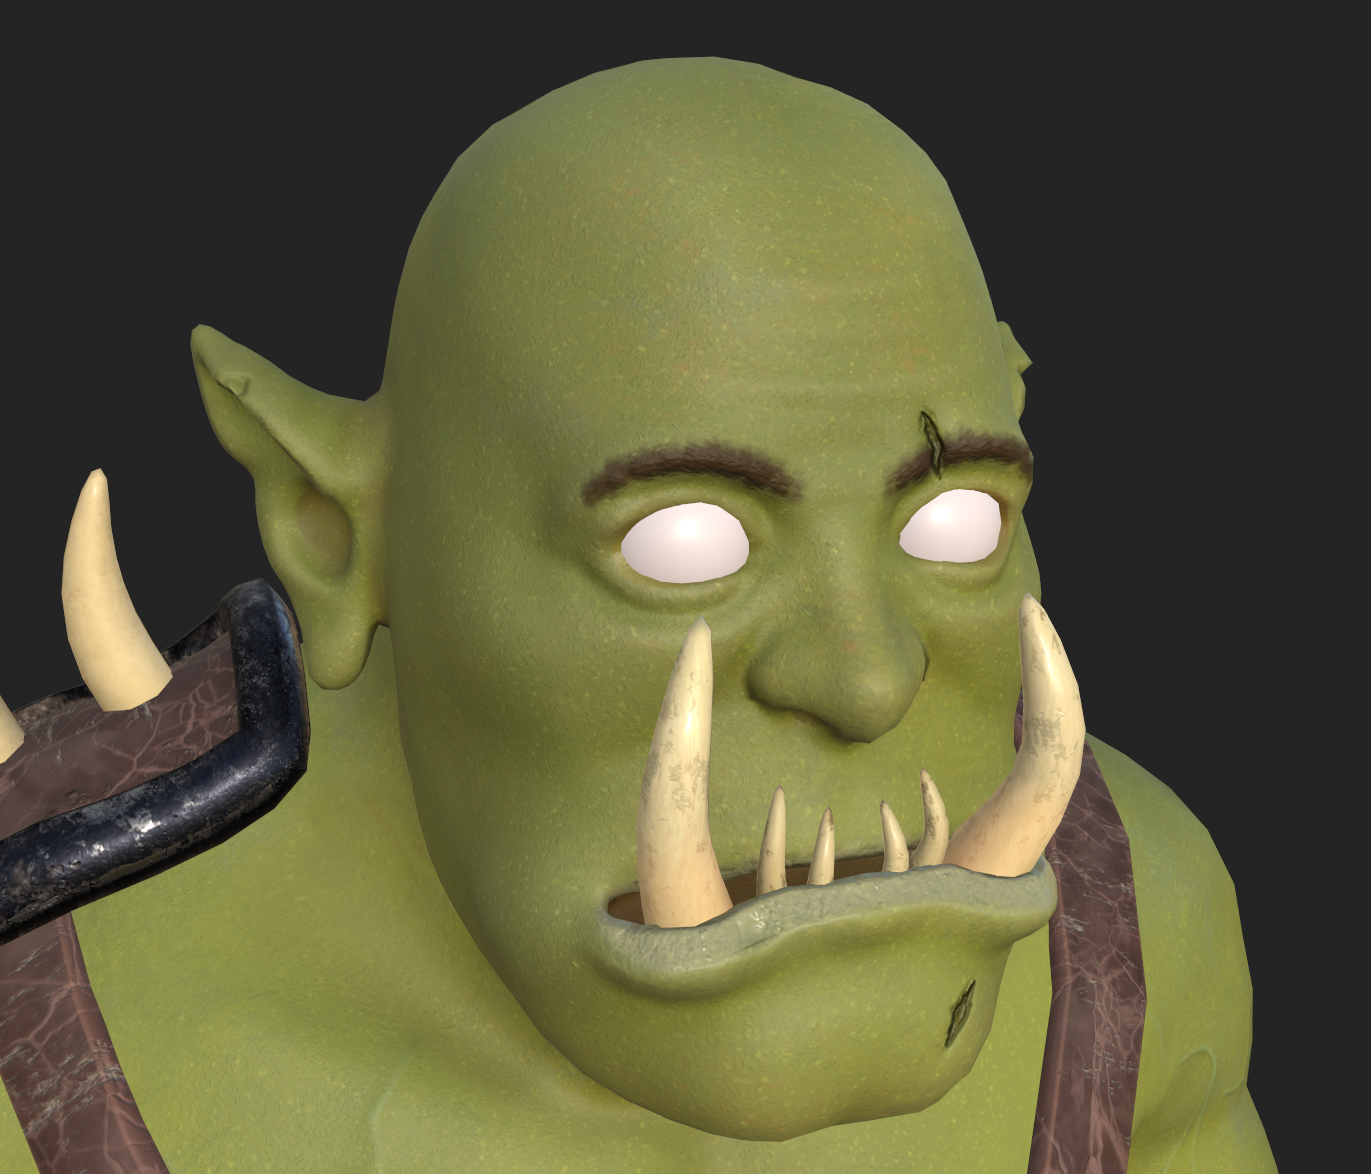
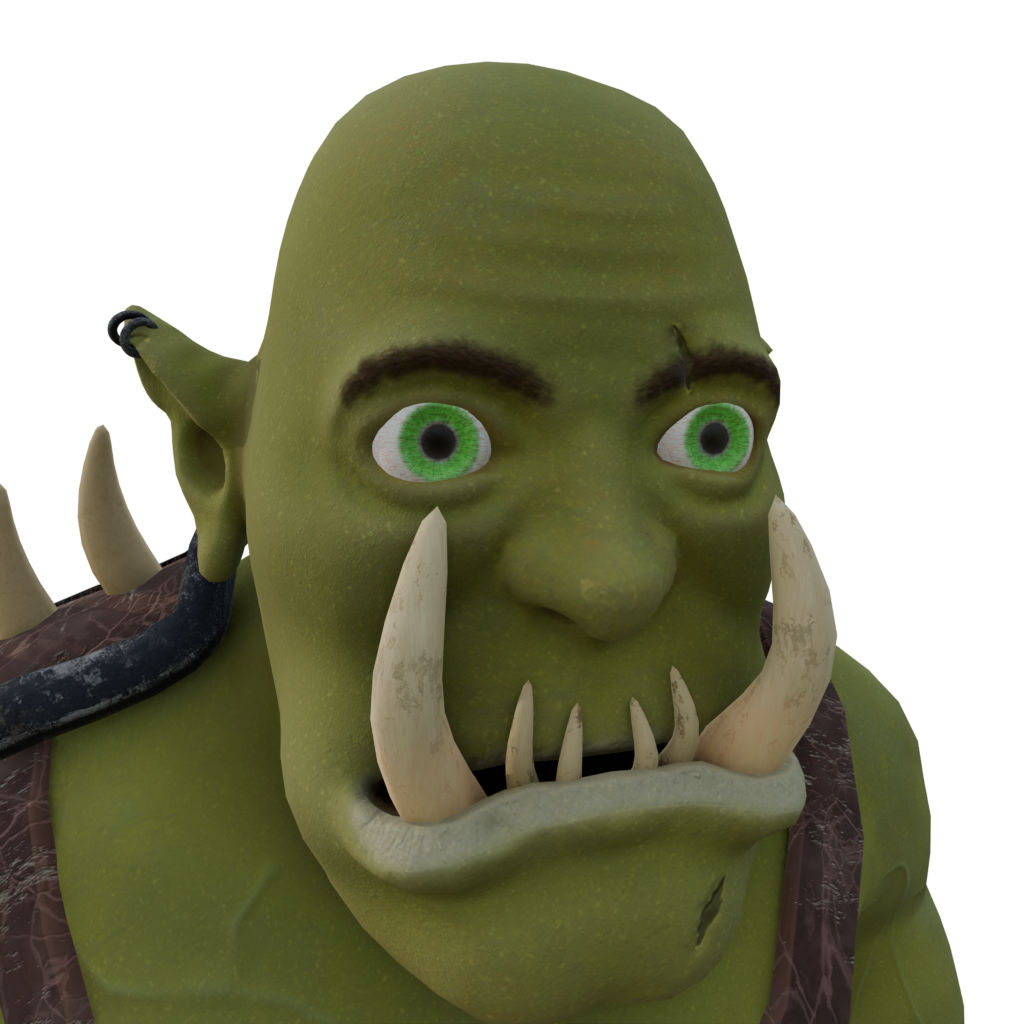
While modelling the head, I worked from multiple different objects that created a skull shape with a defined jaw line, eye sockets, nose bridge and cheek bones. I got this starting point from an online tutorial (PixelicaCG, 2022) because I struggled to create a head shape that fit my expectations. Next, I started adding skin to the shape using the clay tools to reach a more desirable look. As this was an orc character, I included stereotypical design features such as a larger mouth, underbite and a lower hanging chin to make room for large tusk-like teeth. I followed 3D model references of heads and facial features (Damiwar, 2024) to create realistic facial shapes for the nose, cheek bones, eye sockets and eye ridges.

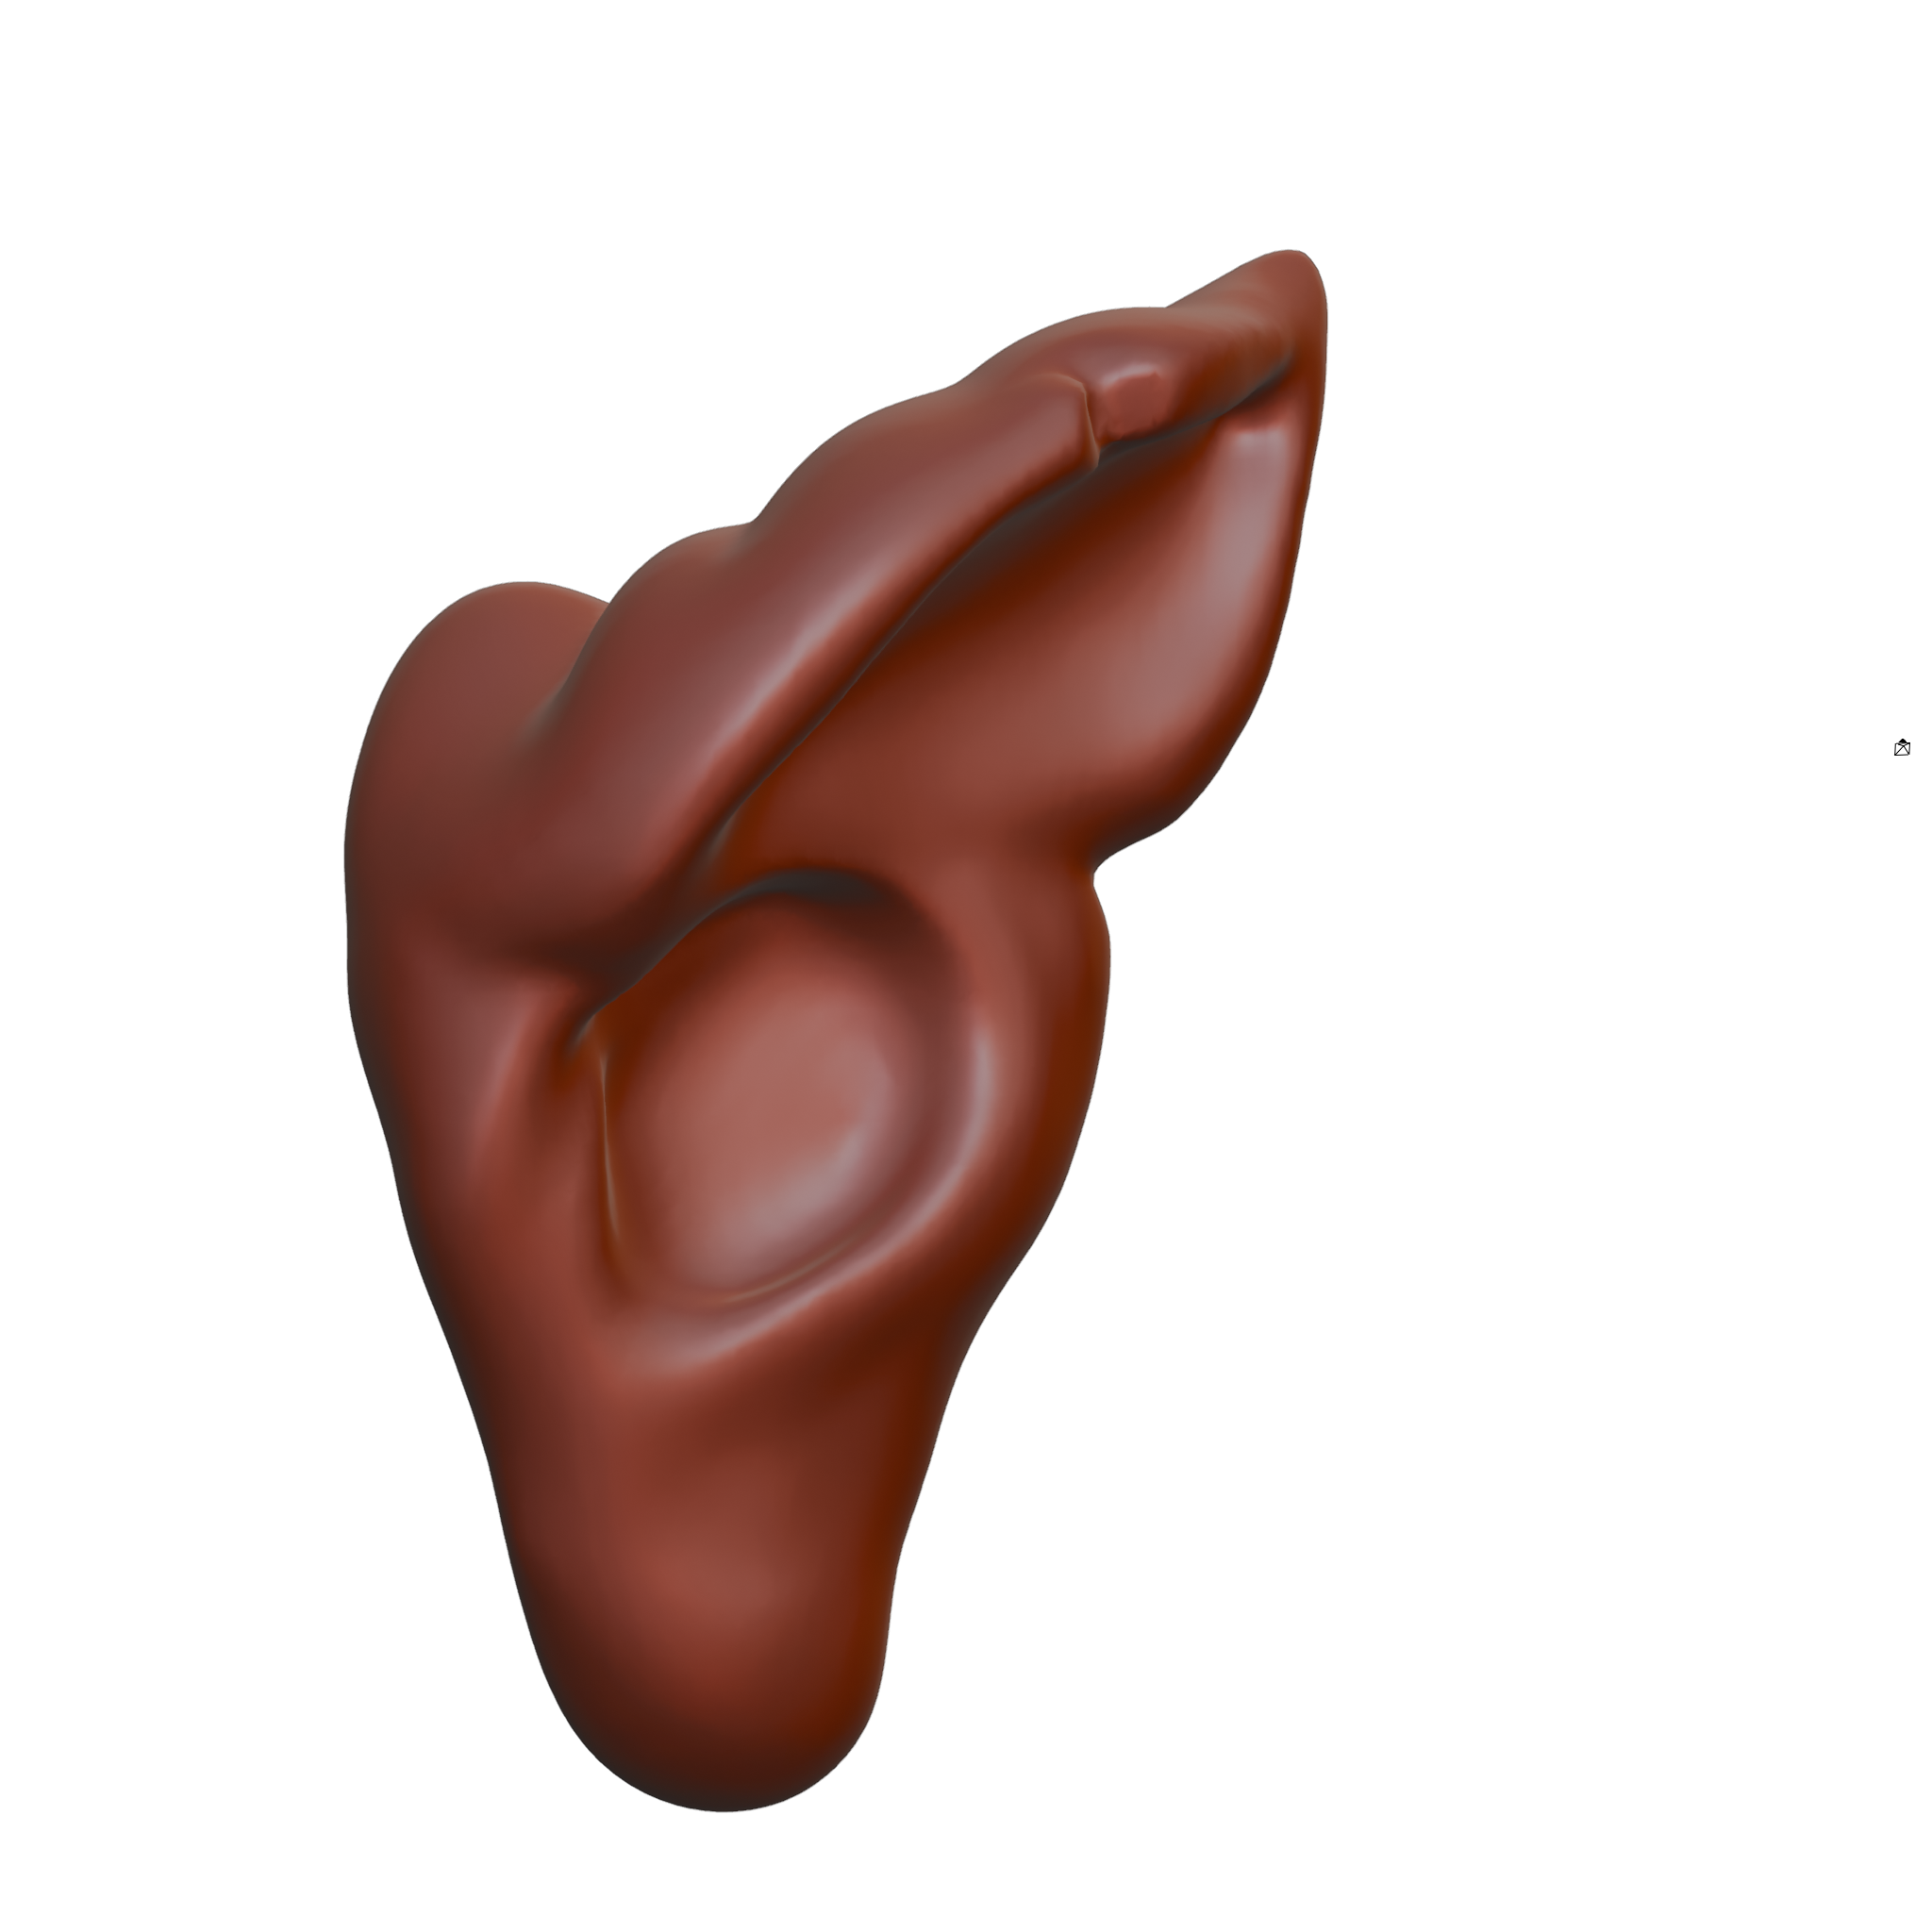
Next, I worked from a cube, shaping it into a pointed ear shape, by using multiple loops and proportional editing. After re-meshing, I sculpted the details including a cavity for the ear canal, skin wrinkles and a chipped area of skin on the upper ear.
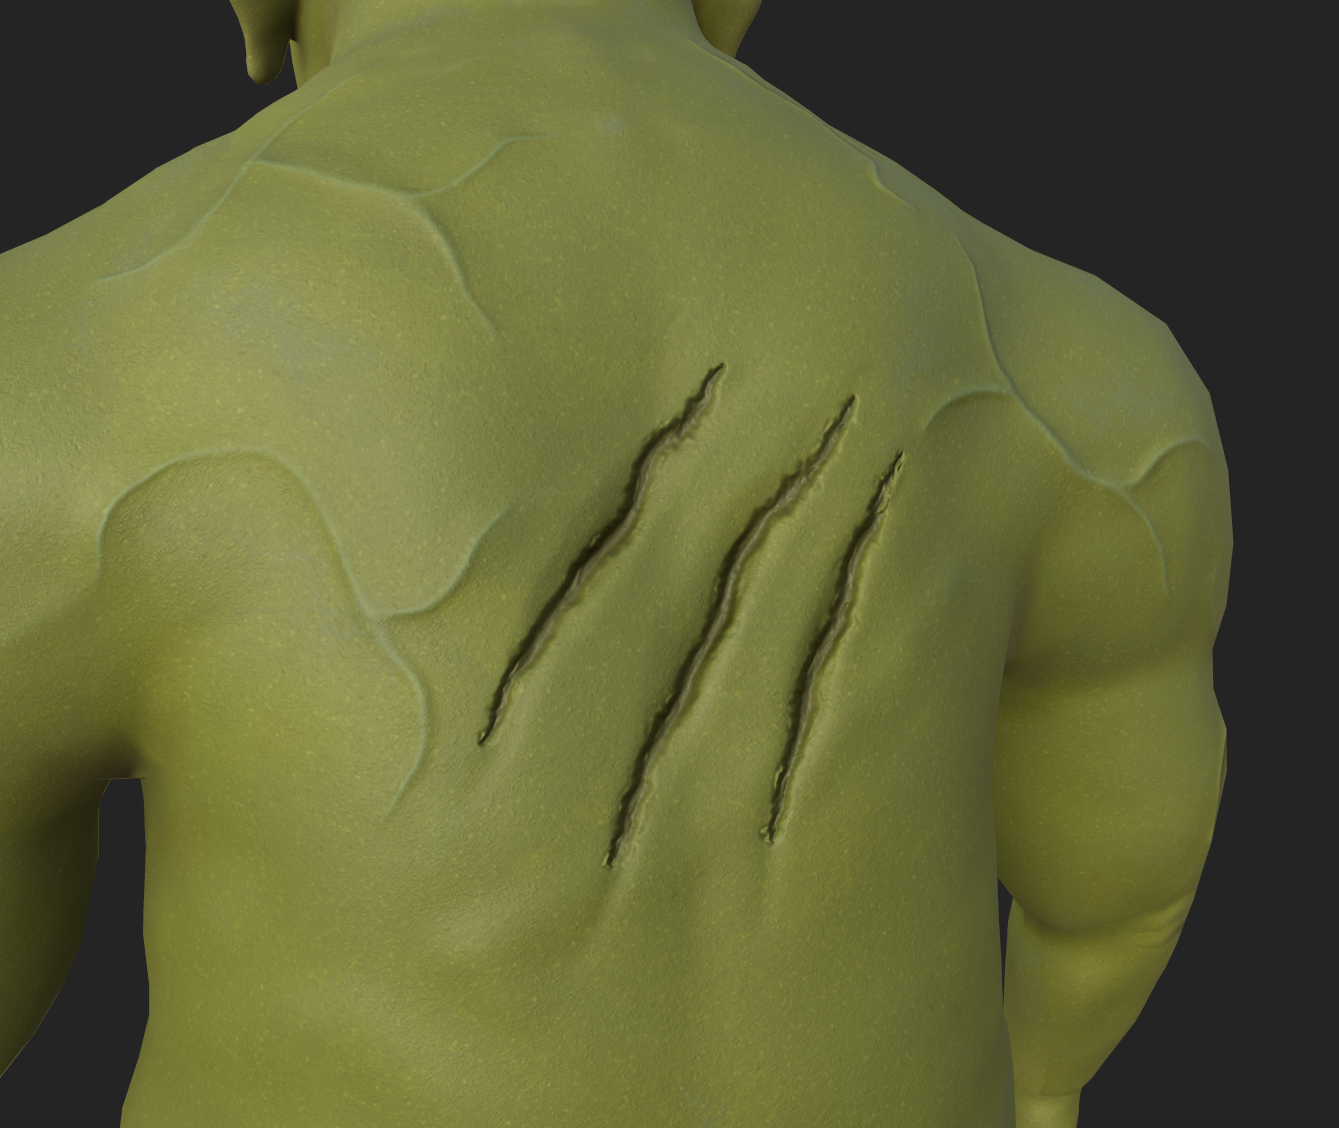
Once the muscle and body proportions had been defined, I started sculpting details into the skin, such as protruding veins and battle scars. In order to sculpt the scars, I used the crease tools to create an initial dent in the skin, then used the clay tools to slightly deepen the wound before finishing with the scrape tool to create sharper edges around the cut. For the veins I simply used the draw tool to create an even thickness vein bump and then used the pinch tool to thin out the ends and intersections of the veins, creating a sharper, more realistic look.
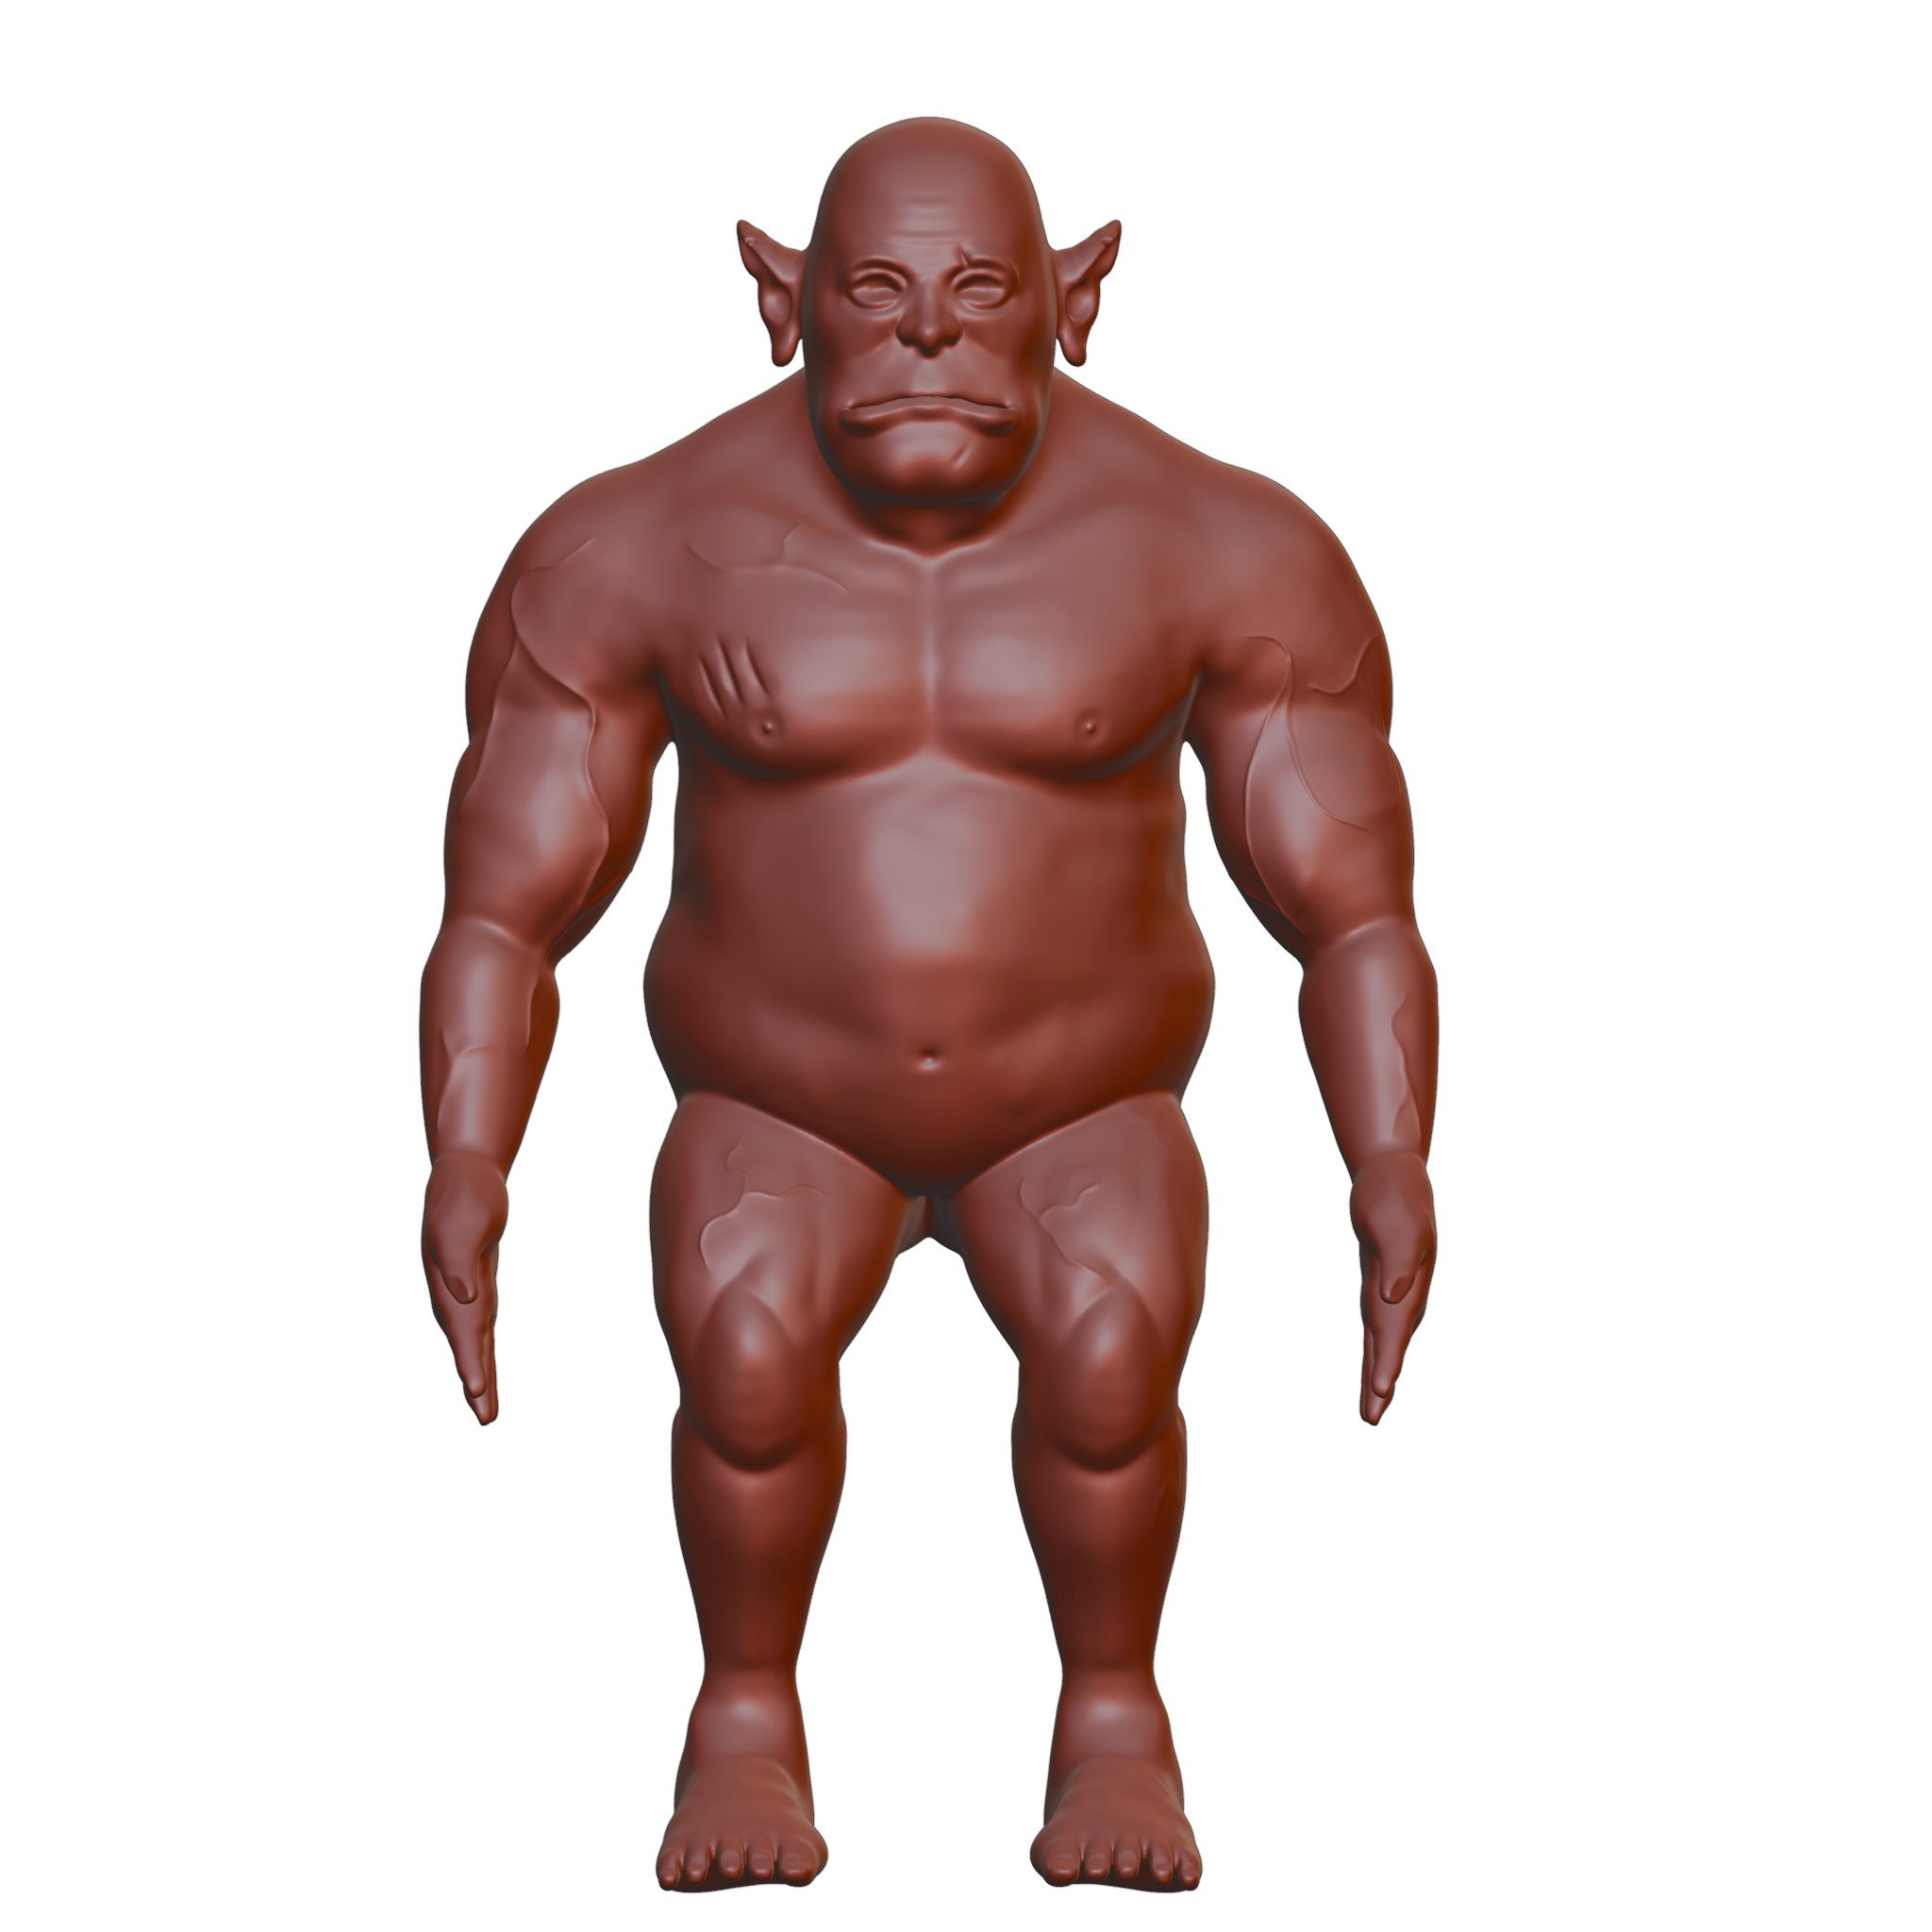
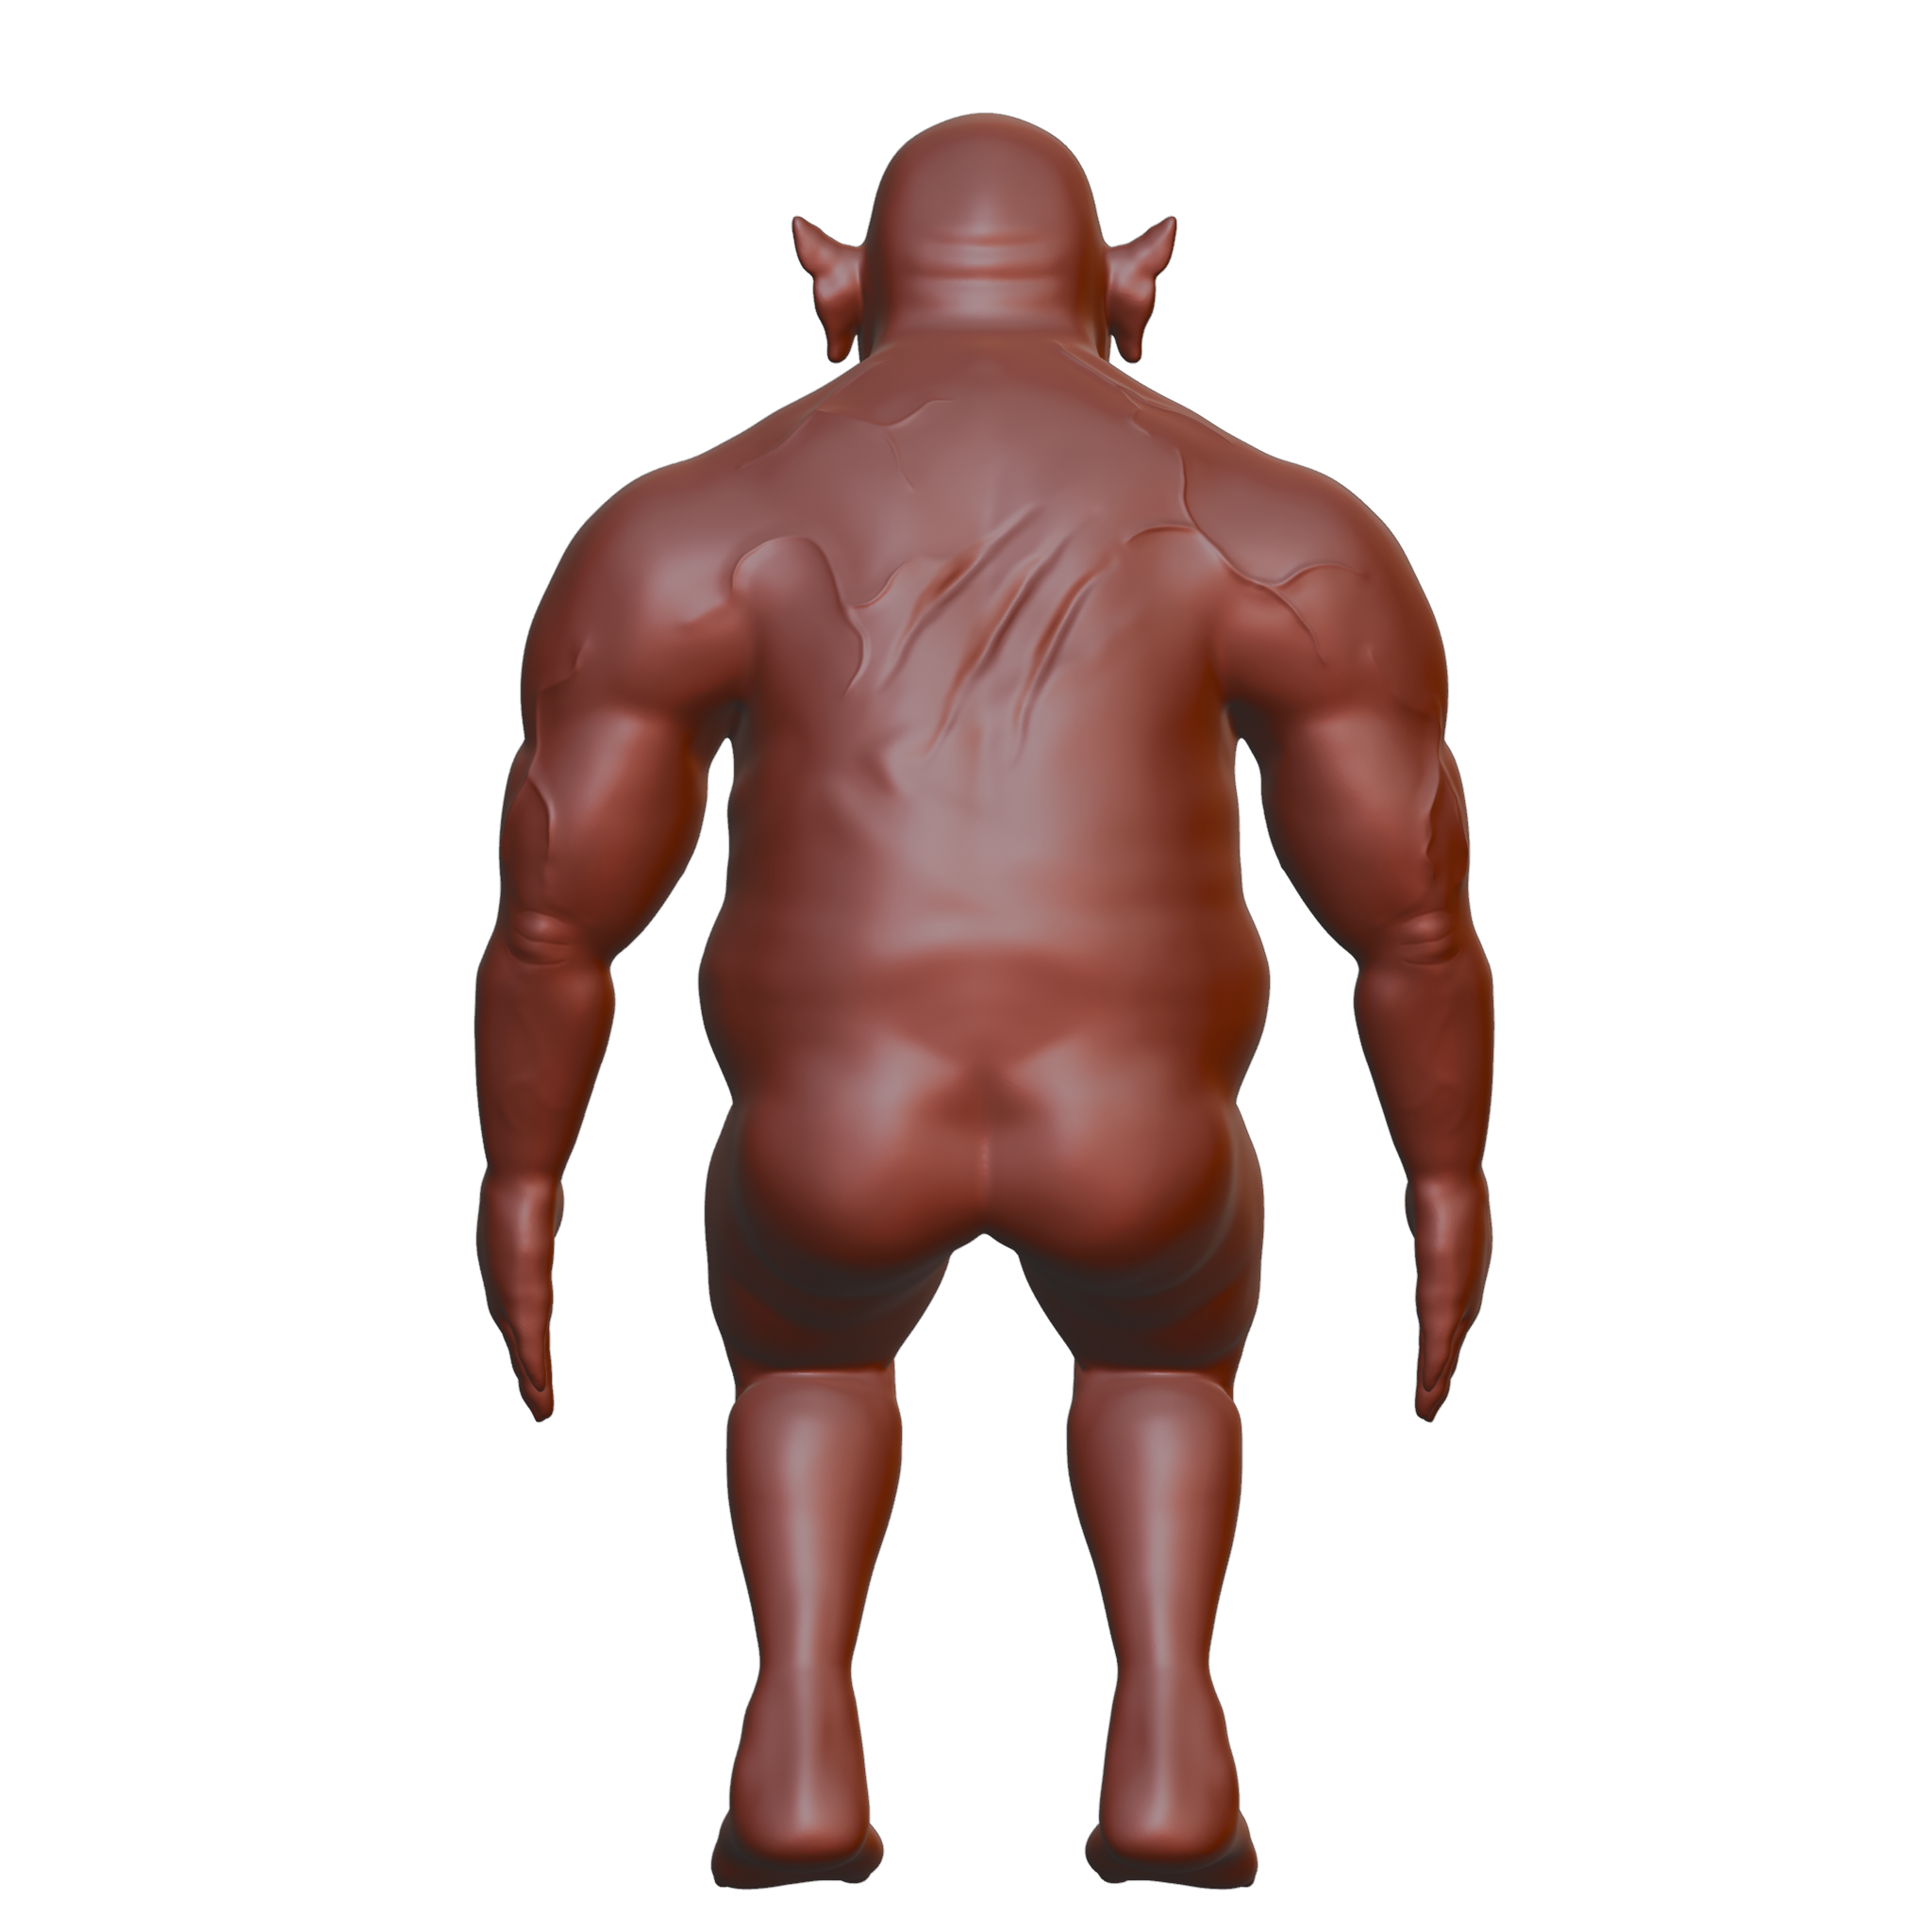
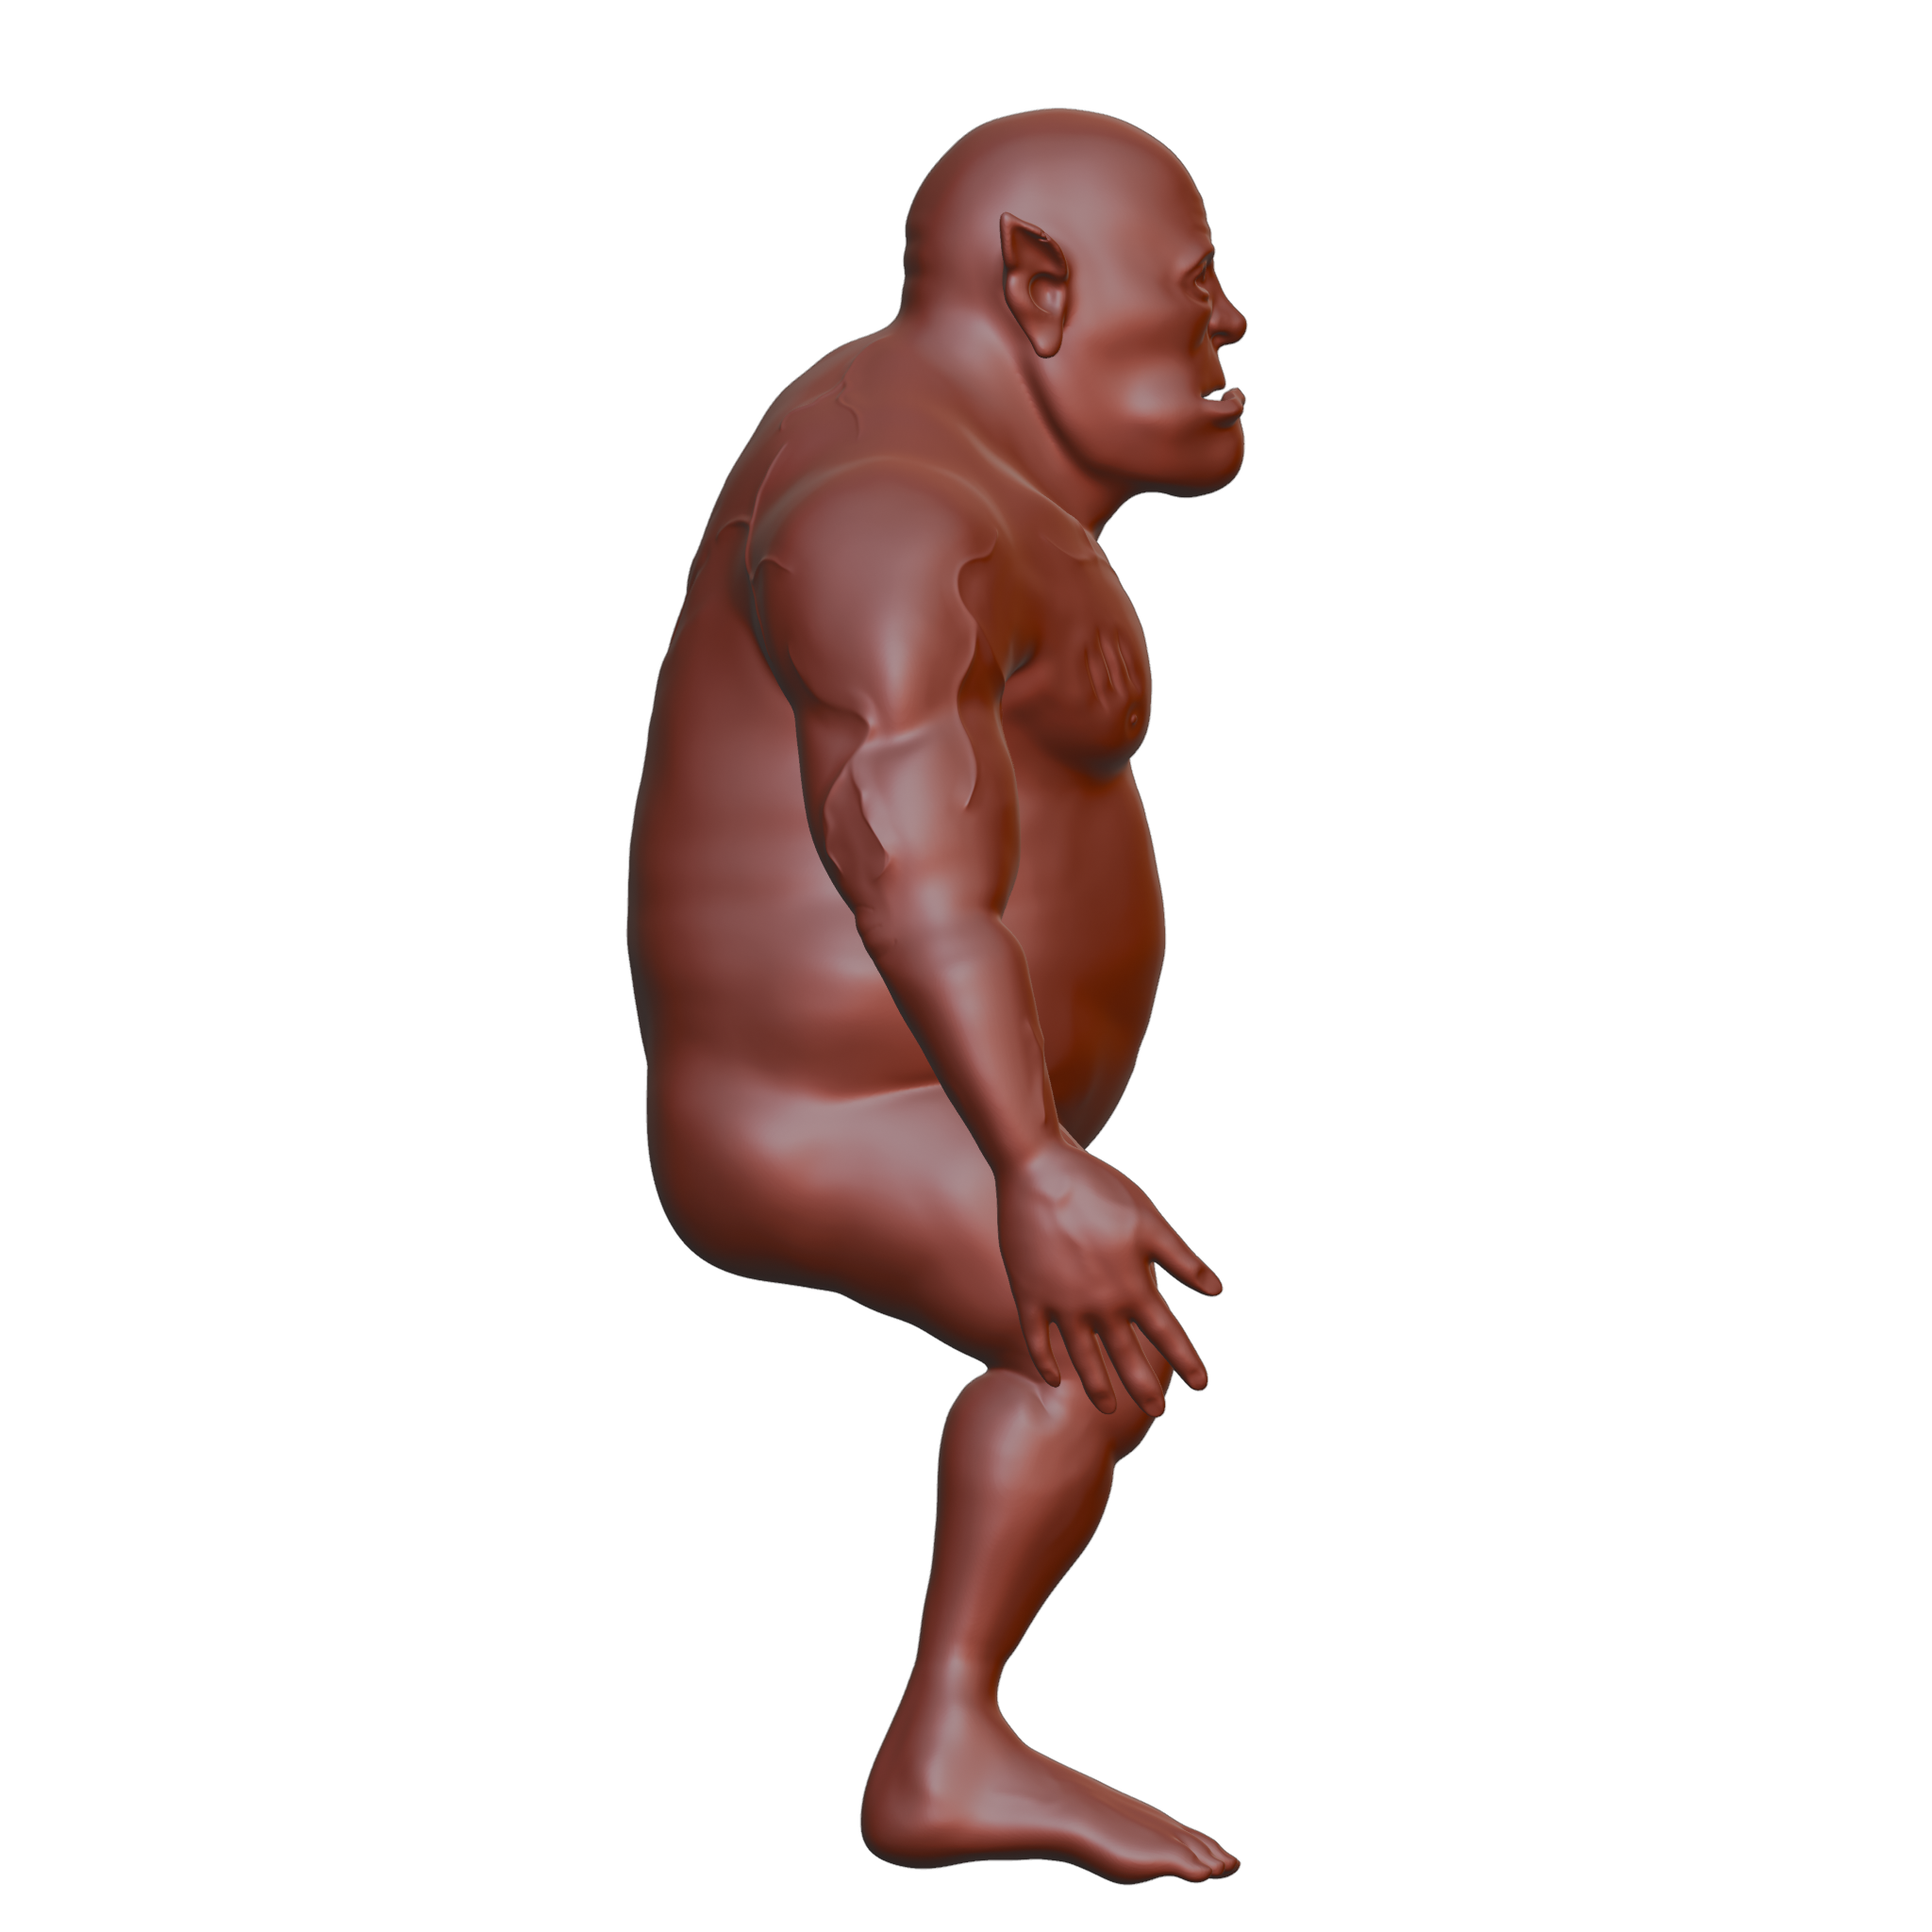

With these details and the chosen body proportions, I aimed to convey a narrative through this character of many long, hard-fought and rewarding battles. I believe the use of scars and wounds that have yet to fully heal, and less defined but still visual muscles with more body fat, is able to encourage this story.
During the modelling and sculpting tasks, I was able to gain a good understanding of applying real life theories and systems, in this case human anatomy, to a digital design piece. Further developing my understanding on body and muscle anatomy will widen the application of this knowledge to less-humanoid and more visually creative characters. I also gained more experience with a range of sculpting tools, particularly with the grab tools which helped achieve the desired shapes of the character.
I proceeded to join all the newly sculpted parts into one using the re-mesh feature to join each body part with new polygons. The next stage involved re-topologising the mesh to optimise the poly count. I used the B-Surfaces and Loop Tools Blender extensions to help create the low-poly character. The B-Surfaces extension modified the draw tool to allow multiple drawn lines to create a low-poly face that would snap to the desired mesh using a shrink wrap modifier and the snapping feature. The Loop Tools extension provided a range of features to control the size and shape of different edge loops on the mesh, such as relaxing a loop to make it curve more smoothly. Using these tools, I created 'essential loops' which, according to an online video guide (Aram Art, 2022), are recommended to include in a low-poly character mesh to make the rigging and animation processes easier.
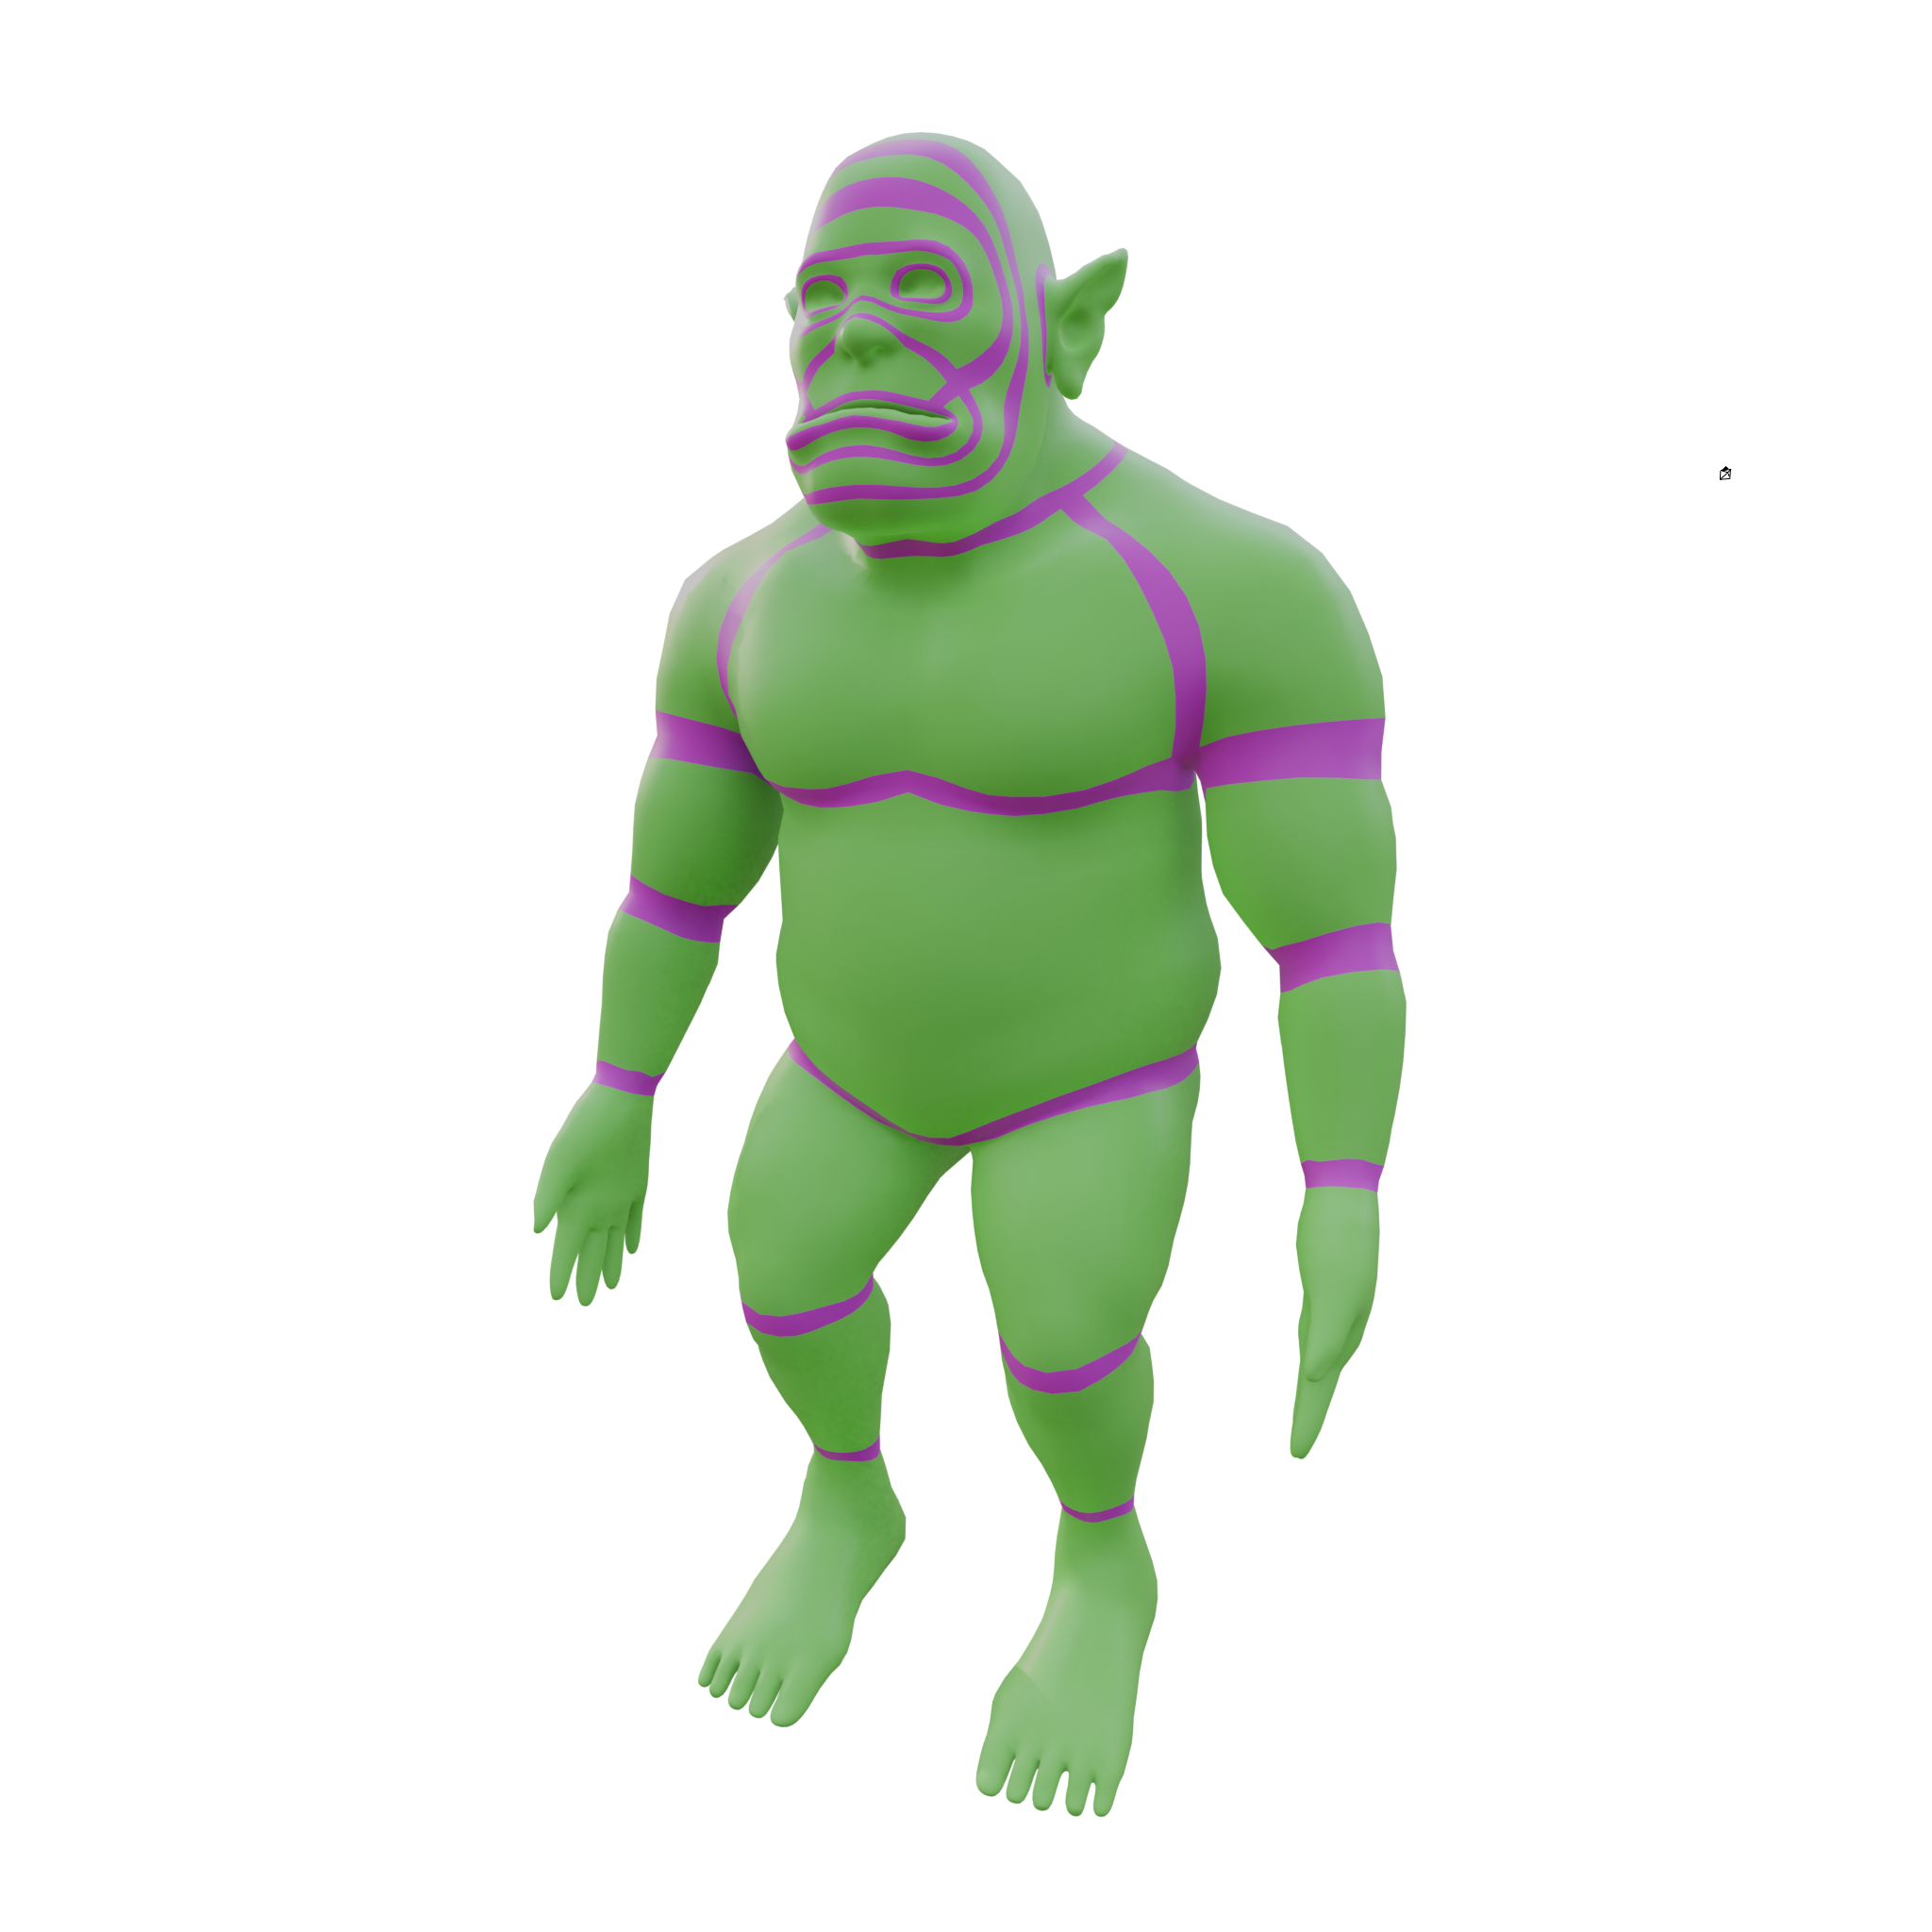
Low-poly mesh with highlighted essential loops.
During this process, I also learnt how to optimise poly count by increasing or dividing the number of faces along a single loop, while maintaining perfect quads. This can be seen in the example cards shown below.
Using these cards, I could more easily manage the poly count in each body part, ensuring that each has enough to capture the shape of the high poly mesh. After the retopology process, I managed to optimise the high poly character mesh with over 7.5 million polygons to a low poly mesh with 23,800.
High poly mesh: 7,566,720 million polygons.
Low poly mesh: 23,808 polygons.
Before UV unwrapping, I hand placed seams in locations I believed they would best fit and result in a more readable UV map. I made seams at the intersections of each limb, with a single vertical seam running down each arm and leg. On each hand and foot, I used two seams: one at the ankle and wrist, and the other running down the middle, creating two flat faces of UVs for each. On the torso, I only used a single seam running vertically down the right side of the body. I separated the head and torso with a seam running around the neck and made the final seams in each facial detail including the eye sockets, nostrils, lips and ears.
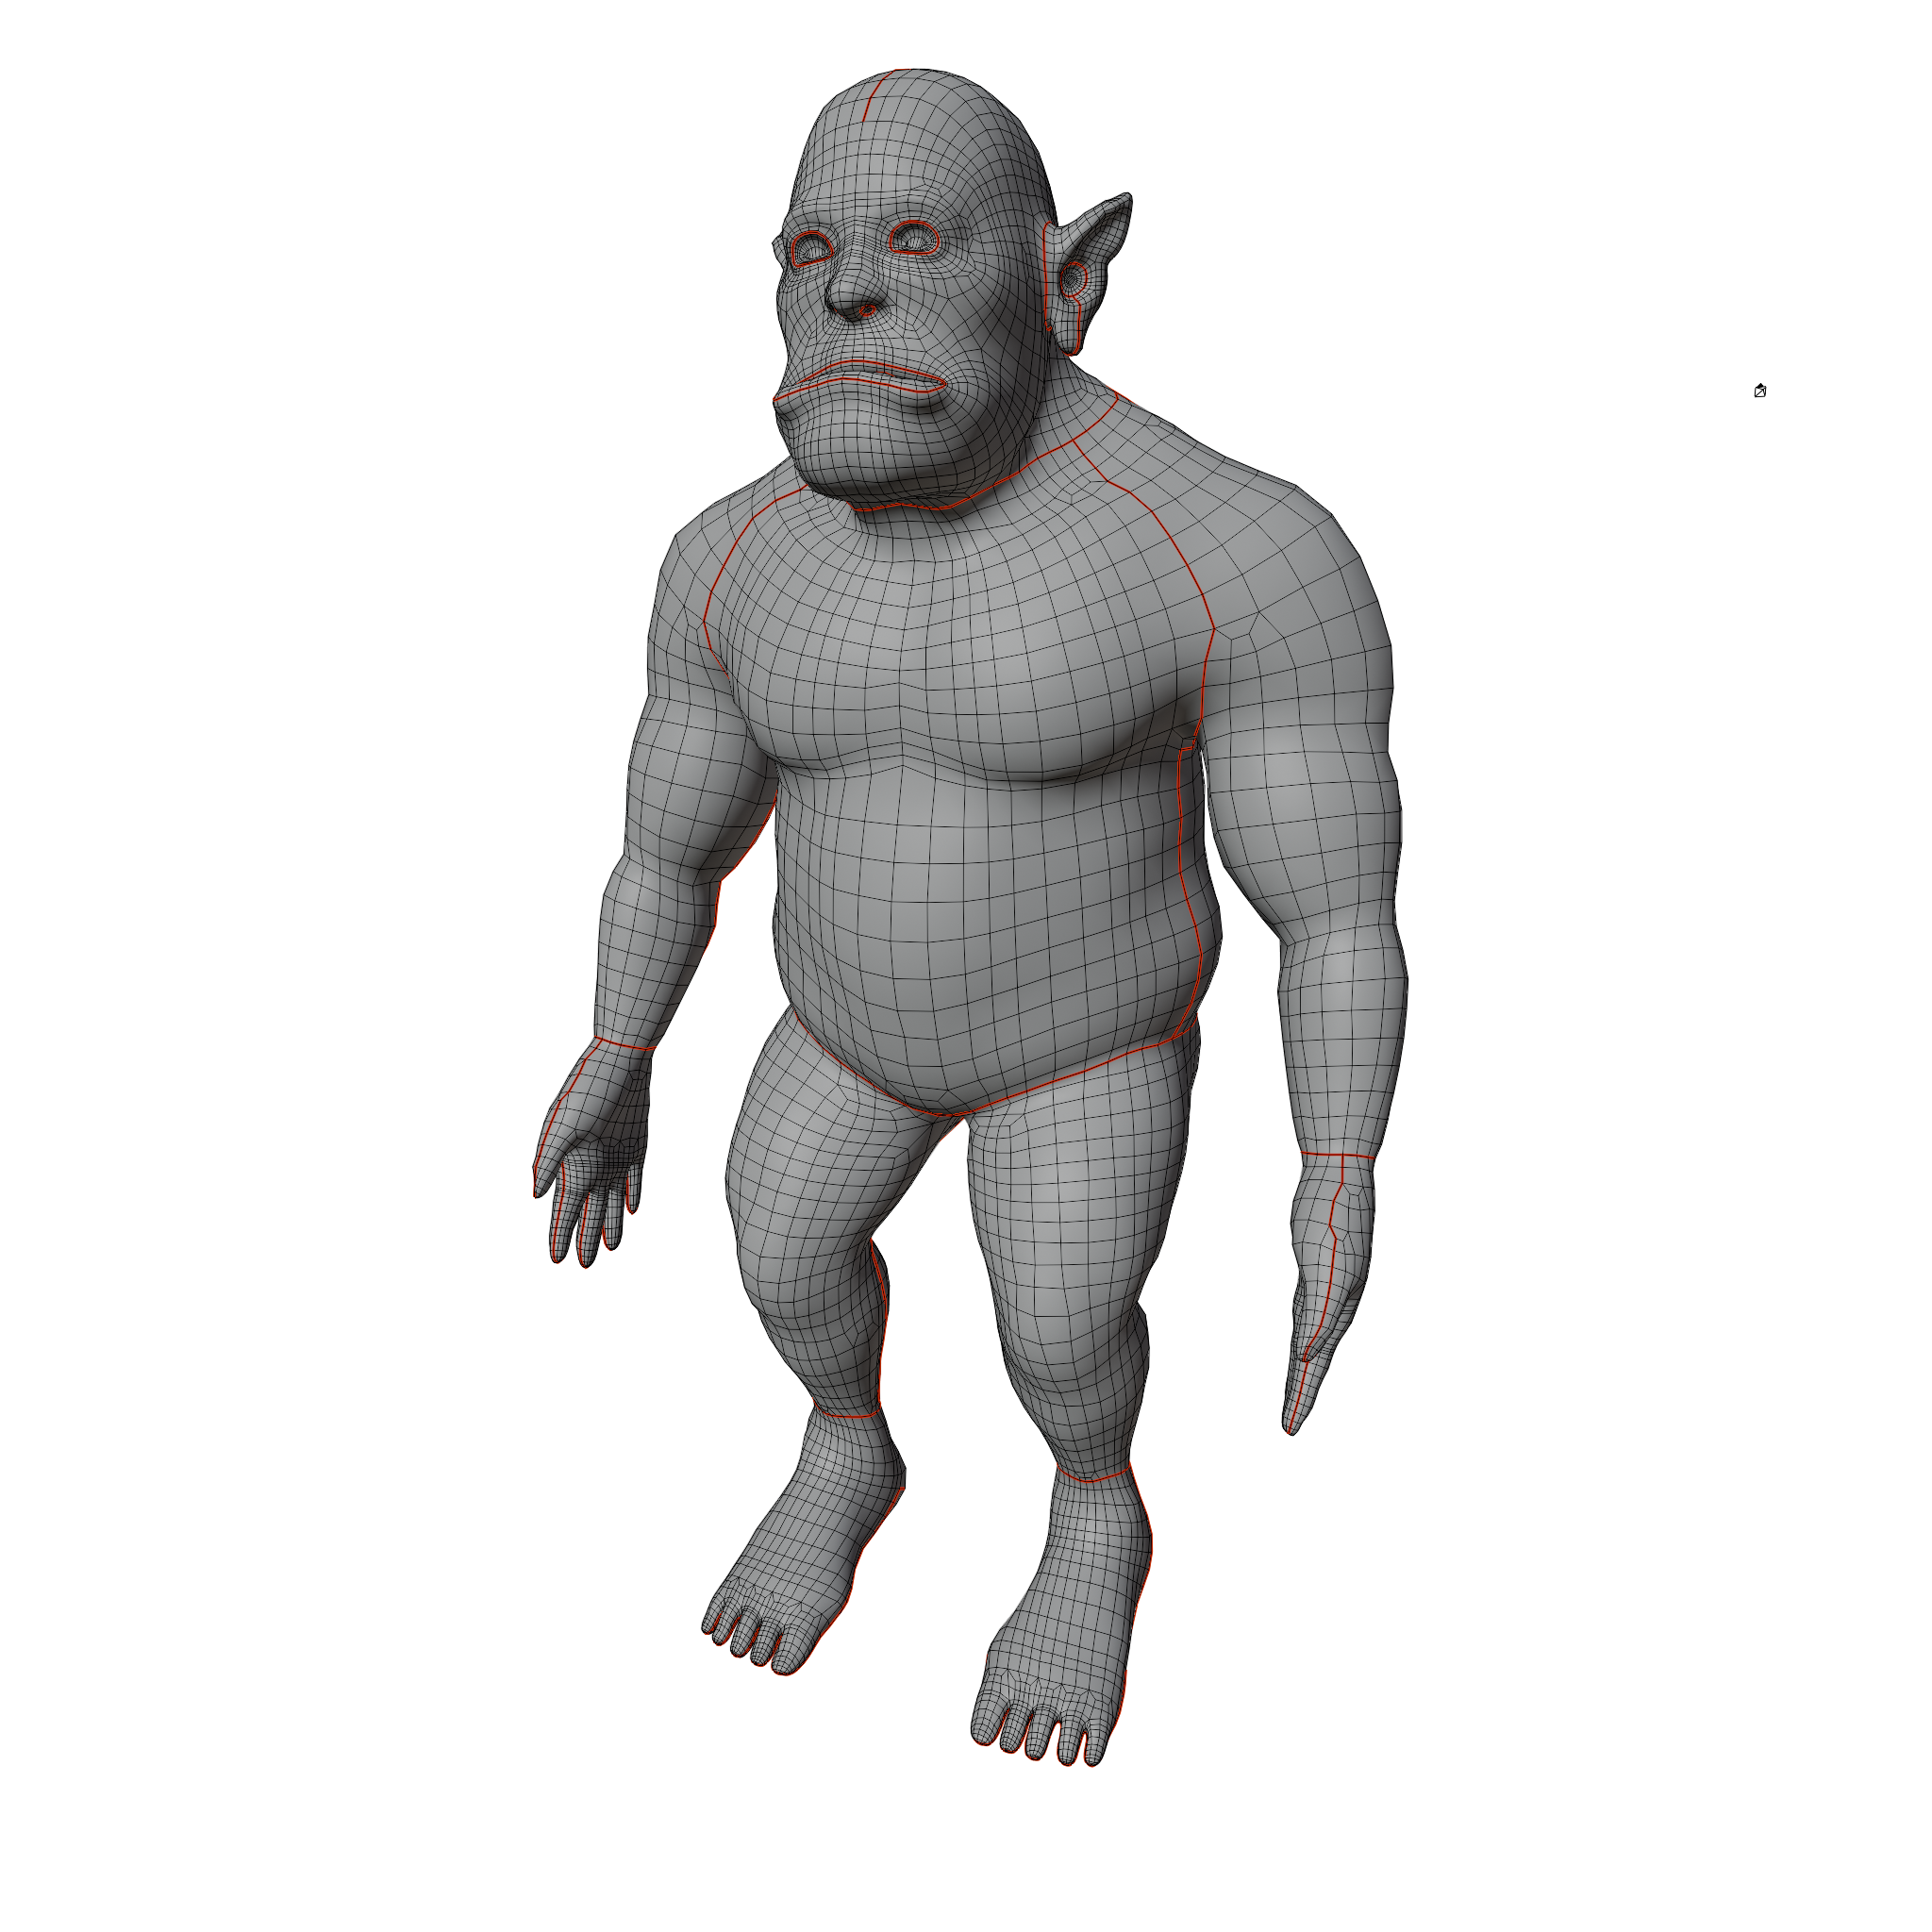
Low poly mesh with red seams.
I created several additional details including teeth, piercings and armour pieces. I used standard modelling techniques for these details and settled on relatively low poly counts without any sculpting details, as it would have been unrealistic to reach project deadlines. Nonetheless, I planned to use detailed textures to emphasise more realism in these extra character pieces. I made a few seams in more subtle areas of each model, trying to make the number of faces in the UV map as low as possible, as many of the models would be using the same map, and I wanted to keep the texture details as high as possible.
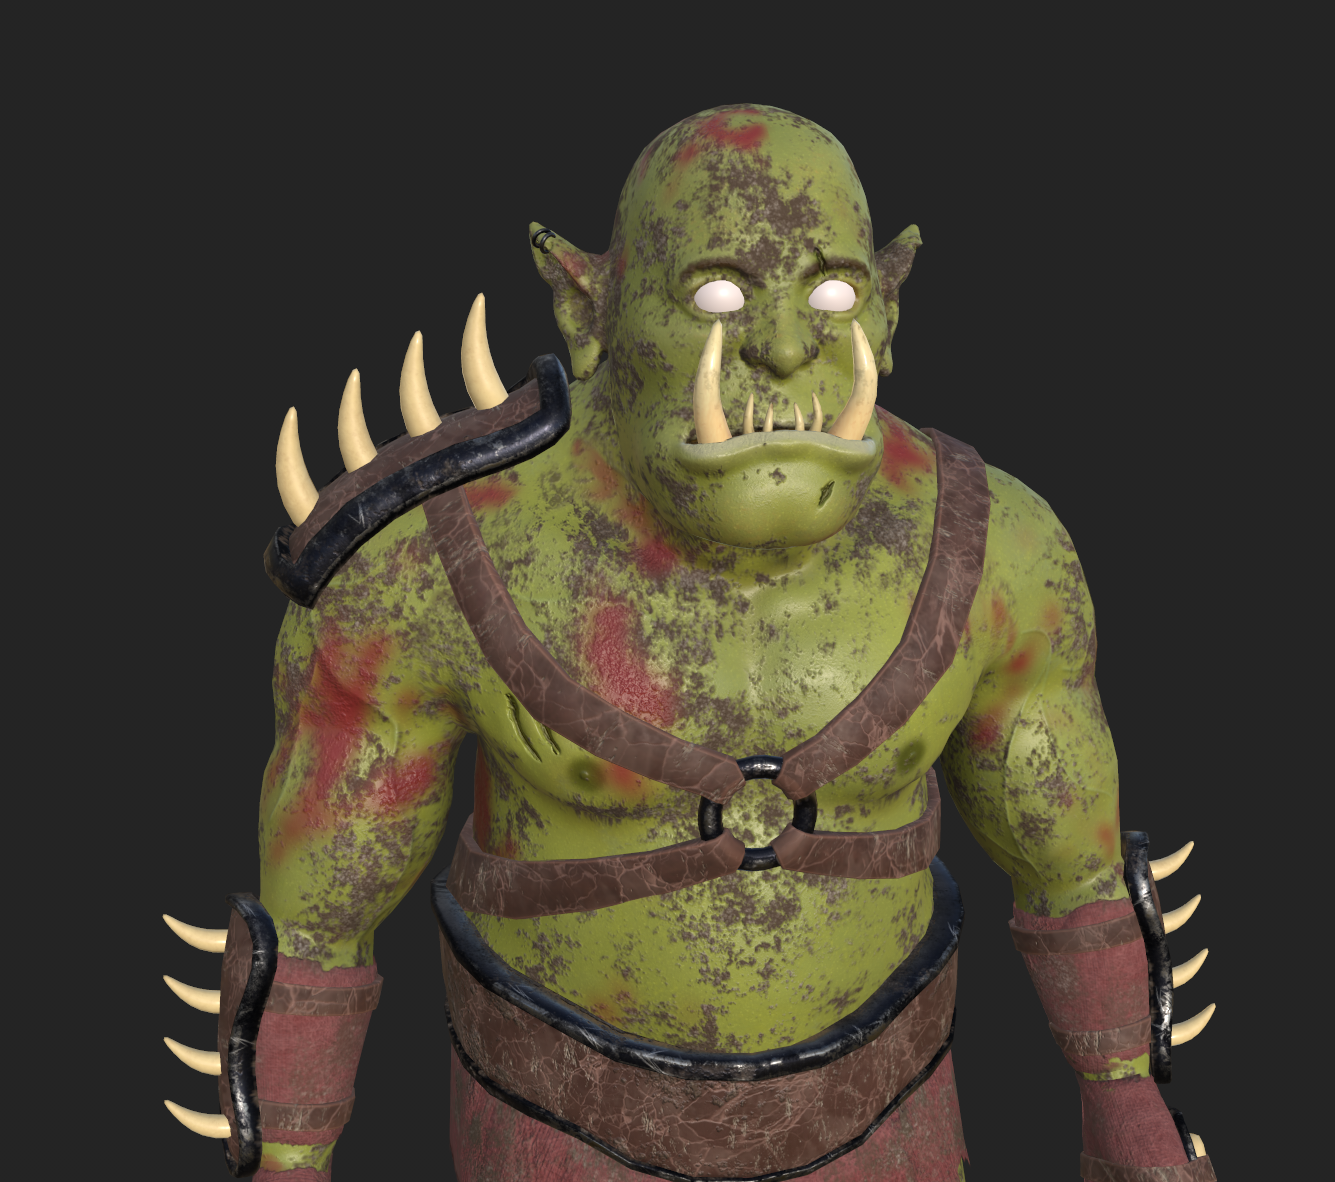
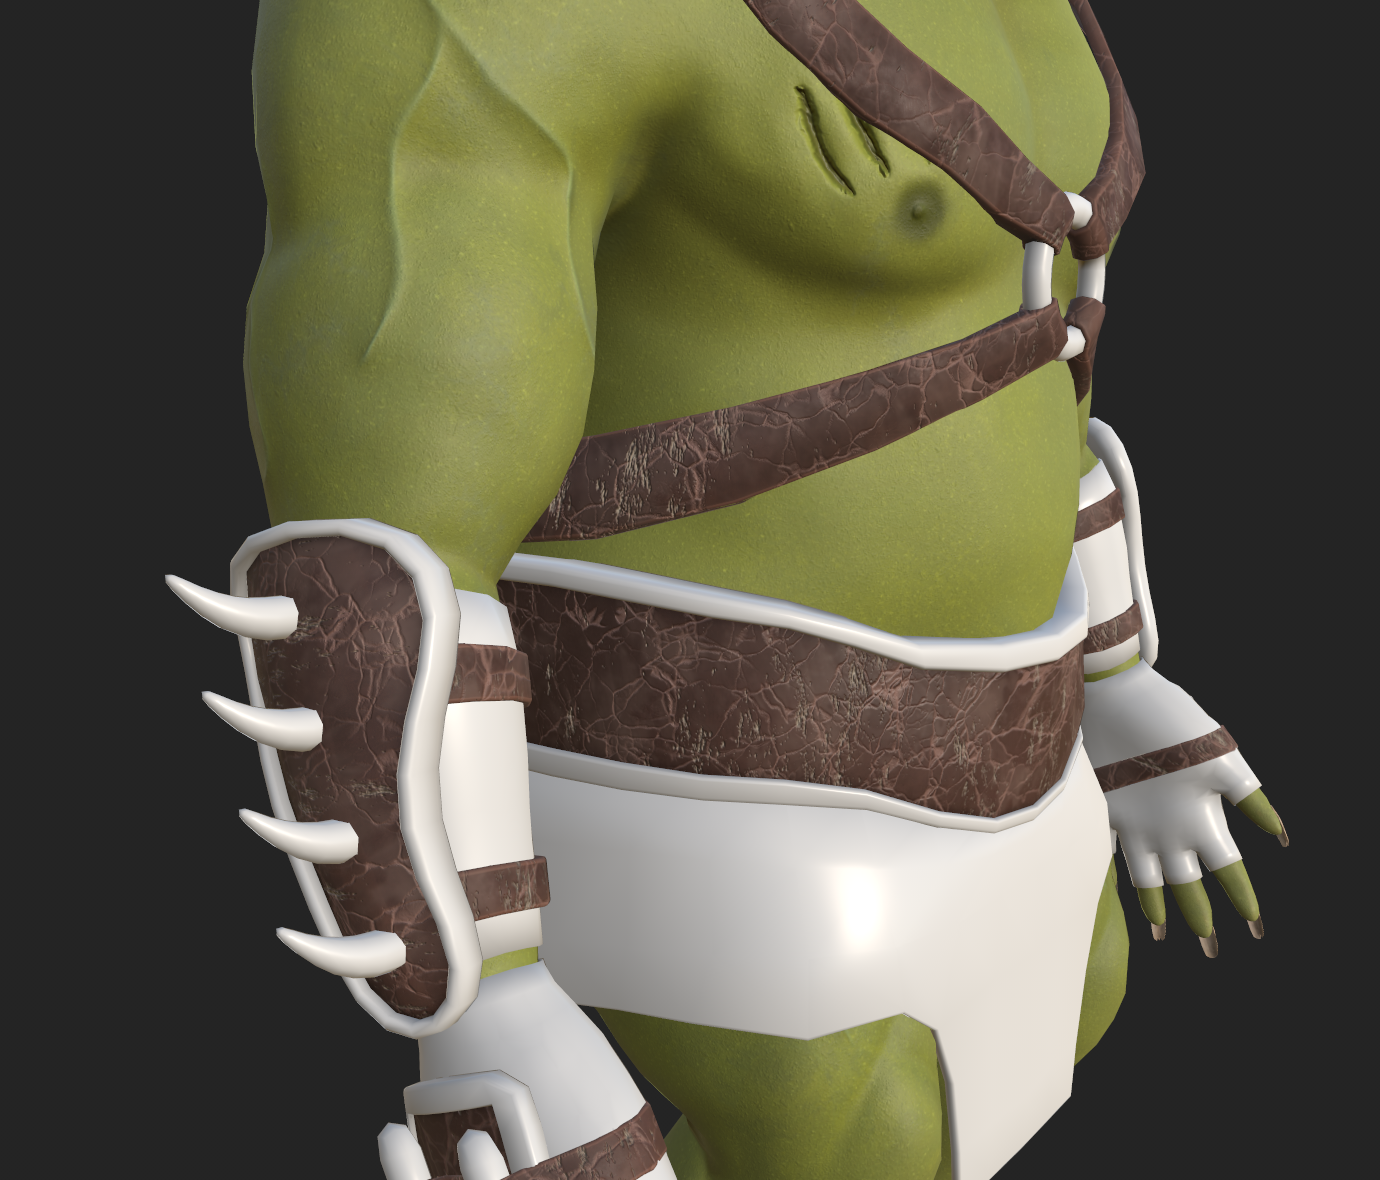
I exported the complete character model into Adobe 3D Substance Painter to start creating detailed textures. Starting with the skin, I worked from a pre-existing smart material named 'Green creature skin'. This provided a great framework including some base colour, varied lighter skin tones and a fill layer, with positive height and a noisy greyscale fill material, resulting in subtle skin bumps. To better match the intended design, I changed the green hues and added more layers of colour with different fill patterns to break up the skin even more. I also modified the skin bumps with a new greyscale noise texture and a second layer to add more variation to the height and size of the bumps.
Changing between a positive and negative roughness value on the base skin layer meant that I could easily switch between a rough and more sweaty skin aesthetic. This degree of freedom meant I could change this skin texture to suit different situations. For example, I could easily create a second set of skin textures that would feature on the character in a battle scene by changing to a lower roughness and adding some blood and dirt with a few simple layers. This level of flexibility is a useful practice that would be worth implementing into future projects, as this allows for the character profile and narrative design to be easily manipulated through slight changes in texture colours and features.
Example of sweaty skin, blood and dirt layers.
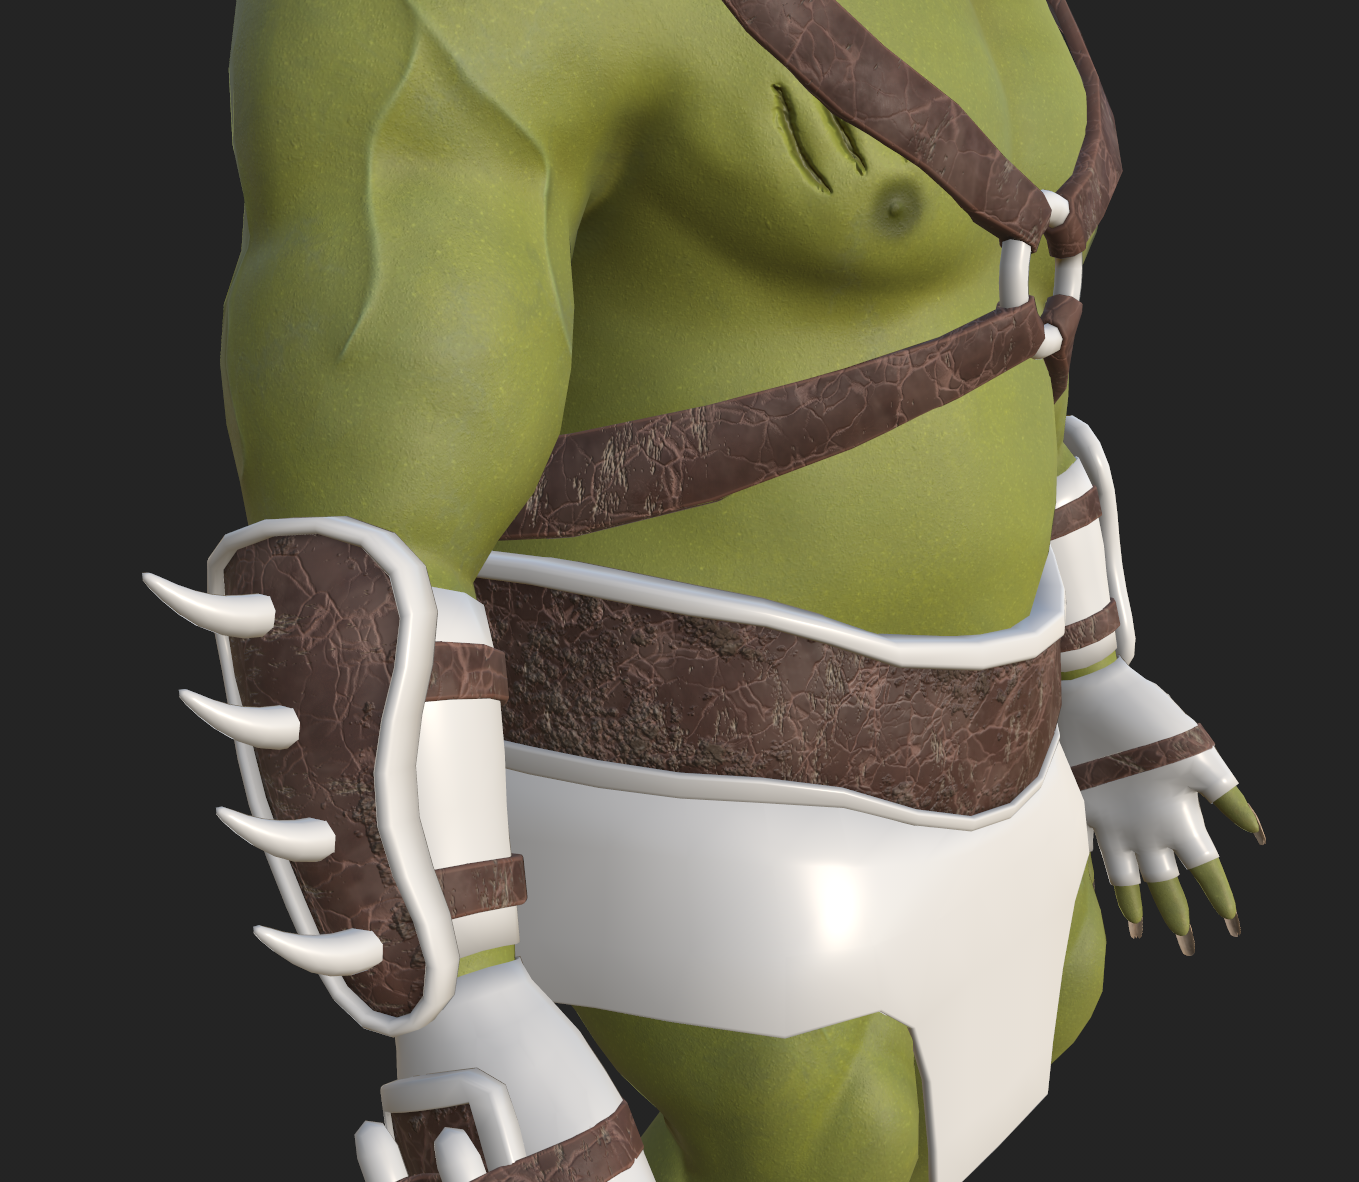
For some additional colour in the skin, I used a new orange-brown fill layer, with a curvature generator to apply some darker undertones to deeper areas of the skin, such as the collarbones. Next, I followed reference images of sun-damaged skin on the human face (Moore, E., A., 2022) to create a layer of faint red blemishes on the face of the character. I used a 'Gaussian Spots' and 'Plasma' texture on different fill layers to create larger and smaller spots respectively. Using the references, I could use a paint layer to accurately distribute the red spots across the face.
Skin undertones.
Face blemishes.
I duplicated the whole skin material created so far, changed the colours to a darker hue and used a mask generator, changing the top to bottom and front to back sliders until I achieved a darker skin tone that covered the back and upper shoulders. This created a more realistic and subtle break between the green skin hues across the body and reflected areas of the skin that would more likely receive more UV radiation from the sun.
I ran into a problem with the skin texture repeating when met with one of the seams made during the unwrapping process. To resolve this problem, I used the clone tool to copy a clean area of skin and paste it along the seam lines. I repeated the process until all the visible seams were hidden. While this feature is helpful with removing seam lines, I could imagine possible scenarios where this could create difficulties, such as a material with a repeating symbol or pattern. In cases like this, it would be even more important that the seam placement is kept to the minimum amount possible, and in areas of the character which will be less visible to the game camera.
Before clone tool.
After clone tool.
In order to highlight the sculpted veins, I created a new fill layer with an attached mask editor and the sharp curvature slider set to a high value. This covered almost just the protruding veins, so I used a paint layer under a black mask to manually remove this effect in any unwanted areas. Additionally, I created a second layer of smaller and more subtle veins by using a fill layer with the plasma greyscale texture and a blur filter. I again used another paint layer to remove the subtle veins from any unwanted areas.
Another texture addition included the lips. To create a suitable colour, I used a light pastel pink fill colour with the layer set to overlay and a low opacity. I also included a blur filter to better merge the lip with the surrounding skin. To finish, I used a paint layer with a crack shaped brush to hand paint different sized cracks across the lips.
While creating the scars, I used a feature called Anchor points, which can reference information from the other properties and filters in the same layer.
In order to learn more about this feature, I watched a short online video tutorial (ProductionCrate, 2023) that detailed how the tool works and gave example uses.
I created a base paint layer with only a negative height value to simulate scars in the skin, which I could individually paint using a thin brush.
I then created a new anchor point to place at the top of this layer's properties. A second layer that housed an additional fill layer under a black mask,
referenced the new anchor point in the greyscale mask input of that secondary fill layer. This new anchor point took the height information from the first scar
layer and applied a positive height value to the outer edges of the scars, which created bumpy skin surrounding the healing wound when combined with a warp filter.
Furthermore, by using a high pass filter and levels property, I could freely control the intensity and area coverage of the surrounding bumpy skin.
Reflecting on creating these skin textures, I found there to be a lot of room for freedom to create textures suitable for several different scenarios. Additionally, using colour theory and visual narrative design, skin textures and the corresponding details can be manipulated to shift the character into a whole new visual narrative and profile. This practice also aligns with the goals of sustainable development goal 10, because this large degree of freedom in the skin textures, is an effective way to promote diversification and representation of different cultures, for example, by using a range of skin hues to represent orcs from different tribes and regions.
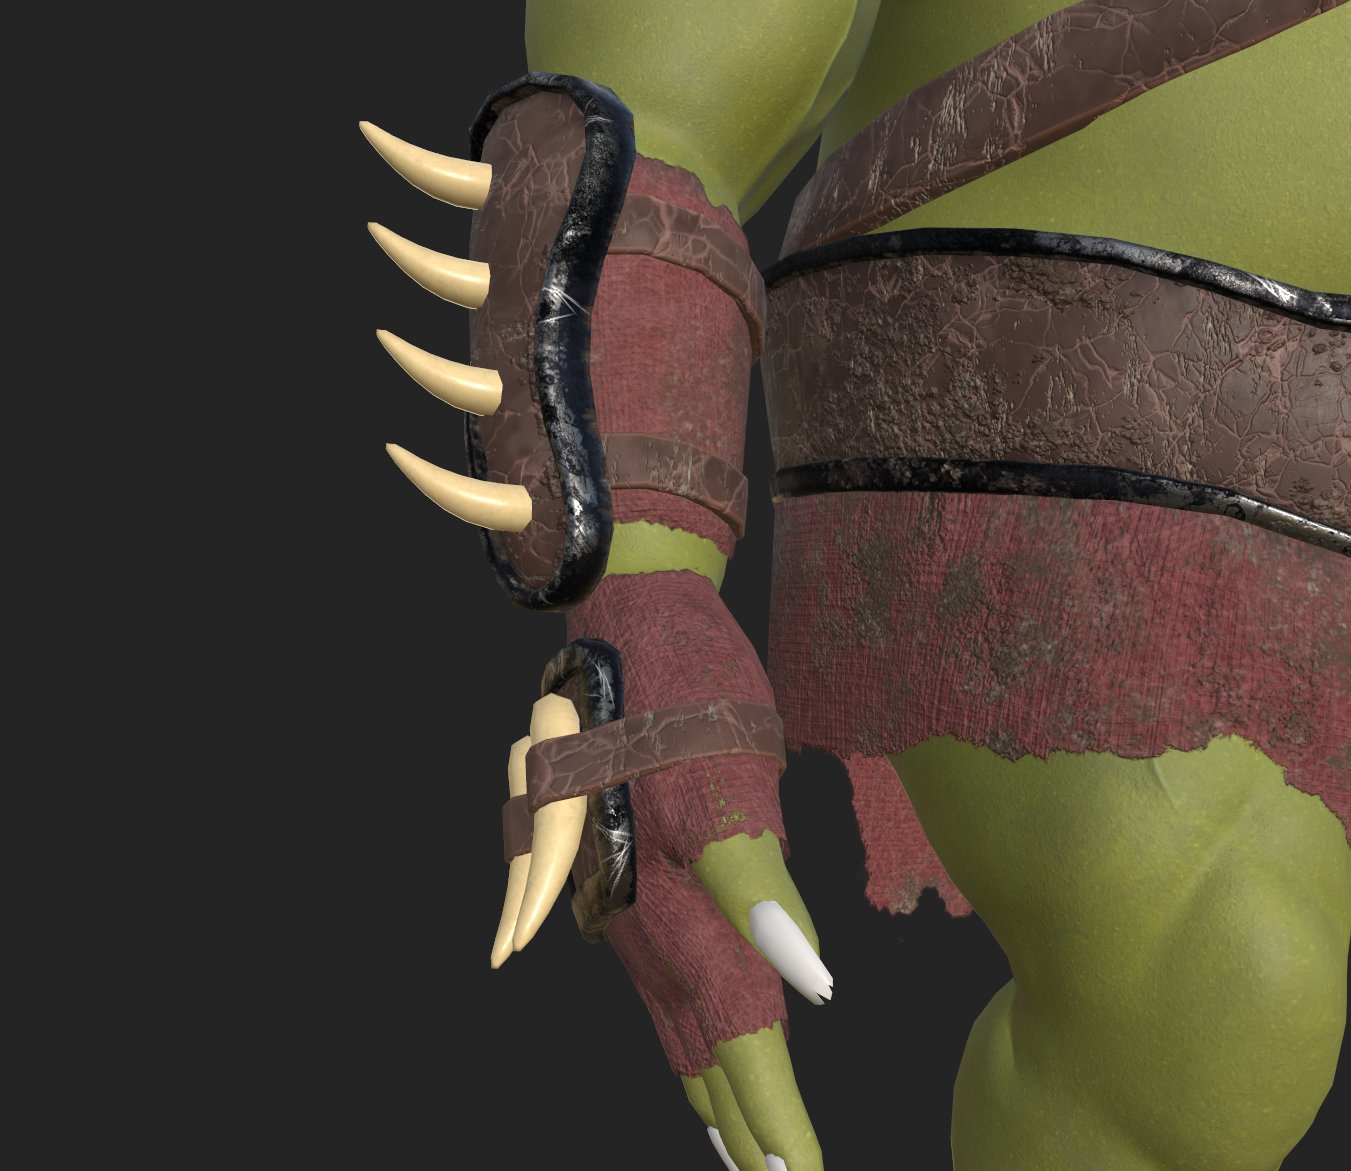
Starting with the leather padding, I used the 'Leather Stylised' smart material and made additions and changes to better suit the intended design. I started with altering the pre-existing noise, curvature and ambient occlusion layers. Next, I created a new layer with a slightly lighter brown tint than the base leather colour. I added a black mask and a fill layer with a greyscale pattern called 'Grunge Fingerprints Smeared'. Combining this with a blur filter, this resulted in a realistic worn-leather look with visual smears.
Next, I added a new fill layer that used a marble vein pattern in the greyscale input, with a small negative height value to make the leather
appear to be peeling away revealing a lighter brown material. I also included some smaller scratches with a directional noise fill layer and
a levels filter to control the number of scratches displayed across the leather.
Finally, I added some dirt by using a fill layer with a dirt texture generator with both a grainy and gradient filter to add
variation to dirt colour and bumpiness.
Without dirt.
With dirt.
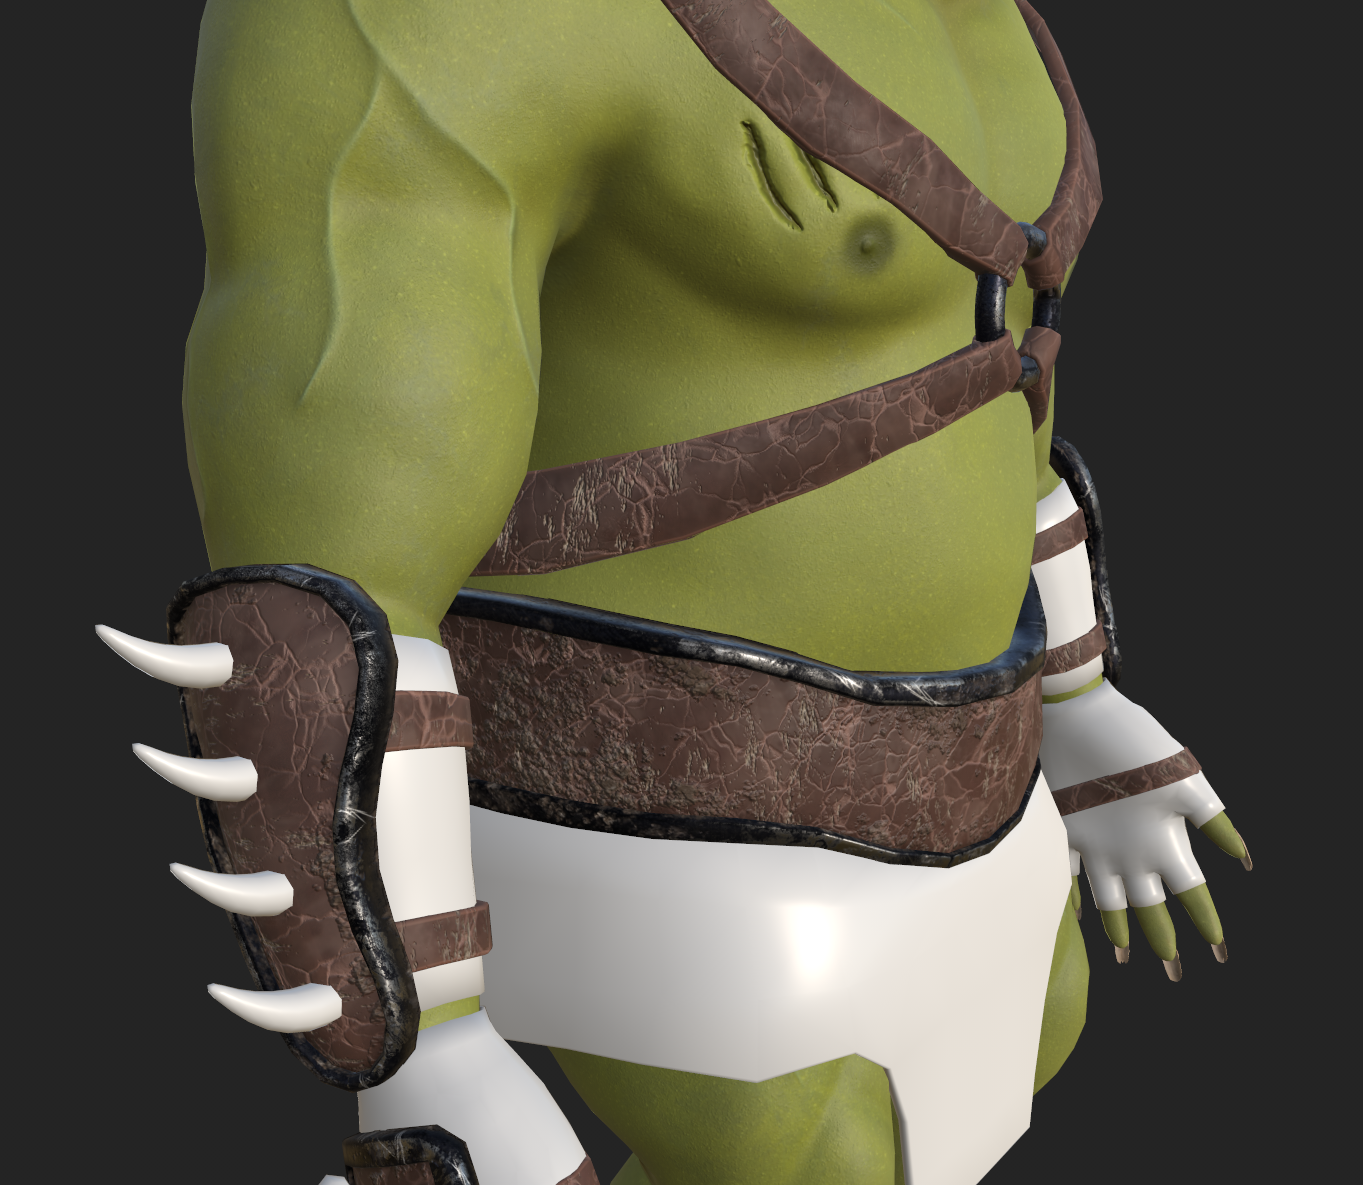
The dark steel armour lining was developed using the 'Iron Forged Old' smart material as a base, which I modified by adjusting the colours, ambient occlusion and edge wear curvature layers to better suit the shape of the armour and the intended design. I added the same dirt used on the leather and created a paint layer that only consisted of negative height, roughness and metallic data which I could use with a custom scratches brush shape to add different sized metallic scratches that would reveal a lighter steel colour below the black iron surface.
The third texture addition to the armour was the cloth that appeared around the waist, hands and forearms of the character.
I used the built-in 'Fabric Linen' material and changed the colours and some of the fill layer patterns to resemble a more worn,
poorly made fabric material. The cloth pieces were too straight around the edges, and they needed some visual tears to make the
texture more believable.
To achieve this, I changed the materials shader setting to use a PBR shader with alpha blending. This allowed me to add
an opacity channel which adds opacity as one of the data parameters in the material. I then created a new paint layer, disabled
all parameters other than opacity and used a noisy brush shape with a high flow value to add transparent tearing along the edges of the cloth.
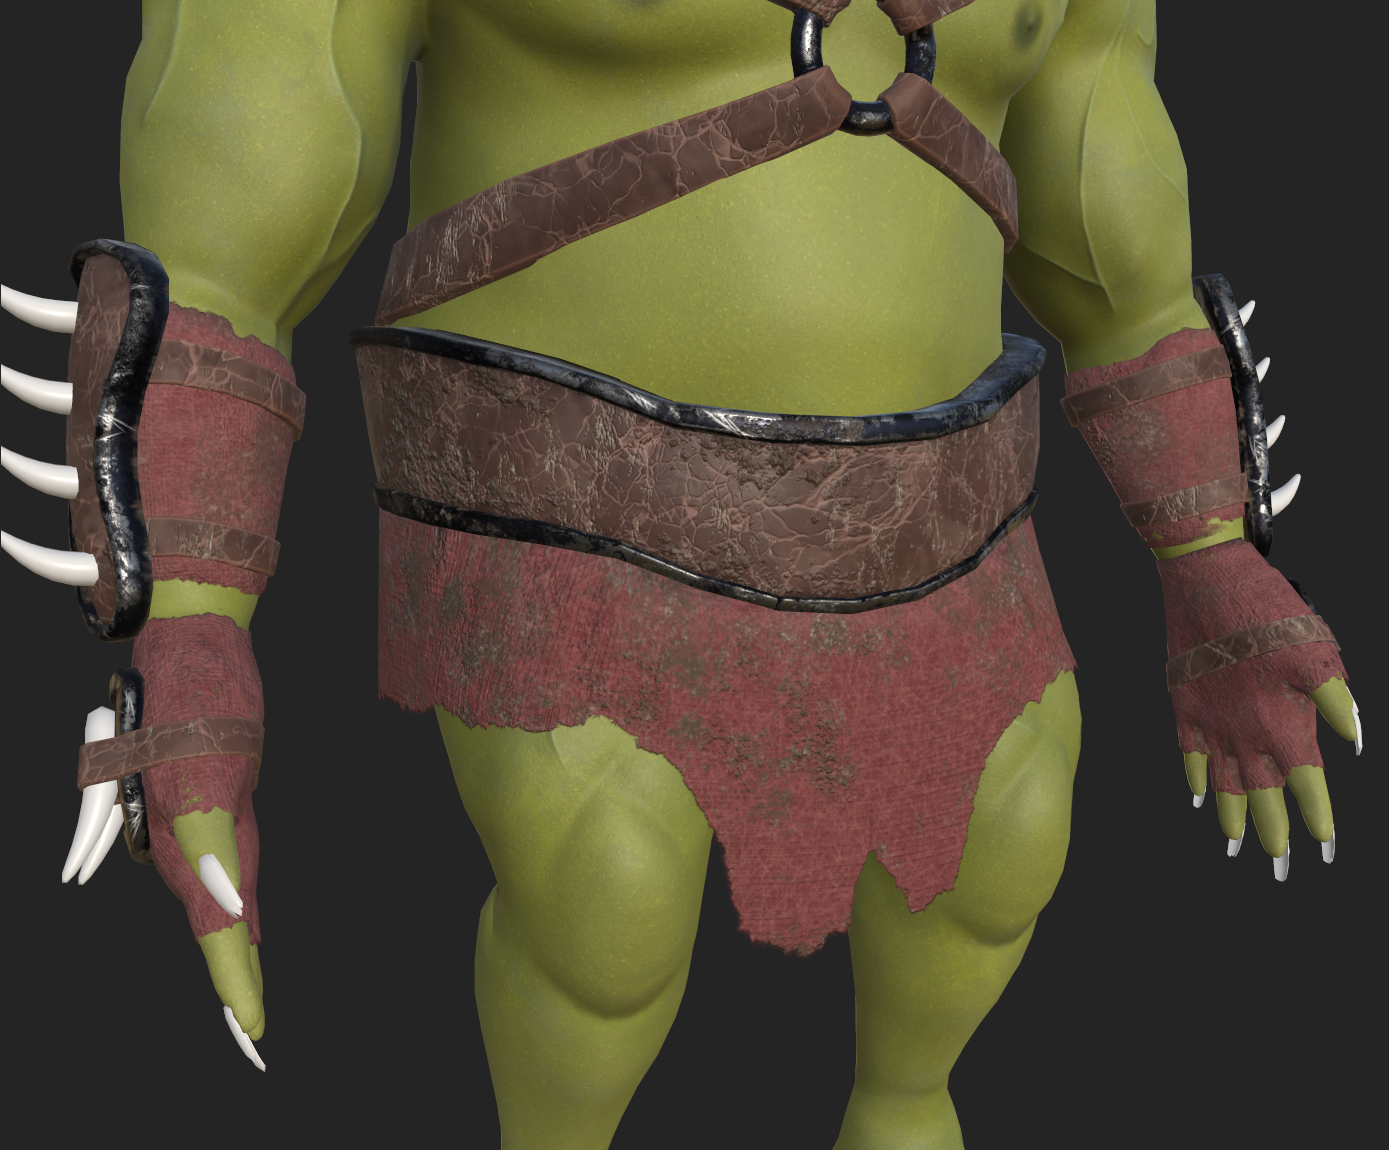
Lastly, to construct the claw decoration textures, I used a simple set up of a light-yellow base colour and a darker yellow fill layer using a dirt greyscale pattern and a levels filter to control the distribution.
I used a similar claw material for the teeth but added a second colour variation and a third fill layer using a grunge pattern with a levels and curvature generator to control the distribution of dirt and damage. Additionally, I created a fill layer using only roughness data and a 'Fractal Sum' greyscale pattern to add a faint rough tooth texture. I finalised the texture with a low-opacity yellow fill layer and orange gradient to add a faint yellow tint, reflecting a lack of care and cleaning. I used this same material for the nails and lowered the amount of dirt.
The remaining details, including the piercings and ankle clamp, used the same dark steel smart material from the armour, with slight modifications to the edge wear, dirt and scratches to match the smaller scales of the objects.

The final texture I developed for the character was the eyes. I struggled to find a method to create these in Substance Painter,
so I instead followed a tutorial that used different shader nodes in Blender to create
a 'procedural eye material' (Pixel Me That, 2024).
This material used a gradient texture node plugged into a colour ramp to differentiate between
the pupil, iris and cornea. A Voronoi and noise texture is also used to add some detail to the iris and a final bump node
adds some roughness to the eyeball. I also made an additional Voronoi node setup to add some faint blood vessels to the cornea.
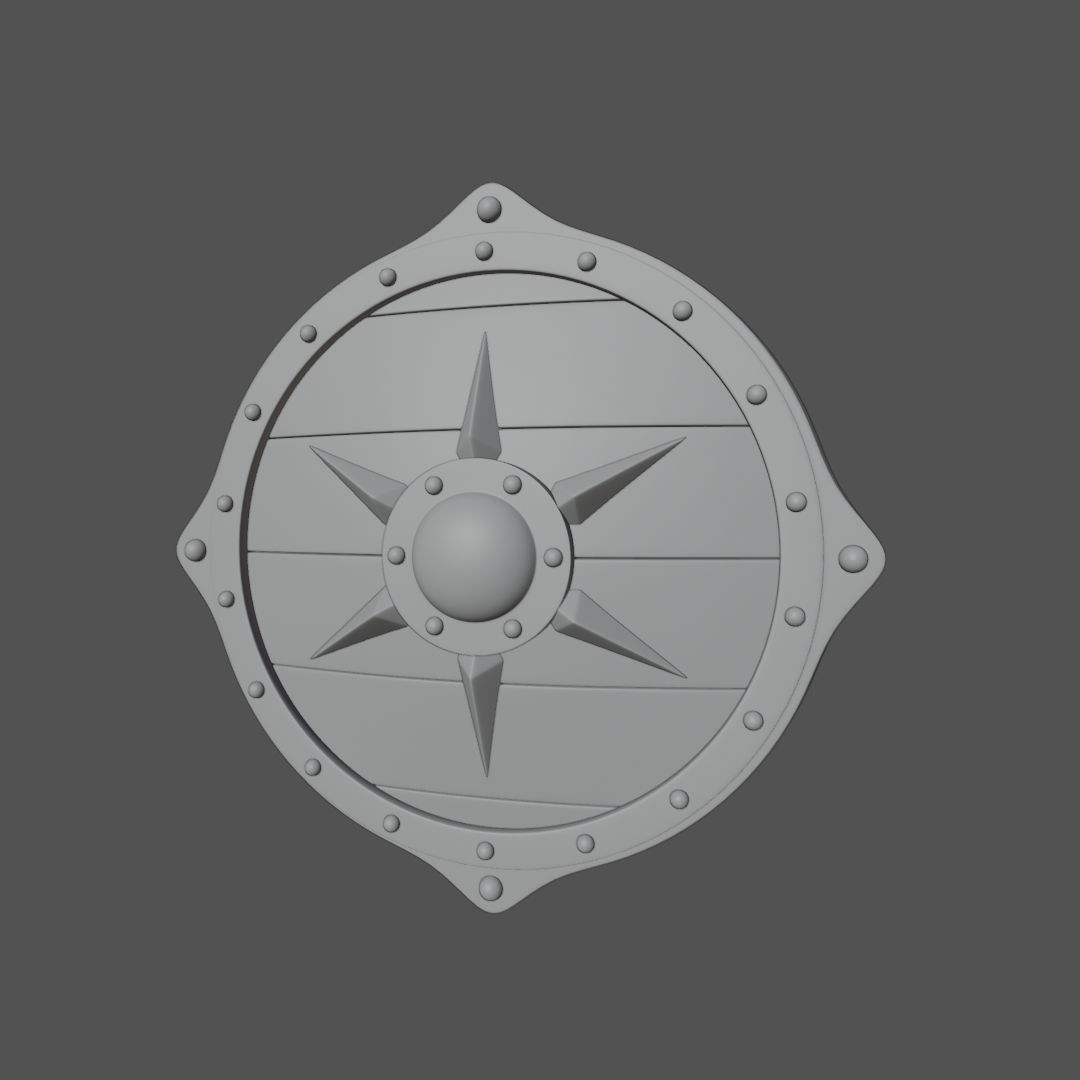
I incorporated a medieval shield asset made in Blender from a previous project to reinforce the characters' identity and role.
Starting with a cylinder mesh,
I inset the centre face and created a large ring serving as the outer rim of the shield. To create the planks, I started
with a cube mesh, scaled up the size to cover the outer ring and used the Boolean modifier with the object reference
set to an inflated duplicate version of the outer ring. This left a circular mesh that fit the curvature of the outer
ring perfectly. I used the knife tool to create gaps between the planks making up the shield face and used a Bevel modifier
to make the edges between the plank's smoother. I then used the Cast modifier with the object target set to an empty object
positioned just behind the planks, creating a subtle curve across the shield face. Lastly, I included some additional decoration before creating the seams and UV unwrapping.
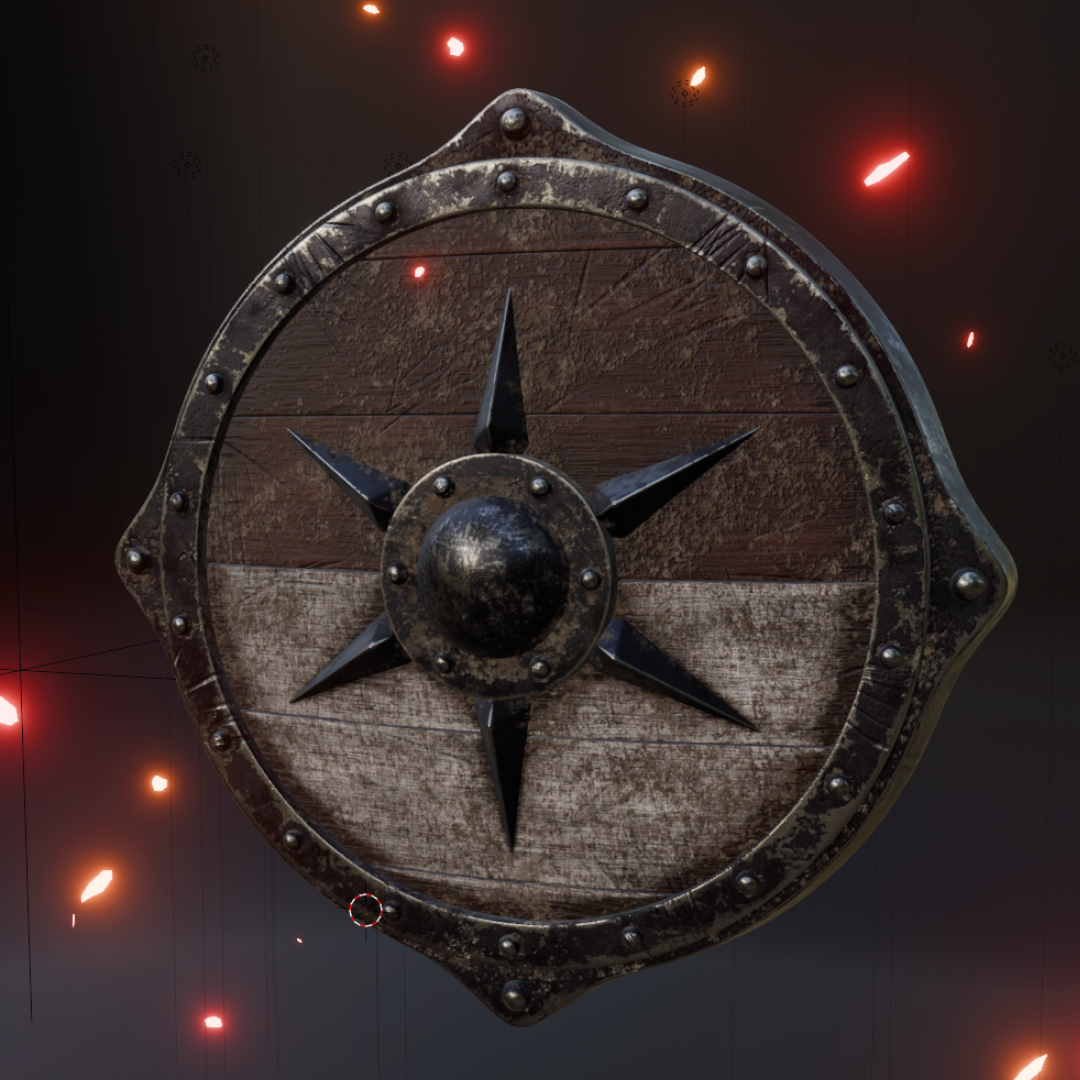
The shield prop includes two distinct textures. The outer frame, handle and front details feature the dark steel smart material, previously used in the armour pieces,
with some slight adaptations to better fit the dimensions of the outer shield.
Secondly, I used the 'Wood Walnut'
smart material as a baseline to work from and adjusted the colours, size and shape of the noise and wood fibre details.
I also used the polygon fill tool to divide the wooden planks into two different colours to add a more interesting visual design.
Lastly, I included some grunge and ambient occlusion to add varied darker tones to the wood and included some darker dirt patches that collected in the similar ambient occlusion areas of the shield. I constructed a final layer of light dirt to cover the whole shield, and hand painted some scratches of different sizes.
In all the above textures, I attempted to create armour and features that exaggerated the number of tough battles the character
has endured by using layers of dirt, scratches and edgewear. This variety of detail helps to build the characters visual narrative,
and has wide application, as with just a few small changes, the characters visual profile can change to promote a diverse range of
genders and cultures.
The armour textures are an example of how this character's features can promote the goals of sustainable development goal 10.
The colour of the cloth, or patterns and symbols that appear on it, can be used to indicate different identifiable
tribes and cultures. Additionally, the leather and steel pieces could have slightly different appearances or be made
with different materials, implying their manufacture from different regions and cultures. For example, an orc character from a colder, northern region could have thicker
layers of armour with white fur lining.
Creating detailed and realistic textures is an area I have rarely touched in my previous projects, specifically with
Substance Painter, so being able to develop that skill in this project was a beneficial experience. While I used some already
existing smart materials to create a baseline to follow for the textures, I was still able to read through the different
layers, understand their purpose and how I could make adjustments to meet my specific needs. I also learnt how to use anchor points,
which proved to be very useful when making the more intricate details in the skin and armour pieces, as well as understanding their
wide applicability to different texture design goals.
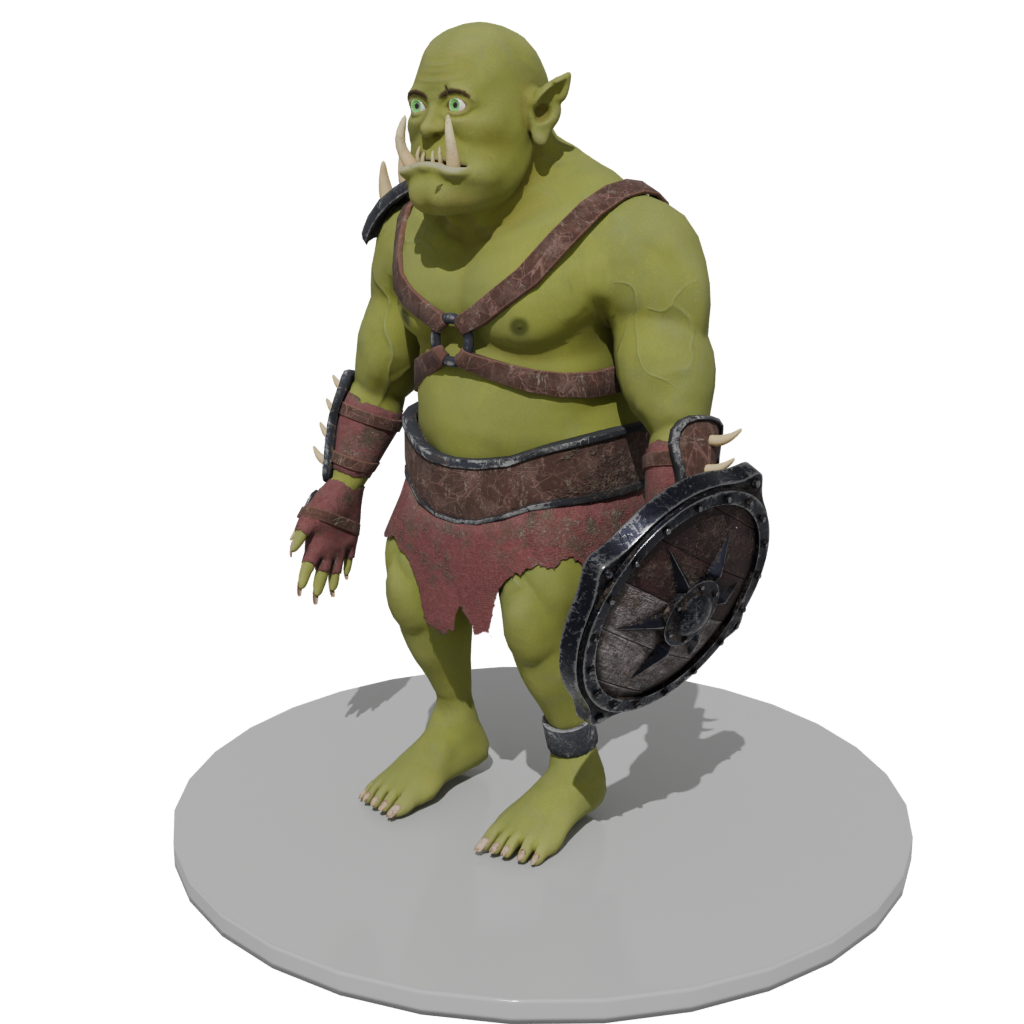
The final character design was well received at an annual showcase event,
drawing positive attention and feedback. This response, combined with
weekly personal reflection of the project, boosted my satisfaction
with the design outcome and my confidence with the new and old skills
I developed throughout the project.
During this
project, I was able to gain an understanding of human muscle anatomy and practiced with applying this knowledge to a fictional character
with humanoid proportions. I believe I could test this new knowledge further and in future projects, attempt to apply my
understanding of muscle anatomy to more visually interesting and unique characters. Furthermore, I gained a better understanding of the appropriate use of
colour and silhouette theory, which I can apply to boost the quality of future character designs and aim for a larger emphasis on visual narrative design.
Additionally, this project was an ideal opportunity to develop a range of new and old personal design skills. For example,
I gained more practice with standard modelling techniques, specifically modelling to create a base canvas that represents
the intended design. I also collected a better understanding of how to appropriately use different sculpting tools and
techniques to make a desired outcome. In this case, I used a range of grab tools to manipulate the clay into the desired character
shape and used more intricate tools, such as the crease and draw tools, to create detailed features. I also achieved a better
understanding of the retopology process, including effective ways to distribute topology to maximise details and maintain the
overall shape of the character. I also learned about how the placement of seams and cleaner topology can make the task of rigging
and animation less stressful, which is useful information I can implement into real industry scenarios. Furthermore, I developed
better confidence in my skills with the different tools inside Substance Painter, such as anchor points.
On the other hand, while reflecting on the project and writing up this report, I found that I failed to
capture a few images of the development of certain tasks. While it was only a
minor discrepancy, it resulted in difficulties when writing about how I
achieved the outcome of certain tasks. Going forward, I plan to carry
out more thorough weekly reflection to ensure I have all the tools I
need to effectively write about the success of the project.
Overall, I successfully managed this project to closely resemble an industry standard character design workflow, whilst exploring
new skills that will aid in future design projects and opening new opportunities for further improvement.